
Planting Calendar Climate Zone 5b
Know which crops are cold tolerant and which need warmth to thrive. Know how to protect your seeds and seedlings from unexpected temperatures. How early you can plant in spring depends on the hardiness (cold tolerance) of the vegetables and your climate.
Depending on where you live, the growing season can be limited, and it can be challenging to extend it. Know which crops are cold tolerant and which need warmth to thrive. Know how to protect your seeds and seedlings from unexpected temperatures. This calendar gives planting dates for both spring and fall in Climate Zone 5b which covers most of northern Illinois as well many other areas in the U.S.
Know WHEN to plant & harvest
The U.S. has 13 “climate zones” (plant hardiness zones.) Find your climate zone in the Map of U.S. Climate Zones. To learn more about how climate zones work and how to use planting calendars go to our blog post What are climate zones?
Average frost dates. Each climate zone has an average first frost date in spring and average last frost date in fall, which determines the length of the growing season. An exact frost date is unpredictable due to climate change. The LAST average frost date is May 10 to 15 in climate zone 5b. The FIRST average frost date is October 10 to 15.
Most Chicago gardeners are in climate 6a. We don’t have a planting calendar for climate zone 6a which is somewhat warmer and applies to most of the city of Chicago due to the “lake effect.” Lake Michigan influences the climate of Chicago and most of northeastern Illinois. The large thermal mass of the lake tends to moderate temperatures, causing cooler summers and warmer winters.
We prefer that Oak Park gardeners follow our zone 5b planting calendar even though Oak Park is officially in zone 6a. River Forest (just west of Oak Park is officially in zone 5b.
Beginners should plant at the warmer part of a planting period. The Deep Roots team likes to be conservative about when to plant to make growing less risky for beginners. But we also want you to learn the tools to protect your garden from unexpected cold temperatures and heat waves.
Experienced gardeners living in zone 6a can take advantage of its longer frost-free growing season. Use our zone 5a planting calendar in this post as a reference point. The zone 6a spring planting dates are 2 weeks earlier and the fall planting dates are 2 weeks later.
Climate change has made the safe planting date a moving target. It’s unpredictable. It’s helpful to know the lowest safe temperature for each crop. Many crops can be planted before the last frost date. Some crops are more sensitive to cold than others. Know what is the lowest temperature a crop can tolerate, especially at night. Some crops are very sensitive to temperature and some are less sensitive. Learn more in our temperature tolerances blog post,
Raised beds are well-suited for season extension because they can be easily covered and protected from the elements.Raised beds have become increasingly popular in recent years due to their many benefits, such as better drainage, improved soil quality, and easier access for gardeners.
Mini-planting calendars for 9 plant groups
These are general guidelines based on averages. The best planting dates can vary based on specific local weather patterns and the particular variety of each vegetable. Always check seed packets for specific planting information. Also, the temperatures given are in Fahrenheit. The temperature tolerance for specific veggies in our mini-calendars is in our blog post Veggie Temperature Tolerance.
Our planting calendar post is divided into 9 planting groups, each with its own mini-chart below. A few important tips are listed under each mini-chart. We hope to provide more tips on each veggie soon in a new post. Below are the veggies in each planting calendar mini-chart:
Brassicas (broccolini, Brussel sprouts, cabbage, cauliflower, collards, kale, kohlrabi)
Cucurbits (cucumbers, cantaloupe, summer squash, winter squash, zucchini, watermelon)
Flowers (cosmos, marigolds, nasturtiums, zinnias)
Fruiting plants (eggplant, sweet peppers, hot peppers, cherry tomatoes, Roma tomatoes, heirloom tomatoes)
Greens (salad amaranth, Swiss chard, Bibb lettuce, New Zealand spinach, spinach, Tatsoi)
Herbs (basil, cilantro, dill, oregano, sage, parsley)
Legumes (bush/pole beans, fava beans, snap peas, snow peas, shell peas)
Root crops (beets, carrots, garlic, green onions, parsnips, radishes)
Corn (sweet corn)
Seeds or seedlings? Plant seeds or seedlings for kale. Plant seedlings for brussel sprouts, cabbage, cauliflower, collards. Plant seeds for kohlrabi.
Pests and diseases: Spray weekly with BT (Bacillus Thuringensis) to repel insects.
Fungal Diseases: There are many fungal diseases. For example, “club root” attacks broccoli and broccolini roots and stunts plant growth. It is very tricky to prevent and manage since the disease stays in the soil for many years. Another example is “stem rot” which can be stopped with a biofungicide/bactericide spray.
Broccolini: A fast growing, delicious crop that can replace broccoli.
Brussel Sprouts: Needs meticulous crop protection over a long season.
Cabbage: Choose short season, compact cabbages for success.
Kale: Is a superfood. Plant early and mid-season for abundant crops.
Kohlrabi: A delicious root crop. Plant early and mid-season.
Seeds or seedlings? Plant either seeds or seedlings for all cultivars. Beginners should plant seedlings.
Pests and diseases: Spray all Curcubits weekly with organic biofungicide for powdery mildew prevention and management.
Cucumber: Pick hidden cucumbers before they get over-ripe and turn yellow which can signal the plant to stop or slow fruit production.
Zucchini: Although they are huge plants with enormous leaves, they don’t need a trellis. Planting in large containers or in a separate bed is best. Many gardeners prefer to pick zucchinis at 12” long or less.
Trellis is needed for cucumbers, summer squash, and winter squash. View this video with a wide range of trellis designs you can buy or make yourself. Cucurbits need a very sturdy and strong trellis. Squash and melons can also grow on the ground or on a lawn without hurting the grass.
Seeds or seedlings? Plant either seeds or seedlings for all cultivars – eggplants, peppers, and tomatoes.
Placement: Alternate peppers, small marigolds, and basil in a bed. Place kale, lettuce and chard on the south side of the tomatoes if there is room.
Tomatoes: Indeterminate tomatoes need a tall stake since they never stop growing. Determinate tomatoes are smaller and produce all fruit at once. Plant seedlings deep so part of the stem is under soil. Don’t water very much, other than at the beginning. Deep water every few days. View a video on tomato pruning. View our blog post on Tomato Growing Tips. Buy tomato seedlings from the Oak Park Tomato Lady and read her growing tips.
Pests & diseases: Plant disease resistant cultivars. Prune the lower leaves up to 10” to prevent fungal spores from splashing upwards. Dip your tool in alcohol as you prune diseased leaves. View tomato disease prevention post.
Eggplant: Plant disease resistant cultivars. Plant mini-eggplant seedlings in midsummer for a fall crop.
Season extension. A lightweight “floating row cover” might provide 2ºF of frost protection, whereas a heavy-weight row cover might provide as much as 6ºF to 10ºF of frost protection. In the spring, when transplants are small, row cover can often be simply draped over plants without a frame.
Seeds or seedlings? Plant either seeds or seedlings for chard, lettuce, New Zealand spinach and tatsoi. Plant seeds for spinach and amaranth.
Pests: Spray weekly with Neem Oil. Use Pyrethrum on alternative weeks
Spinach: Plant seeds November 15 to 30 for March germination. Spinach will begin to flower (called “bolting”) as soon as spring days begin to lengthen. The response comes when days are longer than 14 hours and temperatures creep above 75 degrees F. (23 C.) In Chicago area 14-hour days start on May1.
Tatsoi: Versatile, nutritious oriental greens.
Lettuce: Don't plant too much at once. Do 2-3 small plantings of leaf lettuce and radishes 7 to 10 days apart in early spring, with another planting in the fall.
New Zealand spinach and amaranth salad: Summer substitutes for spinach. Heat tolerant.
Seeds or seedlings? Plant either seeds or seedlings for basil, cilantro, oregano, sage and parsley. Plant seeds for dill at intervals for big harvest.
Basil: Is a must for pest protection. Plant next to tomatoes.
Oregano: Is an excellent ground cover for strawberry and asparagus. It is a cold tolerant perennial that comes back year after year
Sage: Is a perennial that needs protection over winter. Place a layer of straw around it.
Dill: Choose a spot protected from high winds because the tall, hollow stalks can easily blow over if you don’t stake them. Sow several batches of seeds a week apart.
Cilantro and dill: Plant in spring and again in August.
Seeds or seedlings? Plant all peas and beans from seed.
Peas: To speed germination, soak seeds in water overnight before planting. Peas come in two heights – bush peas and climbing peas. Provide a trellis since all peas need support. Bush peas are only 2 to 3 feet tall. Climbing peas may reach 6 to 8 feet tall and they need a sturdy trellis or a pole.
Bush beans and pole beans: Plant weekly for successive summer crops.
Fava beans: They grow as rigid, upright plants from 2 to 5 feet tall and often require staking as they mature. Plant in late spring.
Pole beans: Are vines that keep growing all season and need a tall trellis.
Bush beans grow compactly (reaching about two-feet tall) and do not require extra support from a structure like a trellis.
Trellis designs: We like this video with a wide range of trellis designs you can buy or make yourself that work well for climbing beans. Use the same trellis for peas and beans. Peas are a cold weather crop for spring and fall. Beans are warm season crop.
Seeds or seedlings? Plant all root crops from seed.
Harvesting: Find one whose top is sticking out of the soil. if it pulls out easily it is ready to harvest. They will not be ready all at the same time.
Beets: Thin early for baby beets and harvest the rest when full size.
Carrots: Over winter in the bed to optimize sweetness. Very tiny seeds are tricky to plant. Keep seeds and new sprouts moist constantly. Great tips in video How to sow carrot seeds that includes protecting seeds with a board until they germinate.
Garlic: Plant in mid-October and harvest in mid-July. Cut off “garlic scapes” (curved white bulbs on a long stem).
Green onions keep renewing as they are harvested. If harvesting, use only green tops over winter and grow again in spring.
Parsnip: Over-winter in the bed to optimize sweetness.
Radish: Fastest crop to grow to maturity
Seeds or seedlings: Plant from seed.
Staking: Support with an 8-foot sturdy pole secured properly.
Pollination: Need at least 10 corn plants to pollinate each other.
Seeds or seedlings? Plant seeds or seedlings for cosmos, marigolds, nasturtiums and zinnias.
Pests and diseases: If you need help, contact Chicago Botanic Garden plant information service: plantinfo[at]chicagobotanic.org and (847) 835-0972.
Cosmos: Plant at raised bed corners. Cosmos attracts beneficial insects that feed on crop pests – everything from tiny parasitizing wasps to aphid-hungry hoverflies.
Marigolds: Are ranked number one as the best flowers to plant in the vegetable garden. Plant at edges of your raised bed and between tomatoes & peppers. They continue to flower into the fall.
Nasturtiums: Have edible flowers, leaves and stems with a tangy flavor. Plant at sides of the bed and prune so it grows only toward the outside of the bed.
Zinnias: Attracts pollinators, especially butterflies. Interplant between vegetables or as a border to attract more pollinators. They lure predator bugs into a fall garden where they eat the pests. Their long bloom season makes them excellent for landscape color in mixed plantings.

Succession Planting Basics
Succession planting is a popular farming and gardening method which gets maximum harvest from limited space by immediately filling empty spaces with new seedlings or seeds. Succession planting Increases your harvest and is part of our biodiversity planting method.
Succession planting is a popular farming and gardening method which gets maximum harvest from limited space by immediately filling empty spaces with new seedlings or seeds. Succession planting Increases your harvest and is part of our biodiversity planting method.

Biodiversity and succession planting
First learn how to use the biodiversity planting method – not placing the same veggie types next to each other. Then add succession planting to your garden plan to increase your harvest by filling empty spaces as you harvest individual new plants throughout the season.
You need a planting calendar for your climate zone which will tell you when to plant and harvest. We provide a Planting Calendar Guide for the great Chicago area (Climate Zones 5b and 6a) since most Deep Roots gardeners are in the Chicago area. Ask your local state university agricultural extension for a planting calendar.
Fill empty spaces with a fresh seedling or plant seeds if there is enough space and enough sun.
Don’t fill an empty space with the same crop that was previously in that spot. This is important for some crops more than others.
Some crops can be planted more than once because they tolerate a range of temperatures and they need a shorter number of days to maturity. (See below a list of crops with short days to maturity.)
Replace crops that slow down production in mid-season by planting fresh young seedlings or new seeds.
Most root crops can only grow from seeds like beets, carrots, radishes. Other crops are healthier if grown from seeds like peas and beans. Carrots are harder to grow since their seeds are very tiny.
You can grow your own new seedlings from seeds in small pots outdoors or directly in your raised bed.
If you prefer growing from purchased seedlings check with your garden center when they will re-stock seedlings. Buy them young and healthy immediately after delivered to the store.
Buy seedlings before you have empty spots to make sure you have them when you need them.
Immediately re-pot purchased seedlings into 5” to 8” diameter pots filled with a mixture of our compost and worm castings so their roots can expand while you wait for empty spots. Keep the soil constantly moist.
Try NOT to buy seedlings that are unhealthy – “root bound” (tangled roots around the root ball), yellowing leaves and tiny fruit.

Benefits of fast maturing crops
The veggies with the “shortest days to maturity” have the least problems with pests and diseases. If you like planting veggies from seed outdoors or are a beginner and want to grow from seed for the first time, we encourage you to try our favorite veggie varieties that come to maturity quickly and can be harvested sooner. (See our list below)
Fast maturing crops have advantages for beginner gardeners. You don't have to wait long for results. If you wait the normal days to maturity for these crops your garden is more vulnerable to pests and diseases. It also frees up space to replant more diverse crops. We have a chance to start more new plants which we call “accelerating” the garden.
Below are examples of 9 fast growing veggies to grow from seed that you can order from seed catalogs online. High Mowing sells all organic seeds and Baker Creek includes unusual mostly organic selections. Order early since seed stock sometimes sell out. If you can’t find the varieties in our list, pick other ones with similar days to maturity. We normally don’t recommend garden supply companies, but in this case there are far too many seed companies, and we want you to start out with the highest quality.
Veggies with short days to maturity
Find seeds that have similar days to maturity as the ones listed below. Learn more about planting seeds in our 2 blog posts.
Beet: (40 days to maturity)
Fast maturing, scaled-down, but fully formed and full-flavored beet. Regular seed, not pelletedBroccolini: (33 days to maturity)
Fast maturing spring harvest mini-broccoli called “broccolini”Carrot: (34 days to maturity)
Baby carrot at early harvest can be left in the soil for another month for full-size harvest.Swiss Chard: (55 days to maturity)
Rainbow chard selection, develops all-season, just keep picking.Green Onion: (50 days to maturity)
A short season scallion.Lettuce: (54 days to maturity)
Butterhead lettuce type.Pea: (51 days to maturity)
A fast maturing sweet spring pea.Radish: (21 days to maturity)
Fastest of all crops.Spinach: (30 days to maturity)
Reliable early crop, full-leaved spinach.
Plant in FALL for spring germination
Plant garlic cloves and spinach seeds in fall for early spring germination. Plant garlic cloves in mid-October for a July harvest. Although the easiest time to plant spinach seeds is mid-November, you can also plant them in March when the ground thaws. Get larger spinach plants and bigger harvests when planting seeds in fall. The spinach seedlings don’t mind a little snow in March. Harvest spinach before warm weather starts which will cause it to go to seed (called ”bolting”) which makes the leaves bitter. Spinach is fully harvested on May 21 or earlier.
April planting and harvesting tips
If you plant spinach seeds in fall you will have lots of spinach seedlings by April. Gradually harvest the spinach by picking big leaves first. With the first sign of ”bolting” cut down all the spinach plants carefully on a dry sunny day. Do NOT pull up by the roots. Cut the stem at the soil level. Shake off any soil. Replant the area with your next crops – NOT more spinach.
Sensitivity to cold varies between spring crops. Crops that CAN NOT take a “hard freeze” (below 32 degrees for many hours) are lettuce, broccolini, radishes, carrots, Swiss chard, kale, leeks, green onions and more. If you plant around April 25 be prepared for a possible hard-freeze below 32 degrees by having “floating row cover” on hand. It’s a light-weight white fabric that boosts the temperature and lets in sun and water. Buy it online.
Plant new lettuce seeds every 2 weeks so your new crop is ready when the old crop has been harvested. Plant beets on April 21 all at once and begin harvesting in 60 days. Plant peas all at once on April 15 to harvest in early June. Check the planting calendar about planting from seeds or seedlings.
May planting and harvesting tips
Frost free dates in Zones 5b and 6a is May 10-15. We used to have a fixed date. But the destabilizing effect of climate change has changed all that. Add to the bed between May 1 and 15 at least 2 or 3 kinds of flowers and 2 or 3 kinds of herbs. They can be placed anywhere in the bed and must include marigolds and basil, but can also include dill, cilantro, parsley, arugula, ginger, nasturtiums, cosmos, sunflowers and calendula flowers. Check the planting calendar for other crops that can also be added in early May.
Put some large perennial herbs like sage and oregano in a large container cloth pot near the bed, but not in the bed. Sage and oregano are perennial in our climate zone 5b and 6a and will return next season if protected over winter with straw. Plant another perennial mint, near the raised bed in a large pot by itself since it is “invasive” (tends to take over all empty spaces).
In the raised beds start planting seeds and seedlings of the rest of the early May crops – tomatoes, peppers, eggplants, cabbage, lettuce, corn, bush beans and pole beans. Near the south side of the bed plant seeds of small crops in clusters (carrots, beets, radishes). Check the planting calendar for which crops must be planted from seed.
Water the soil before you place your tiny seeds. Gently water your seeds with a sprayer nozzle on your hose or watering can. Keep your seeds and seedlings constantly moist. Drip irrigation makes growing from seeds much much easier.
Plant the tiny carrot seeds about an inch apart. Try the “board trick” with tiny carrot seeds. Save watering time by placing a small board over a cluster of carrot seeds to stop evaporation. Carrots don’t need sun to germinate. Check them daily for germination. Remove the board when the first seed germinates. Pick some baby carrots to make room for some of the carrots to grow longer.
Plant in separate large containers or in separate raised beds the larger crops – cucumbers, summer squash, zucchini, winter squash (butternut, acorn, etc), and potatoes. They will take over and need lots of space. Grow them vertically on a trellis whenever possible. The separate pots or raised beds for very large plants need herbs and flowers on edges in spots where they get the most sun.
There is lots of sun in your entire bed until mid-June when the plants are still small and the garden lacks shade. Take advantage of the shade cast by large mature plants later in the season for crops like lettuce that don’t need lots of light and suffer from high heat (like lettuce).
June planting and begin harvesting
By mid-June you can begin to harvest the April plantings. Start your harvest of cherry tomatoes in late June and continue to harvest all season long.
Which plants to harvest in June and which to keep growing? For example, If you are still eating lots of kale and chard, keep these plants in the bed. If you are eating less of a crop, harvest it now and store it for later. As you harvest, fill empty spaces with warm weather salad greens (salad amaranth and New Zealand spinach), culinary herbs, bush beans, radishes, and carrots.
When harvesting leafy greens (kale, swiss chard, spinach, lettuce, collards) harvest the largest outer leaves first to make more room for neighboring plants. Plants NOT in the same biodiversity family group could touch each other since diseases and pests prefer one plant family.
The first exception to the rule of NOT planting the same plant variety as neighbors is spinach in the fall or spring. It’s the only popular leafy green veggie that will grow in cold temperatures.
The second exception to the neighbors rule applies to clusters of small crops like carrots, beets, radishes, green onions, broccolini. Plant seeds in small clusters (8” diameter area) and rows (8” long) of small plants along the southern edge of your bed and containers to maximize sunlight and avoid shadows cast by larger plants.
Plant large plants like zucchini, squash and cucumbers in large cloth or wood containers (about 2 feet in diameter and 15” tall) because these big plants take up too much raised bed space. But, if you have a huge garden with lots of raised beds, dedicate some of the beds to large plants with lots of flowers and herbs around the edges or in small pots around the exterior of the bed. But remember that the small pots will need more attention and frequent watering. Try to set up irrigation for them. Although it’s okay if the huge leaves of vining squash plants overflow onto a deck or lawn it is better to grow vertically in limited space. My butternut squash sprawling on my lawn didn’t hurt the lawn at all. Spray with a OMRI certified fungicide to prevent and manage powdery mildew.
Vining plants like peas, pole beans, and tomatoes need a way to grow vertically. Plant them at the north side of a raised bed or container so they don’t shade the other plants. Learn more about vertical growing in an upcoming post.
August planting for a fall harvest
Some plants that were planted earlier in the season that you have already harvested can actually be planted again - in a “second-round”. Sometimes, if planted in the hotter time of year, harvested in the cool temperatures, the plants are sweeter and more tender.
Timing is key. Start early to think about what comes next after their beautiful summer veggies have been eaten. They should think about what to plant now and when to plant. This is determined by how long it will take before the veggie matures. Getting the timing down to finish one harvest and start growing for another takes time and experience. It is an art. You don’t want to plant a veggie that takes a long time to mature, and risk it failing due to frost.
Weather is unpredictable, especially now during climate change. Any plant that we suggest for August planting could be overwhelmed by an unexpected heat wave. Best to choose veggies that love both hot and cool weather. Plant more than one of each crop – so, if one doesn’t make it – you’ve got some others!
“Grow Your Own Food” blog posts
See the full list of our Grow Your Own Food blog posts. Each post is assigned ”tags” which are under the post title. If you need a quick answer to a gardening question give us a call or send a text to our customer support team – support[at]deep-roots-project.org AND 708-655-5299.
Deep Roots online store
See our online store for details about prices, ordering and delivery of raised beds, planter boxes, microbe-rich compost, worm castings, leaf mulch and more. We don’t sell traditional soil, since we use 100% compost as our growing medium. Our online store has 2 sections – (1) raised beds and planter boxes and (2) compost, worm castings, fertilizer.
Please contact our customer support team before placing an order online so we can assist you with the details and answer your gardening questions. You can pay by credit card in the store or by check.
(708) 655-5299 and support[at]deep-roots-project.org
Sign up for our newsletter
Please leave your cell phone number when you sign up for our eNewsletter, if you want text message announcements now and then.
Donations help us provide organic kitchen gardening education to individuals, organizations, and entire communities. Thank you in advance for contributing to our community and for sharing our website and blog with friends and family.

How to Sterilize Garden Tools
Garden tools play a crucial role in maintaining a healthy and beautiful garden. They help us till the soil, plant seeds, trim the plants and keep the garden in pristine condition. However, if not properly maintained and sterilized, garden tools can spread diseases and pests from one plant to another, leading to significant damage and loss. In this blog post, we'll discuss the best ways to sterilize garden tools to keep your garden free of any harmful organisms.
Garden tools play a crucial role in maintaining a healthy and beautiful garden. They help us till the soil, plant seeds, trim the plants and keep the garden in pristine condition. However, if not properly maintained and sterilized, garden tools can spread diseases and pests from one plant to another, leading to significant damage and loss. Tips for sterilizing small pre-used pots for transplanting seedlings is also highly recommended.
Sterilizing garden tools is an essential step in maintaining a healthy and beautiful garden. There are several methods that can be used to sterilize garden tools, including the use of a bleach solution, boiling water, UV-C light, heat treatment, and hydrogen peroxide. Choose the method that works best for you and your tools, and make sure to sterilize your tools regularly to keep your garden free of any harmful organisms.
Several sterilization methods available
Cleaning the tools before sterilization: Before sterilizing your garden tools, it is essential to clean them thoroughly. This will ensure that any dirt, debris, or residual plant material that may be present on the tool is removed. You can clean your tools with water, soap, and a scrub brush, or by using a solution of water and bleach (1:10 dilution).
Disinfection with a bleach solution: One of the most effective ways to sterilize garden tools is by using a bleach solution. Wear rubber gloves and don’t get the bleach on your skin. Eye protection is also beneficial.You can make a solution of 1 part bleach to 9 parts water and soak the tools in it for at least 10 minutes. This will kill any bacteria, viruses, or fungi that may be present on the tools. Make sure to rinse the tools thoroughly with water after soaking in the bleach solution to remove any residual bleach.
Sterilization with boiling water: Boiling water is another effective way to sterilize garden tools. Fill a large pot with water and bring it to a rolling boil. Carefully place the tools in the pot and let them boil for 10 to 15 minutes. This will kill any harmful organisms that may be present on the tools. After boiling, let the tools cool down before handling them.
Use of UV-C light: UV-C light is a powerful sterilization method that can be used to sterilize garden tools. UV-C light has been proven to kill 99.9% of bacteria, viruses, and fungi in a matter of minutes. You can purchase UV-C sterilization lamps, which are designed specifically for sterilizing garden tools. Simply place the tools in the lamp and let the UV-C light do its work.
Heat treatment: Heat treatment is another effective method of sterilizing garden tools. You can sterilize your tools by baking them in the oven at a temperature of 160°F for 30 minutes. This method is particularly useful for metal tools as it will kill any harmful organisms that may be present on the surface of the tool.
Use of hydrogen peroxide: Hydrogen peroxide is a powerful sterilizing agent that can be used to sterilize garden tools. Mix a solution of 3% hydrogen peroxide with water in a spray bottle, and spray it on your tools. Let the solution sit for 10 to 15 minutes and then rinse the tools with water. This method is particularly useful for sterilizing wooden handles of garden tools.
Proper tool storage
It’s worth noting that while sterilizing your tools is important, it's also crucial to properly store them to extend their life and prevent rust, wear, and other damage. Keep your tools clean, dry, and oiled to prevent rust, and store them in a cool, dry place when not in use. With proper care and maintenance, your garden tools will last for many years and help you create a beautiful and thriving garden.
“Grow Your Own Food” blog posts
See the full list of our Grow Your Own Food blog posts. Each post is assigned ”tags” which are under the post title. If you need a quick answer to a gardening question give us a call or send a text to our customer support team – support[at]deep-roots-project.org AND 708-655-5299.
Deep Roots online store
See our online store for details about prices, ordering and delivery of raised beds, planter boxes, microbe-rich compost, worm castings, leaf mulch and more. We don’t sell traditional soil, since we use 100% compost as our growing medium. Our online store has 2 sections – (1) raised beds and planter boxes and (2) compost, worm castings, fertilizer.
Please contact our customer support team before placing an order online so we can assist you with the details and answer your gardening questions. You can pay by credit card in the store or by check.
(708) 655-5299 and support[at]deep-roots-project.org
Sign up for our newsletter
Please leave your cell phone number when you sign up for our eNewsletter, if you want text message announcements now and then.
Donations help us provide organic kitchen gardening education to individuals, organizations, and entire communities. Thank you in advance for contributing to our community and for sharing our website and blog with friends and family.

Garden Partnering & Bartering
Food garden partnering and bartering is a great way for people to come together, build community, save money on groceries, and share the fruits of their labor. Whether you are working with family members, neighbors, schools, churches, or community gardens, there are many ways to get involved and start sharing your produce, skills and time. Here are some of the ways that food garden partnering and bartering works.
Food garden partnering and bartering is a great way for people to come together, build community, save money on groceries, and share the fruits of their labor. Whether you are working with family members, neighbors, schools, churches, or community gardens, there are many ways to get involved and start sharing your produce, skills and time. Here are some of the ways that food garden partnering and bartering works.
Family Members: One of the simplest ways to participate in food garden partnering and bartering is by working with family members. If you have a backyard garden, you can share your produce with your family members, and they can do the same with you. This can be especially helpful for families who are trying to save money on groceries.
Involve apartment and condo dwellers who don’t have land to grow a garden.
Neighbors: Neighbors can also work together to share the bounty of their gardens. If you live in a community where many residents have a garden, you can organize a weekly or monthly gathering where everyone brings their produce to share with each other. This can help to build a sense of community and foster friendships between neighbors. Plus, set up an online website and email list to share harvest, knowledge and labor.
Schools: Many schools have started to incorporate food gardens into their curriculum, and this can be a great way to get kids involved in food garden partnering and bartering. Students can work together to grow fruits and vegetables, and then they can share their harvest with other students, teachers, and staff members.
Churches and temples: Churches, temples and other religious groups can also be a great place to organize food garden partnering and bartering. If your church has a garden, you can organize a weekly or monthly event where members can bring their produce to share with each other. This can help to build a sense of community within the church, and it can also provide fresh produce to those in need. Or bring crops to share at regular weekly gatherings.
Community Gardens: Community gardens are perfect for gardeners who live in apartments, condos and have no yards. Community gardens are a great way for people to come together and share their love of gardening. If you participate in a community garden, you can work with other gardeners to share your produce and learn from each other. Many community gardens also organize events where members can bring their produce to share with each other.
Connecting apartment dwellers & food gardeners
Cultivating connections between apartment dwellers and food gardeners. In urban environments, space can be a limiting factor when it comes to growing a food garden. Many apartment and condo dwellers may not have access to land for cultivating their own gardens. However, community residents with gardens often have extra food to share or could use a helping hand in maintaining their green spaces. By connecting these two groups, a mutually beneficial relationship can be established, fostering both community-building and sustainable urban agriculture.
Community Garden Initiatives: Establishing or joining a community garden is an excellent way for apartment and condo dwellers to get involved in gardening. These gardens are communal spaces where members can cultivate individual or shared plots. They provide an opportunity for people without access to land to grow their own food, while also allowing experienced gardeners to share their knowledge and resources.
Garden Share Programs: Garden share programs can connect apartment dwellers with gardeners who have available land. These programs work by matching individuals who want to grow food with those who have extra space in their gardens. The two parties can then collaborate on the cultivation of the plot, sharing both the workload and the produce.
Tool and Resource Sharing: Creating a shared resource center can benefit both apartment dwellers and community gardeners. By pooling tools, seeds, and other gardening supplies, individuals can reduce their expenses and make gardening more accessible to those without their own resources.
Skill-Sharing Workshops and Events: Organizing workshops and events focused on gardening skills, such as composting, plant propagation, and organic pest control, can help build connections between apartment dwellers and community gardeners. These events can serve as opportunities to share our Transformational Gardening method, biodiversity planting. and the importance of nurturing the ecosystem below and above the ground.
“Grow Your Own Food” blog posts
See the full list of our Grow Your Own Food blog posts. Each post is assigned ”tags” which are under the post title. If you need a quick answer to a gardening question give us a call or send a text to our customer support team – support[at]deep-roots-project.org AND 708-655-5299.
Deep Roots online store
See our online store for details about prices, ordering and delivery of raised beds, planter boxes, microbe-rich compost, worm castings, leaf mulch and more. We don’t sell traditional soil, since we use 100% compost as our growing medium. Our online store has 2 sections – (1) raised beds and planter boxes and (2) compost, worm castings, fertilizer.
Please contact our customer support team before placing an order online so we can assist you with the details and answer your gardening questions. You can pay by credit card in the store or by check.
(708) 655-5299 and support[at]deep-roots-project.org
Sign up for our newsletter
Please leave your cell phone number when you sign up for our eNewsletter, if you want text message announcements now and then.
Donations help us provide organic kitchen gardening education to individuals, organizations, and entire communities. Thank you in advance for contributing to our community and for sharing our website and blog with friends and family.
No Till, No Dig, No Pull Rule
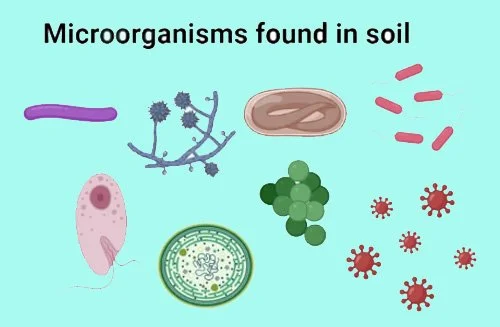
Pulling a plant out by its roots interferes with bacterial colonies and fungal networks. Think of soil structures as invisible towns and cities that the microflora live in. Only pull out the roots of root veggies. The “No Till” rule comes from regenerative gardening and farming practices.
The "No Till, No Dig, No Pull" rule in Regenerative Gardening (which we call Transformational Gardening”) helps sequester carbon in the soil and supports the fight against climate change. The animated video below by Jimi Sol explores three different regenerative practices that have great potential both in food production and in healing the land.
Science and principles of Regenerative Agriculture
1. No Till / No Dig
Soil Structure Preservation: Tilling or digging soil disrupts its structure, breaking apart soil aggregates and exposing carbon-rich organic matter to the air. When this organic matter is exposed, it oxidizes and releases carbon dioxide back into the atmosphere.
Carbon Sequestration: By not tilling, carbon remains sequestered in the soil. This is because undisturbed soil can hold more organic matter, including carbon.
Soil Microbe Protection: Tilling can destroy the habitats of essential soil microbes. These microbes play a crucial role in nutrient cycling and help maintain soil health.
2. No Pull
Root Decomposition: By leaving plant roots in the ground after they die, they decompose naturally, adding organic matter and nutrients back into the soil. This process also helps in carbon sequestration.
Reduced Soil Disturbance: Avoiding the pulling of plants minimizes soil disturbance, which helps maintain the soil's carbon storage capacity.
3. Healthy Soil Microbes
Nutrient Cycling: Microbes decompose organic matter, releasing nutrients that are essential for plant growth.
Soil Structure Improvement: Microbial activity improves soil structure, enhancing water retention and aeration.
Disease Suppression: Healthy microbial populations can help suppress plant diseases, reducing the need for chemical interventions.
4. Use of Compost and Worm Castings
Nutrient and Microbe-Dense Compost: Compost adds both nutrients and beneficial microbes to the soil. It acts as a natural fertilizer and improves soil structure.
Worm Castings: Known as vermicompost, worm castings are rich in nutrients and beneficial microbes. They are more effective than commercial fertilizers as they provide a balanced nutrient profile and improve soil health without the risk of chemical build-up.
Advantages in Regenerative Food Gardening
Sustainable Practices: These methods promote sustainable gardening by reducing dependence on synthetic fertilizers and pesticides.
Enhanced Soil Fertility: Over time, these practices lead to richer, more fertile soil capable of supporting robust plant growth.
Biodiversity Support: Regenerative gardening supports biodiversity both above and below the soil surface.
Climate Change Mitigation: By sequestering carbon, these practices contribute to the mitigation of climate change.
Regenerative Gardening addresses many environmental challenges
Regenerative agriculture is a holistic approach to farming and gardening that focuses on improving and revitalizing the soil. The "No Till, No Dig, No Pull" approach aligns with the principles of sustainability, soil health, and carbon sequestration. It not only benefits the garden ecosystem but also contributes positively to the broader environmental challenges we face globally.
One of the key benefits of regenerative agriculture is sequestering carbon in the soil through practices such as cover cropping, reduced tillage, crop rotation, and the integration of livestock.
Sequestering carbon indirectly pulls carbon dioxide from the atmosphere Here's how it works:
Photosynthesis: Plants absorb CO2 from the atmosphere during the process of photosynthesis. This is a natural and vital process where plants use sunlight to turn carbon dioxide and water into glucose, a form of sugar that they use for energy.
Carbon Storage in Soil: When plants die or shed leaves, stems, or roots, this organic matter gets incorporated into the soil. In a regenerative agriculture system, practices like composting, cover cropping, and minimal soil disturbance help to maintain and increase organic matter in the soil.
Reduced Soil Erosion: Regenerative practices often lead to better soil structure and health, which can reduce soil erosion. Healthier soils can hold more carbon over time.
Increased Soil Organic Matter: By increasing the organic matter in the soil, regenerative agriculture practices help to store more carbon in the soil. This organic matter is made up of decomposed plant and animal material, which includes carbon.
Therefore, while the primary action of regenerative agriculture is not directly pulling CO2 from the atmosphere, it facilitates the natural process of photosynthesis and improves soil health, which indirectly leads to more carbon being removed from the atmosphere and stored in the soil. This process can be an important component of strategies to mitigate climate change.

“Grow Your Own Food” blog posts
See the full list of our Grow Your Own Food blog posts. Each post is assigned ”tags” which are under the post title. If you need a quick answer to a gardening question give us a call or send a text to our customer support team – support[at]deep-roots-project.org AND 708-655-5299.
Deep Roots online store
See our online store for details about prices, ordering and delivery of raised beds, planter boxes, microbe-rich compost, worm castings, leaf mulch and more. We don’t sell traditional soil, since we use 100% compost as our growing medium. Our online store has 2 sections – (1) raised beds and planter boxes and (2) compost, worm castings, fertilizer.
Please contact our customer support team before placing an order online so we can assist you with the details and answer your gardening questions. You can pay by credit card in the store or by check.
(708) 655-5299 and support[at]deep-roots-project.org
Sign up for our newsletter
Please leave your cell phone number when you sign up for our eNewsletter, if you want text message announcements now and then.
Donations help us provide organic kitchen gardening education to individuals, organizations, and entire communities. Thank you in advance for contributing to our community and for sharing our website and blog with friends and family.

Moisture and Mulch
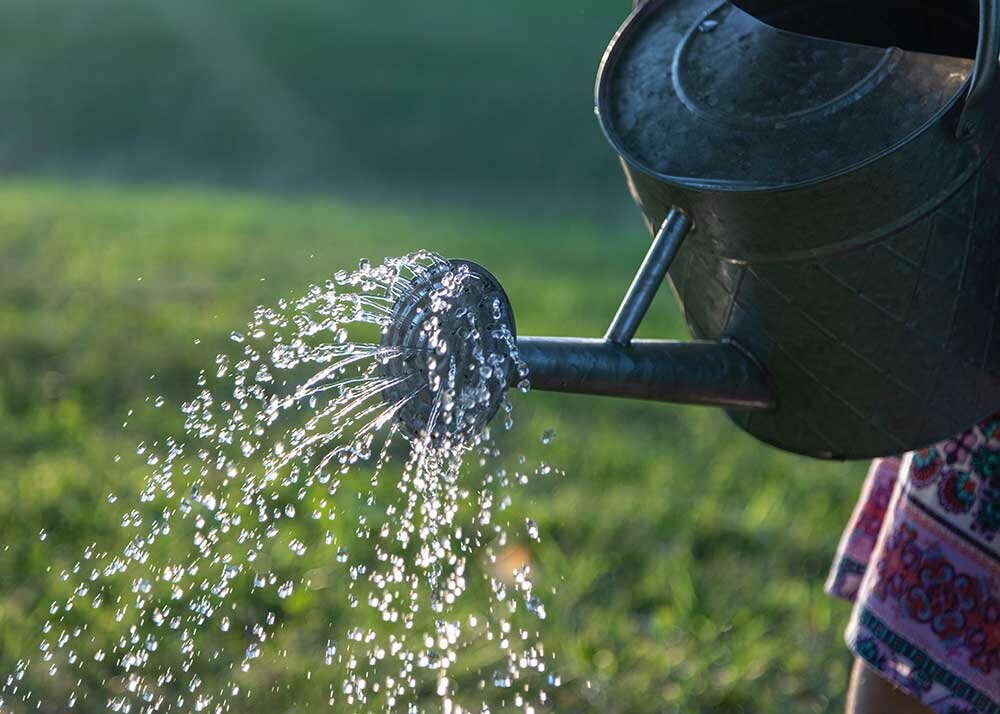
Although deep watering is usually best, over watering can also stress your plants. Of course, there will be a lot of variables to take into consideration – such as the amount of rain and other weather conditions. Do a simple moisture test with your finger on the top 2 to 4 inches of soil before you water. Be careful about the watering tips you see circulating on the internet or in Youtube videos!
Different plants need different kinds of watering. Some veggies need more frequent and deeper watering than others. Seeds and seedlings need to be constantly moist. Although deep watering is sometimes best, over watering can also stress your plants. Of course, there will be a lot of variables to take into consideration – such as the amount of rain and other weather conditions. Do a simple moisture test with your finger on the top 2 to 4 inches of soil before you water. Be careful about the watering tips you see circulating on the internet or in Youtube videos!
Proper watering is critical to plant health
Just as soil health depends on the latest soil science – the same is true of about watering edible plants.The Deep Roots method creates the best environment for your plants because our compost used as soil has good drainage and lets the water get to the plant roots quickly. We recommend installing drip irrigation if you don’t have time to water or go out of town often. Take time to correctly set the irrigation timing and amount.
Cover soil with straw mulch & compost
Retaining as much moisture as possible saves watering time and keeps your plant healthy and happy. Our method use two layers – a one inch layer of compost covered by a couple inches of cut-up straw. Don’t use hay since it can add unwanted seeds to your garden. We grow our own straw by planting a large beautiful prairie grass called Miscanthus. Over winter the grass dries and in the spring we cut it down and store it in large barrels with lids. Keeping the straw dry is important.
DON’T water a little everyday!
Because It promotes shallow roots. One of the worst practices is to water your garden lightly every day or every few days. This frequent sprinkling provides water to only the top layer of the soil and promotes shallow root systems.
Simple, standard suggestions like: water every day and “make sure you give your plants an inch of water each week” are now being questioned and re-evaluated. Because the plant’s roots are not close to the soil surface, we now know that the water needs to get deep enough. AND the roots need to have enough time to soak it up will allow the plants to develop deep root systems that are necessary to be healthy.
But, be careful since over watering stresses many plants. If top 2 inches of soil feels dry it’s time to water. Soak the soil to a depth of 4 to 6 inches. Test for soil moisture also after you water.
Overhead watering (sprinklers) is the least efficient and least preferred method of watering. Far too much of the water is lost to evaporation. Water the soil, not the plants with a soaker hose, drip irrigation, watering can or watering wand. Overhead watering substantially increases the risk of fungal disease, especially in humid and rainy climates.
Watering tips from our horticulturist
Some conventional soils can have drainage problems, so too much water does not allow plant roots to breathe and will cause plants to wilt from lack of oxygen.
Don’t water too fast. Water gently at all times. When watering with a hose, avoid a hard stream of water, which risks injuring your plants and the soil. Use a steady, gentle shower of water instead – but only on the soil, not the plants.
If you are using municipal water, put a water filter on your hose or water source. Municipal water often has levels of chlorine that kill essential microorganisms. There are also many harmful pollutants in some city water.
Lack of water stresses plants. Drought may produce stunted fruit, produce no fruit at all, or may produce tasteless, woody, or unpalatable fruit.
Over watering stresses plants. Over watering can cause as much stress as severe drought. Too much water will saturate soils, displace air which starves the roots of oxygen. The compost Deep Roots uses instead of conventional soil (Microbe Rich Compost) has good drainage properties.
Keep SEEDS moist at all times. Germinating seeds must be constantly moist. Watering seeds twice a day may be needed on dry hot days. It’s easiest to let drip irrigation water your seeds. Some gardeners without irrigation have found a work-around that saves time and constant attention.
Place a board or large tiles over tiny carrot seeds. This keeps the moisture in the soil longer and protects them from being washed away by heavy rain. Make note of how many days it takes for the first sign of germination. Check the seeds everyday when it is close to germination. Remove the cover when the first seed sprouts. Some seeds will sprout sooner and some later. Carrot seeds are very tiny and need to be kept constantly moisturized more carefully.
Keep SEEDLINGS moist at all times and water daily or more often for 2 weeks. When the seedling is at least 5 inches tall its roots are stronger and constant monitoring is not necessary. Test soil before and after watering and water gently and deeply as needed.
Don’t over water seeds! Finding the right amount of water for your seeds is difficult. Not enough and they will not germinate - BUT too much and they could rot. Just to be safe - water seeds lightly twice a day - you just need to moisten the top layer.
When plant leaves wilt on a very hot day, it could be from the heat and not lack of water.
Prune off lower foliage of plants prone to fungal diseases that prefer damp environments like powdery mildew on cucumbers and squash) and like tomato blights. Water very close to the soil with a watering wand on a hose or a watering can. Avoid wetting the leaves. Water early in the day
Health of mature plants is dependent on correct watering. Remember that large plants need a lot more water than seedlings. We want mature plants to have deeper roots that suck lots of water out of the soil.
A drip irrigation system nurtures healthier plants and less stressed gardeners. If you can’t or don’t want to water and monitor your soil moisture constantly get a drip irrigation system. Drip irrigation should be the watering method of choice. It will save you time and make your plants stronger, happier and healthier. The larger your garden the more critical drip irrigation becomes. Contact the Deep Roots team for advice on installing the new system we designed.
“GrowYour Own Food” blog posts
Questions, comments, suggestions? We’d love to hear from you! Send photos of your garden too!
See the full list of our Grow Your Own Food blog posts. Our blog posts are divided into 6 categories – each with its own page of blog post photos and summaries.
Questions, comments, suggestions? We’d love to hear from you! If you need a quick answer to a gardening question give us a call or send a text. We are here to solve your gardening problems. Please call OR text our Customer Service team at 708-655-5299 OR send an email to: support@deep-roots-project.org.
Deep Roots online store
See our online store for details about prices, ordering and delivery of raised beds, planter boxes, microbe-rich compost, worm castings, leaf mulch and more. We don’t sell traditional soil, since we use 100% compost as our growing medium. Our online store has 2 sections – (1) raised beds and planter boxes and (2) compost, worm castings, fertilizer.
Please contact our customer support team before placing an order online so we can assist you with the details and answer your gardening questions. You can pay by credit card on the store or by check.
(708) 655-5299 and support[at]deep-roots-project.org
Gardening connects you to the Earth. Our community connects you to each other.
SIGN UP FOR OUR NEWSLETTER
(Use green rectangle and white type button style)
Please leave your cell phone number when you sign up for our eNewsletter, if you want text message announcements now and then.
Donations help us provide organic kitchen gardening education to individuals, organizations, and entire communities. Thank you in advance for contributing to our community and for sharing our website and blog with friends and family.

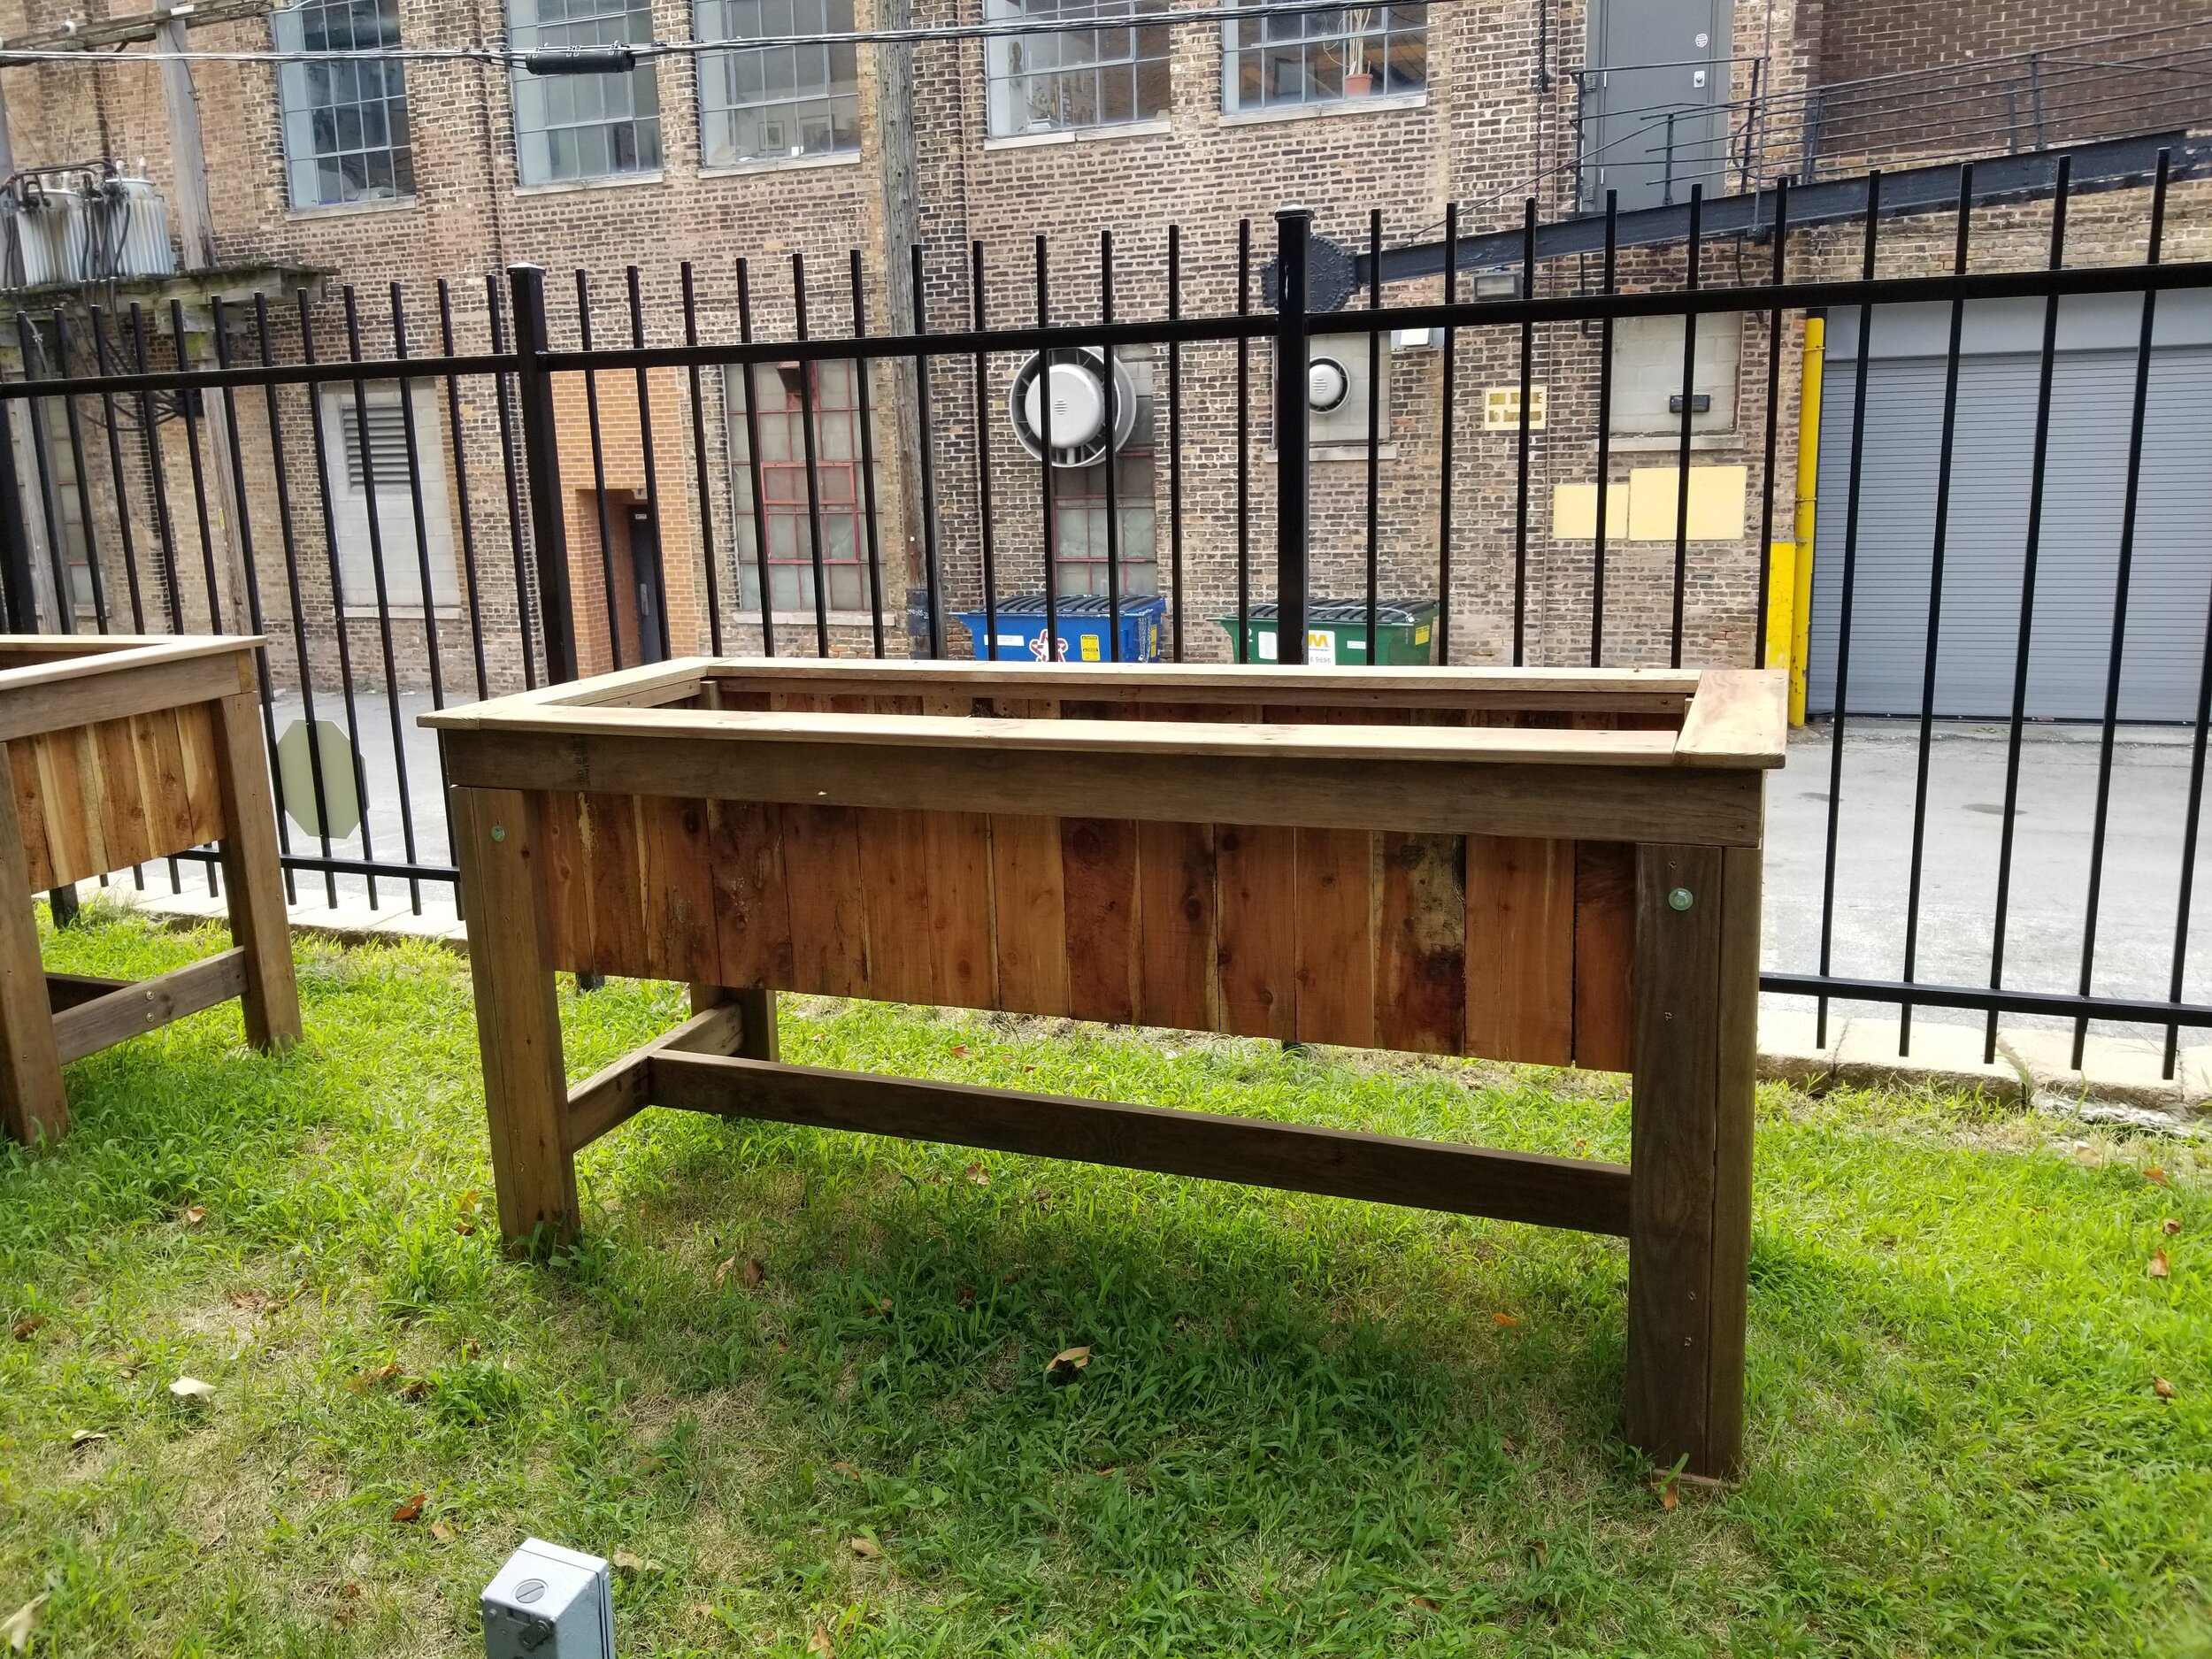
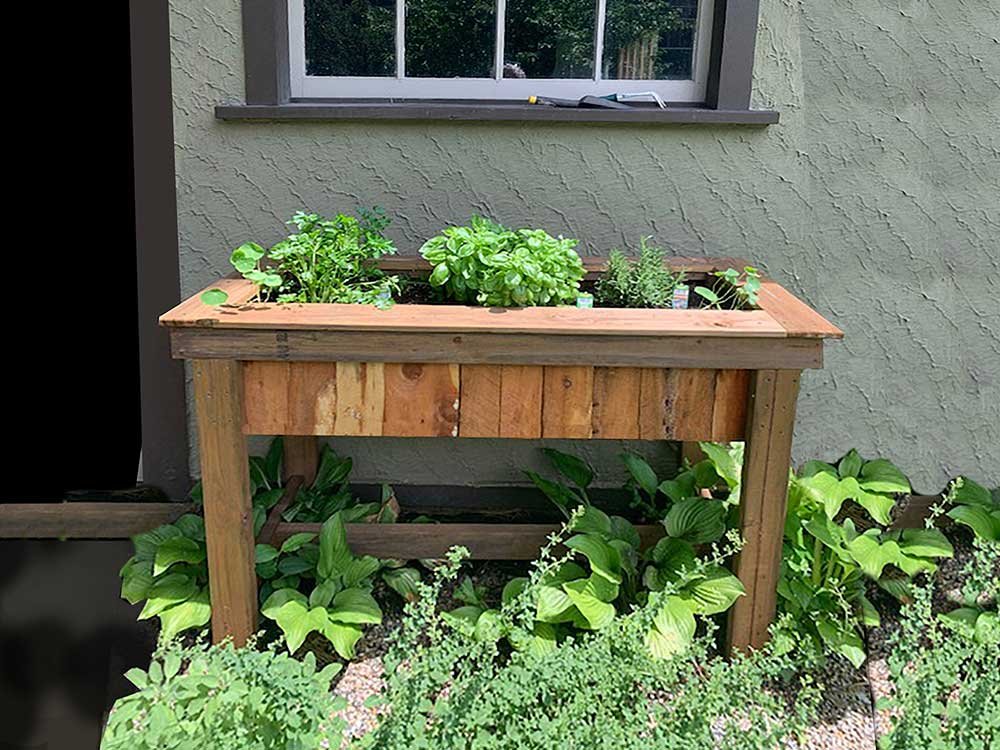
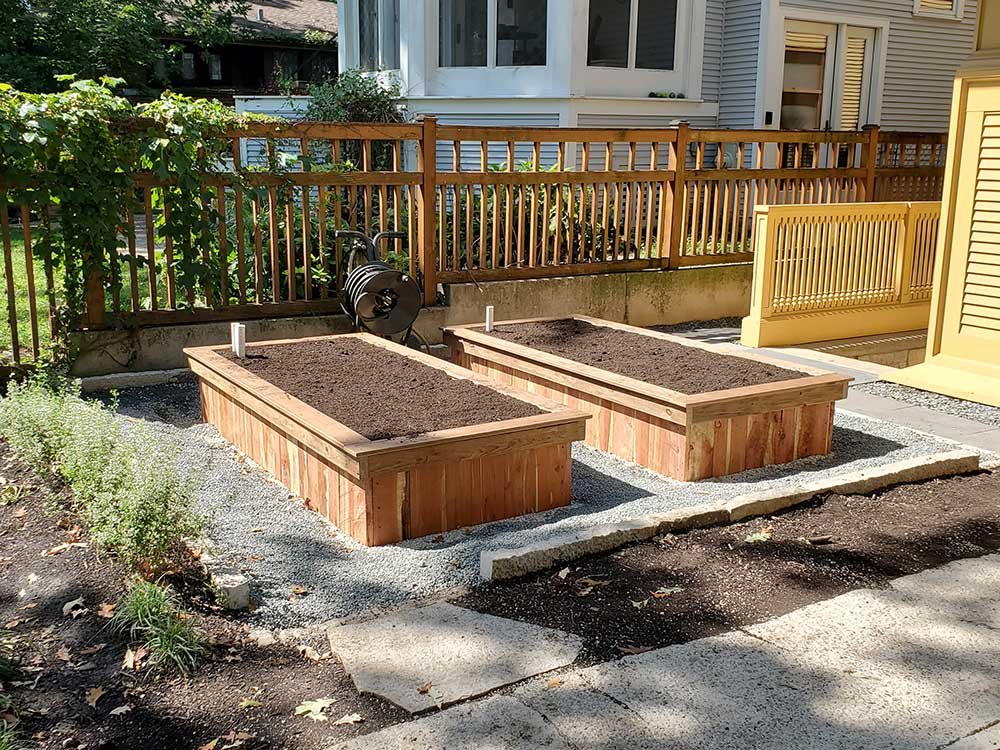
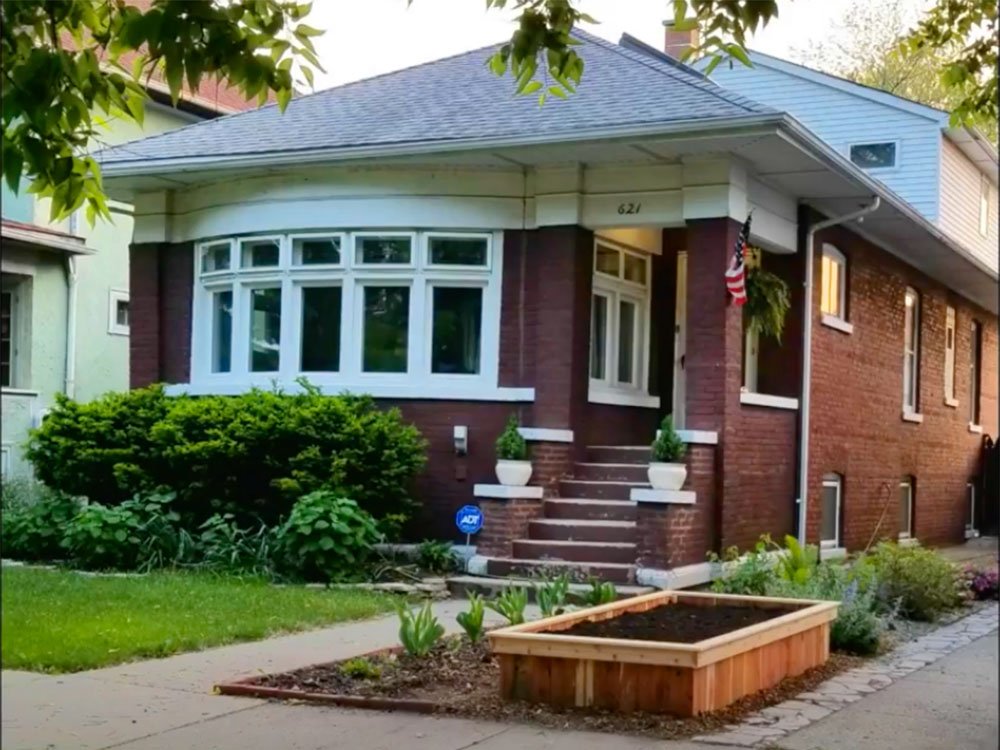
Why Raised Beds Are Best
Of course, if you don’t have the space - you won’t be able to grow your food in a raised bed. But, we have yet to find any disadvantages to this growing method that guarantees you will provide the best soil for your plants to thrive.
Absolutely beautiful – they are custom made and there is nothing like them on the market (if you don’t see a style you like – call us for a custom quote). Built from the finest quality eastern cedar boards that are affordable, beautiful and long lasting (less expensive beds built from fir/pine are also available). We pick the wood up directly from the source to control quality!

Learn more about our growing method in two recently revised blog posts.
With raised beds choose your own soil
We don’t fill our beds with conventional soil. The most important benefit is that with raised beds YOU choose the soil rather than accepting the soil you have in your yard. Rafa Crevoshay, our horticulturist, carefully researched our options and chose to fill raised beds with a microbe and nutrient rich compost from a local dairy farm. Our gardeners grow healthy seedlings and mature plants right from their first growing experience.
Built for harsh winters year after year
Chicago-area food growers and in other areas with very cold winters should not try to save money on less durable wooden raised beds made from thinner boards. The materials won’t last, and the design/construction of other beds will not have the unique long lasting characteristics. If you build your own beds, don’t use “treated wood” since toxic chemicals leach into the soil. Also, remember that untreated pine raised beds rot after only a few years.
The expected lifespan of cedar raised beds can vary based on a number of factors, including the thickness of the boards, the design of the bed, and the climate in which it is located. However, in general, cedar is a durable and long-lasting wood that is resistant to decay, rot, and insect damage.
Our cedar raised beds are made with 1.125 inch thick boards lined up vertically with horizontal 2x4 boards at the top and bottom for added strength to withstand the expansion of freezing soil over winter. With proper care and maintenance, these beds could last for 10 to 20 years or even longer.
The climate in which the beds are located can also have an impact on their lifespan. Cedar is naturally resistant to rot and decay, but prolonged exposure to moisture, extreme heat, or freezing temperatures can cause the wood to deteriorate more quickly. In humid or rainy climates, it is especially important to ensure that the beds have proper drainage to prevent water from pooling and causing damage to the wood.
To extend the lifespan of cedar raised beds, it is recommended to regularly inspect the wood for signs of damage or decay, and to treat the wood with a protective coating or sealant to help prevent moisture from penetrating the surface. Additionally, it is important to avoid using harsh chemicals or fertilizers that could leach into the soil and damage the wood over time.
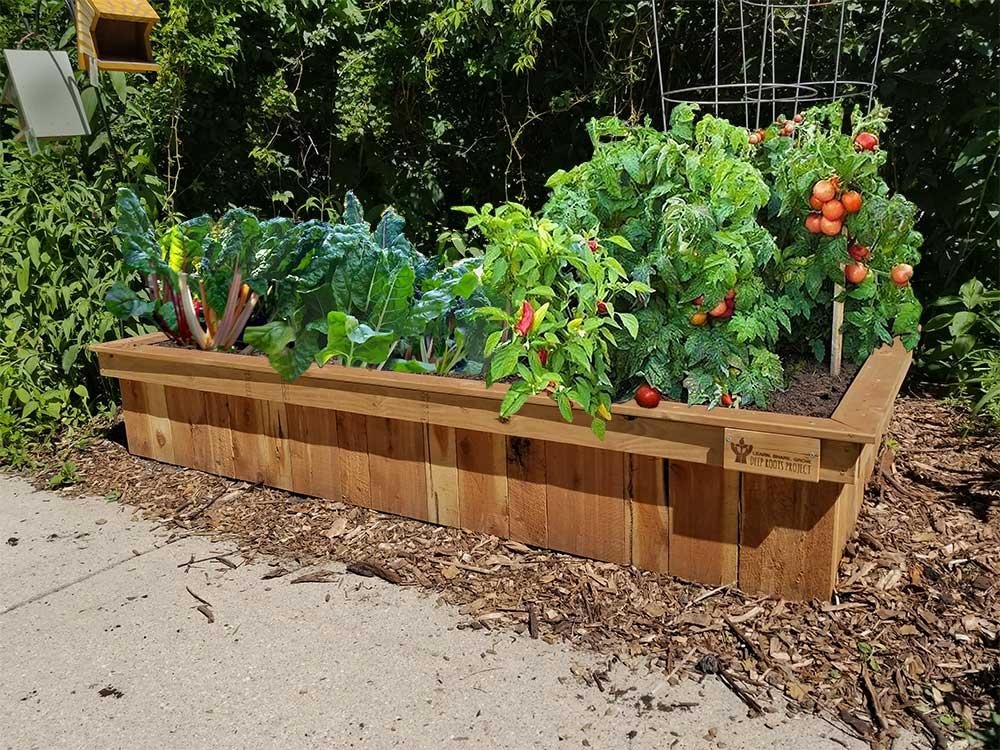
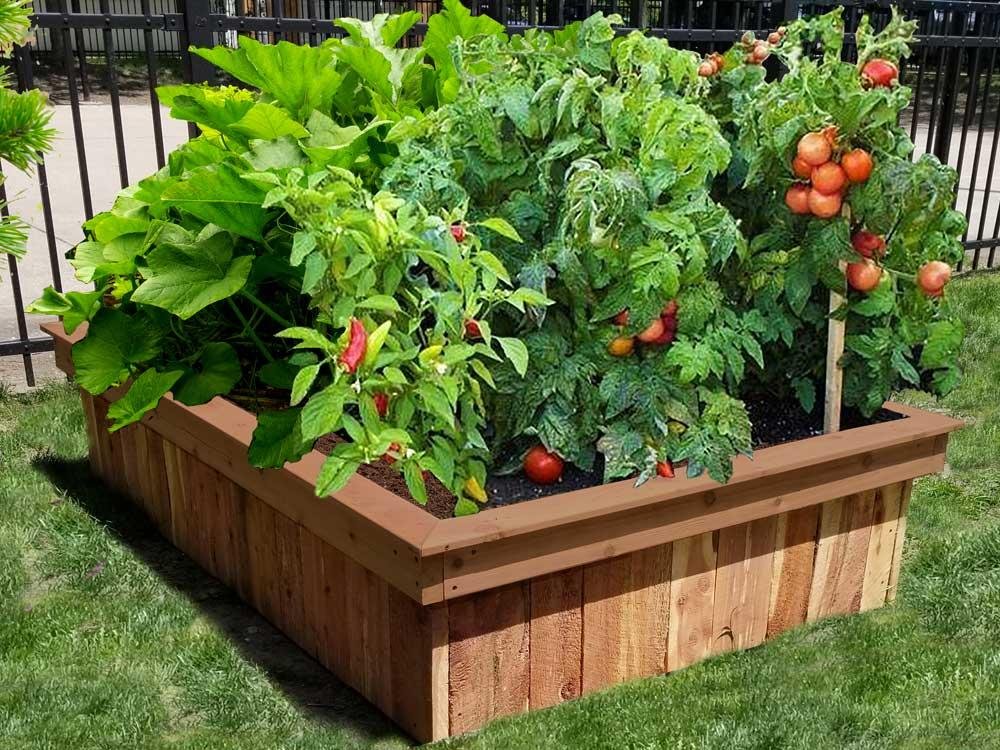

Benefits of our raised beds
Super durable and designed to last longer due to thicker planks and a unique design that combines vertical and horizontal boards.
Withstands harsh winters. Freezing soil will not cause the wood to bow which occurs with beds using cheaper, thinner wood.
15 inches tall to allow space for deep-rooted veggies like tomatoes, more space for microbial populations to expand and can hold more water for a healthier ecosystem.
Custom sizes and accessories for the raised beds and smaller planter boxes. We also make beds on legs and beds with a trellis.
Bunny-resistant: Bunnies are unable to climb over our reinforced top overhang and thick ledge.
Varnishing the beds is optional to preserve the cedar colors.
We deliver in our truck and install beds with soil in the greater Chicago area.
We have yet to discover the disadvantages to growing food in raised beds. The list of the advantages below was put together by the University of Georgia extension. Almost all university websites promote raised bed benefits. All of the raised beds benefits are identical for our smaller custom planter boxes.
Grow more food in limited space
Prevents of soil compaction and plant damage: One of the greatest advantages of raised beds comes from the protection the structure provides from foot traffic. The soil does not get compacted and plants are less likely to be damaged.
Longer growing season: Raised beds warm up more quickly in the spring.
Less weeding and maintenance: Once the soil in a raised bed has stabilized, compaction is almost non-existent.
Better drainage: A well-prepared raised bed allows the soil to drain better than in an in-ground garden (DRP NOTE: this depends on the soil that you put into the bed, of course).
Easier soil amendments: A raised bed can enable crop growth in an area that otherwise would not support gardening. On steep slopes, raised beds can act as a form of terracing. Raised beds can be built on parking lots and other compacted, difficult-to-garden urban soils.
Material conservation: Because the gardening space is concentrated, the management of water, fertilizer, mulch and soil amendments can be more carefully controlled, leading to less waste.
Access for gardeners with disabilities: Raised beds, at the proper height, can improve access for wheelchairs, or for gardeners who have a hard time bending over.
SOURCE: Raised Beds vs. In-Ground Gardens | UGA Cooperative Extension
Our Innovative Food Gardening Method
Learn more in our two recently revised blog posts.
Our online store
See our online store for details about prices, ordering and delivery of raised beds, compost, worm castings and more. Please contact our customer support team before placing an order online so we can assist you with the details and answer your gardening questions.
QUESTIONS? COMMENTS?
Contact us at (708) 655-5299 or support[at]deep-roots-project.org.
Stay in touch
Please leave your cell phone number when you sign up for our eNewsletter, if you want text message announcements now and then.
Donations help us provide organic kitchen gardening education to individuals, organizations, and entire communities. Thank you in advance for contributing to our community and for sharing our website and blog with friends and family.

Growing Seeds and Seedlings for Beginners
This post gives beginner gardeners tips and tricks for planting a successful garden from the first year. We want to help you avoid common beginner mistakes.
Start small and learn at your own pace. Take on as much as you can handle the first year. Gardening is all about trying new things and learning from your mistakes. Let nature do most of your work for you. Call or send questions to our support team when you run into a problem. Learn more about our Transformational Gardening Basics.

Deciding to plant seeds or seedlings
Ultimately, the decision to plant your crops from seeds or seedlings will depend on your personal preferences, growing conditions, goals, and gardening experience. If you have the time, space, resources and equipment to start seeds early indoors, it can be a rewarding and cost-effective option. If you want a faster harvest and are willing to pay a bit more, seedlings may be the way to go. Both seeds and seedlings each has its advantages and disadvantages.
Learning to grow easy crops from seed is a useful skill if you have the time to learn and monitor the progress. There are several factors each gardener needs to consider when deciding to plant a crop from seeds or from seedlings. In a large garden you can lower costs by growing from seed. Other factors are skill level, available time, garden size, budget, favorite foods and interests.
Some crops should not be transplanted and should be grown from seed directly in an outdoor bed or container. But know where and when to plant certain crops. Spinach is a food example. We get much larger spinach plants and harvests when we plant spinach seeds in the mid or late November in Zone 5 and 6. Learn the spinach details below under “Tips for growing from seed.”
Decide which crops to plant from seed and when to buy as seedlings. As a beginner your goal could be to buy only a few seedlings of the bigger plants like tomatoes, cucumbers, peppers, and squash that may need months to mature in colder climates like Chicago (Zones 5 & 6) and should be started indoors.
Know WHEN to plant from seeds and WHEN to plant seedlings in your climate zone. Our Planting Calendar for Zone 5b and 6a will tell you which crops must grow from seed, which must grow from seedlings and which can grow either way. The calendar includes many other details about specific crops.
Ways to start crops: There are various methods available for starting crops in your garden.
buying and planting seedlings (young small plants also called “transplants”)
in spring plant seeds of cold tolerant plants (radishes, kale, swiss chard, lettuce) directly into your bed outdoors
grow seedlings from seeds in pots or growing trays outdoors when the temperature are appropriate. Know what temperature is best to germinate seeds of specific crops so a part of the crop seed will germinate.
growing seedlings from seed indoors using grow lights and other specialized equipment,
growing seedlings and cold tolerant plants outdoors in early spring under the protection of a ”cold frame.”
Buying seedlings at a garden center or other vendor is the easiest and fastest solution to growing great crops your first year. But it limits the scope of your plant selections. Also, most garden stores don’t sell organic seedlings. ”Conventional” seedlings (not grown from organic seeds) are fine as long as you grow them in organic soil and compost without any conventional (toxic) pesticides. It helps to find a top quality garden center or nursery nearby.

Which seedlings to buy. Buy the healthiest seedlings. The most affordable seedlings are in “six-packs” or “four-packs”. Some garden stores let their seedlings sit on the shelf too long in tiny posts.The seedlings get stressed from lack of root space and nutrients. Buy your seedlings as soon as they arrive at the store so they are healthy and fresh. Make sure that they have been well taken care of, appear healthy, have no flowers or fruits, and that the roots are not “root-bound” – knotted and circling the bottom of the pot. Reject spindly, elongated plants with weak stems with weird discolorations. Look for plants that are young and vigorous, with only green foliage.
Our compost is your new soil
We use 100% compost to fill beds and containers instead of conventional soil. Read our blog post Compost, Microbes and Soil Science to understand why 100% Microbe-Rich Compost grows much healthier larger plants than conventional soil in an organic garden. Conventional soil can be a mixture of many things like top soil, leaf mulch, compost, tree waste, etc. Our compost costs less than expensive commercial potting mixes purchased in bags, and gives better results. Our compost has several other uses in our innovative method. When a bed or container is filled with compost it is convenient to simply call it “THE SOIL.”
If you want to boost the growing power of your existing raised bed filled with conventional soil you can dig out about a 4” layer or more and refill with our compost.
Learn why microbe and nutrient rich “worm castings” (vermicompost) is a superior soil amendment for all our plants. We use it instead of commercial organic fertilizers except for fish emulsion made from fish waste.
Tips for planting seedlings
Level the soil as best you can. Removing low and high areas makes watering easier. Or try lowering the soil just a little just around the seedling so most water soaks in the root area.
Protect your seedlings from drying out. Don’t plant on a hot sunny day. Better to plant on a cloudy day or early evening, Water your seedlings before you plant them.
If there are many seedlings in one pot, divide them carefully with a knife. This step is not necessary if you have separate compartments for each seedling.
Mix a batch of half and half compost and worm castings. The more worm castings you add, the healthier and better your plants will grow. Use as much compost and worm castings mix as you like. Mix together in each hole or in a large bucket. Add 1 cup of planting mix for a medium-size plant like kale. Add 2 cups of planting mix for a large-size plant like tomatoes and squash.
Digging a seedling hole. If your raised bed or container is filled with our Microbe Rich Compost, make your seedling holes 2-3 times bigger than the seedling root.
If your raised bed or container is filled with conventional soil, make your seedling holes 4-6 times larger than the root to allow room for more of the planting mix.
Add the mixture to each hole and make space for the root ball.
Place the seedling into the hole, slightly lower than it was growing in the container. Gently firm the soil around the roots, but be careful not to compact it.
Water slowly and deeply. Read our post Deep Watering is Best. Water your seedlings daily for 2 weeks — mornings are best. On very hot days you may want to water twice. Don’t water lightly. Deep watering is best since it makes the roots grow deeper.
Test for moisture before you water since over watering stresses plants.
Watering early in the day is best.
Water the soil, not the plant. Never water tomatoes and other plants that get fungal diseases late in the day. Fungus likes a humid environment.
We highly recommend you install drip-irrigation. Ask our support team about details (support[at]deep-roots-project.org).
Fish Emulsion is the one organic soil amendment we use. It’s made from fish waste. Its primary purpose is feeding the soil microbe, but it also replenishes the nitrogen. Follow the directions on the bottle and spray every one or two weeks.
Tips for planting seeds
Mixed baby veggies Densely plant seeds so you can harvest lots of baby veggies while you wait for some of the sprouts to grow bigger. Use this with carrots, beets, loose-leaf lettuce, and amaranth. Plant a mixture of seeds an inch apart between the transplanted seedlings all over a section of the bed or in a container. If you plant the seeds further than an inch apart you will do less “thinning” of baby plants. If you plant mixed baby greens seeds in 20 days you will get 2 to 4” tall baby plants to pick. Plant basil seeds 4“ apart anywhere around the bigger plants. If it gets less sun it won’t get as big. Keep the basil low by harvesting the top leaves.
Root crops (beets, onions, garlic, radish, carrots, parsnips, turnips) must be planted ONLY from seed because their roots can’t survive being disturbed. Plant garlic in later October with the pointy end of the clove facing upward.
Plant peas, beans, and spinach from seed. Some plants are healthier and bigger if they are planted from seeds but it’s not usually worth the extra time and trouble. But the extra effort to plant peas, beans and spinach from seed is well worth any extra effort because you get a healthy bigger plant and larger harvests.
Spinach is easier to grow from seed in fall than in spring in cold climate zones like Chicago with a shorter growing season. Plant spinach seeds 4” apart in mid-November. Many areas have enough rain in early spring so you don’t have to water the seeds. They over winter in the soil and germinate in the early spring. In March the spinach seedlings grow quickly into healthy large plants. You can also plant spinach seeds in spring as soon as the ground thaws. Spinach seeds planted in spring become smaller mature plants and produce a smaller harvest.
Garlic is best planted in mid-October in Zones 5 and 6. Garlic cloves are used instead of seeds. Harvest in July.
Crops with tiny seeds like lettuce and carrots need special tricks, time and skill because their seeds are hard to plant and water. Try covering tiny carrot seeds with a board (not treated wood) or a tile to save watering time and to protect them from heavy rains. Lift the board and check every day. Remove the board when the first seed germinates. Try planting a new row or cluster of leaf lettuce spaced 1” apart every week or two. During the warmer summer days plant lettuce seeds where they are shaded by a large plant or shrub. Or plant them in a pot you can move to a partial sun location on really hot days.
Plant seeds in ”furrows” or “clusters” It is your choice to plant your seeds in 6” to 8“ long narrow indentations (called “furrows”) or in 6” to 8“ round clusters. Place the furrows and clusters in spots that will get enough sun or less sun depending on the heat tolerance of the crop and the heat of the season. Fill your furrow or cluster with the same compost and worm casting mixture described above for planting seedlings. Check our Planting Calendar for Climate zone 5b and 6a for how deep to plant the seeds. Some seeds are planted on the surface with the compost/worm castings mixture sprinkled on top. Press down gently to firm up the soil after planting. Cover with straw to protect from heavy rains.
Watering seeds: Never let them dry out. Seeds must be kept moist at all times until germination. A light watering will moisten the soil sufficiently when it’s done frequently. Frequency depends on how hot, if the sun is shining, if it has rained recently, and so forth.
Set up a hose with a sprinkler nozzle to water on a timer. This saves time and makes sure the watering is done properly. Ask our support team (support[at]deep-roots-project.org) which timer to buy and for help setting it up. Support the hose nozzle about 2 feet from the ground and set to a gentle spray. It should spray an area 3 x 3 feet. Adjust the hose to best cover the area you need watered. Cover the seeds with straw to protect them from heavy spring rains. Once the seeds germinate keep moisture in the soil by covering it with straw.
A drip-irrigation system makes planting seeds at random spots in your bed much easier. There are narrow hoses that attach to the 1/2” hoses that allow you to direct water to any spot. Plus the narrow hose can have a tiny sprinkler attached that sprinkles your seeds. Ask our support team for details (support[at]deep-roots-project.org).
To intermediate or advanced gardeners
The universe of gardening information is virtually limitless. It is constantly expanding. Fortunately, the array of gardening techniques is accessible now on the web. Our purpose is to feature our compost based method of soil optimization with beneficial microbe populations and worm castings. We encourage you to use the web resources to explore an accessory technique that captures your imagination.
Don’t rely on single sources – University Ag Extensions, local botanic gardens, YouTube, articles and books. For example, if you want to build a trellis look at several techniques and pick the one that works for you, or even better integrate a combination of the techniques you discover.
As you learn a new technique, improve it. Deep Roots is learning all the time. We can also learn from the discoveries by our community of gardeners. If people decide to garden in ways that will not pollute, improve the environment, give us healthy food, optimize nature’s ability to provide plant nutrition, we all benefit.
Our Innovative Food Gardening Method
Learn more in our two recently revised blog posts.
Our online store
See our online store for details about prices, ordering and delivery of raised beds, compost, worm castings and more. Please contact our customer support team before placing an order online so we can assist you with the details and answer your gardening questions.
QUESTIONS? COMMENTS?
Contact us at (708) 655-5299 or support[at]deep-roots-project.org.
Stay in touch
Please leave your cell phone number when you sign up for our eNewsletter, if you want text message announcements now and then.
Donations help us provide organic kitchen gardening education to individuals, organizations, and entire communities. Thank you in advance for contributing to our community and for sharing our website and blog with friends and family.