
How to Identify Pests & Diseases
A crop-by-crop symptom list is your starting point for addressing unhealthy veggie symptoms. The goal is not for gardeners to self-diagnose their crops, but to describe symptoms clearly when they call or email their local university cooperative extension office.
A crop-by-crop symptom list is your starting point for addressing unhealthy veggie symptoms. The goal is not for our gardeners to self-diagnose their crops, but to describe symptoms clearly when you contact gardening advice services and also when you do research on other websites and watch YouTube videos. Remember that almost all other gardening advisors don’t follow the Deep Roots method of using 100% compost as soil for above ground veggies, and worm castings as natural fertilizer.
Gardening Advice Services
For gardeners in the Chicago area, one of the best first stops for help with garden pests, plant diseases, and plant identification is the Chicago Botanic Garden Plant Information Service. Staffed by horticulture specialists and University of Illinois Extension Master Gardeners, the service offers guidance on insect and disease problems, cultural disorders, plant care, soil, composting, pruning, mulching, plant selection, and more. You can visit the Plant Information Desk at the Garden, call the Plant Information Hotline at (847) 835-0972, or submit questions online, including plant diagnosis or insect identification requests with photos. Hours vary by season; currently, and the hotline as Wednesday–Friday, 10 a.m.–4 p.m., closed holidays.
University agricultural extension programs are another excellent source for free, research-based gardening and horticulture advice. In Cook County, the University of Illinois Extension provides local support through programs such as Master Gardeners, urban agriculture education, youth development, nutrition education, and gardening resources. Gardeners can email Cook County Master Gardeners at Chicago-MG@illinois.edu and include photos when possible. ; phone 773-800-2557; email uie-cook@illinois.edu; hours Monday–Friday, 9 a.m.–3 p.m.
When contacting the extension include:
crop name,
variety if known,
when symptoms started,
whether old or new leaves are affected,
whether the plant wilts and recovers in the evening,
watering pattern,
photos of the whole plant and close-up leaves,
whether pests are visible on leaf undersides.
Common Mid-summer Symptoms by Crop
Tomatoes
Tomato problems vary widely by symptom, including leaf spots, wilting, mites, herbicide injury, and disease.
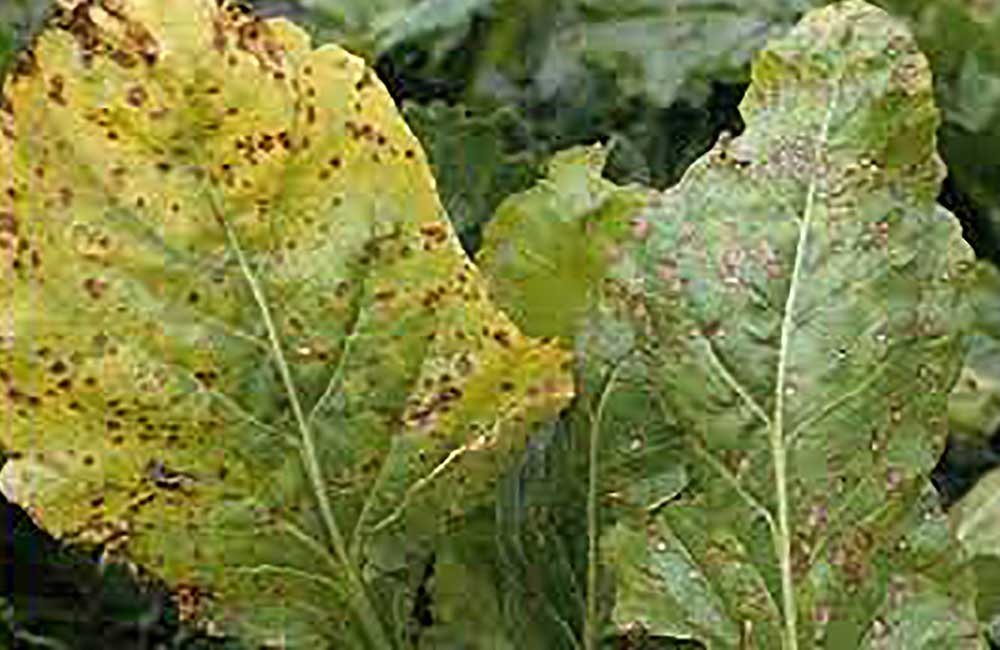
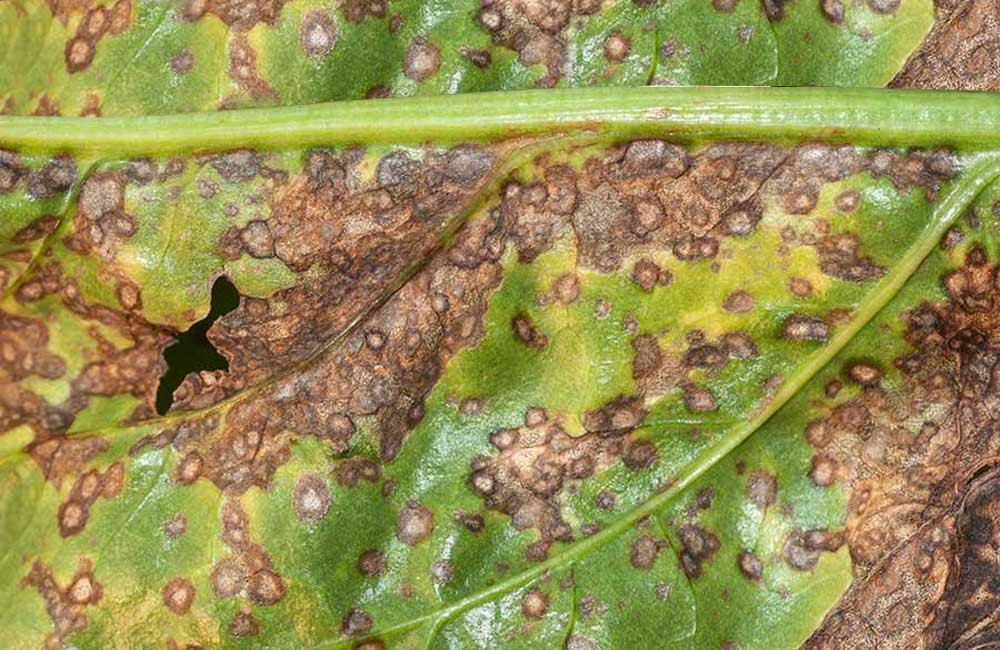
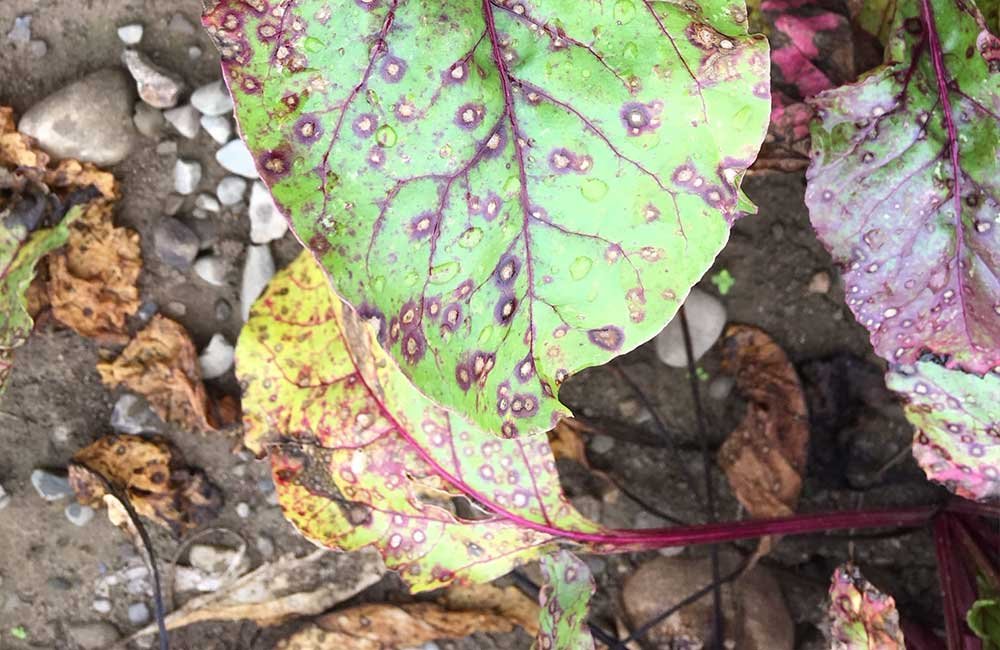
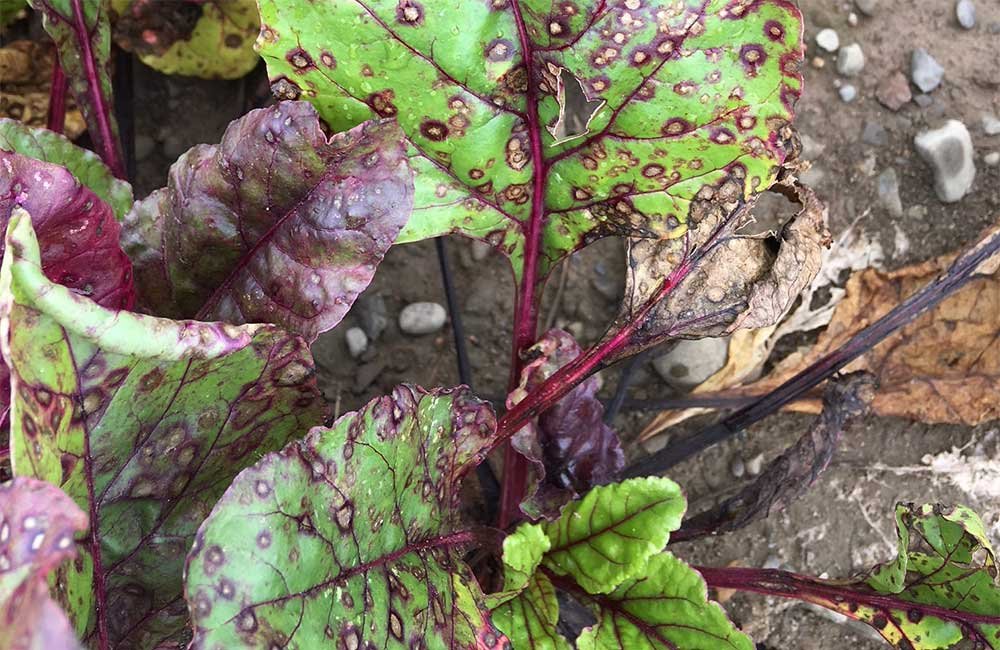
Lower leaves yellow first: could be normal aging, early blight, Septoria leaf spot, Fusarium wilt, water stress, or root stress.
Small gray or brown spots with yellowing on lower leaves: often Septoria leaf spot or early blight.
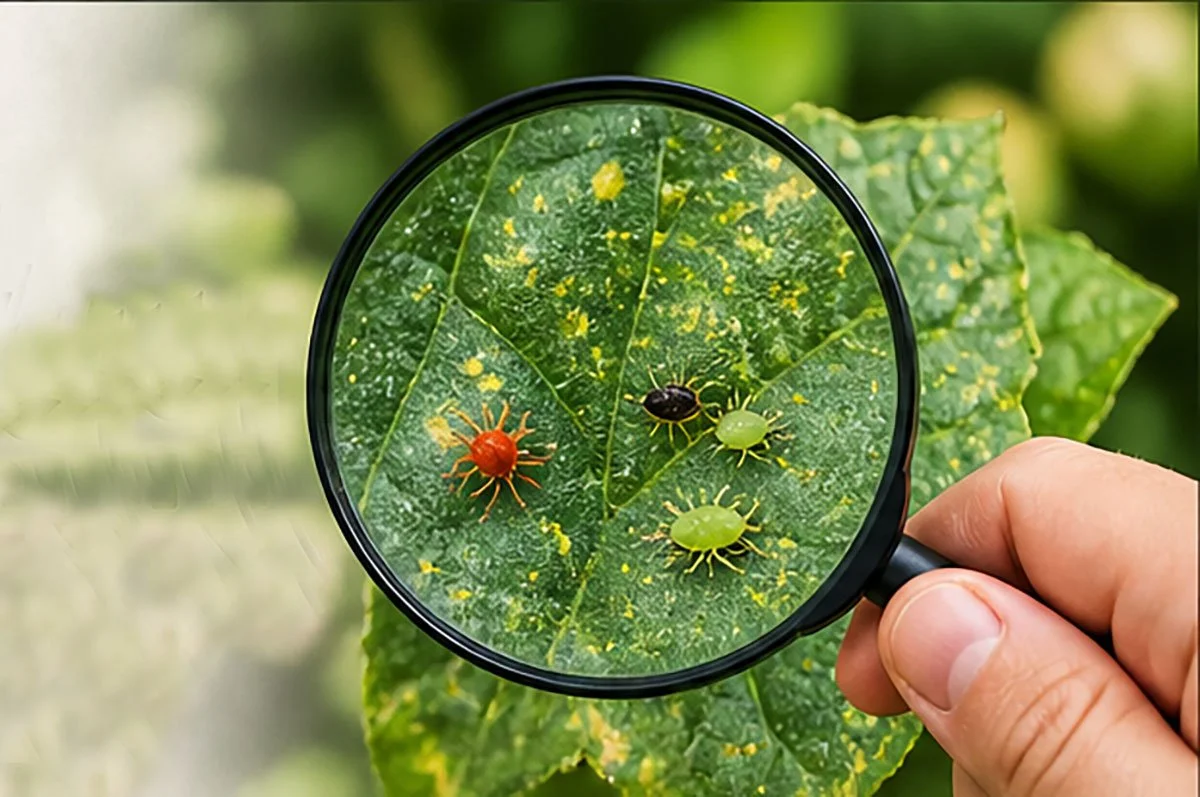
Tiny yellow or white speckles/stippling: check undersides for spider mites, especially in hot, dry weather.
New leaves twisted, curled, narrow, or distorted: possible herbicide drift or exposure.
Whole plant wilts during hot afternoons but perks up at night: often heat or water stress.
Wilting plus yellowing lower leaves and brown streaking inside the stem is possible Fusarium wilt. Fruit symptoms
Brown or black sunken spot on bottom of fruit: blossom-end rot, often related to uneven watering and calcium movement, not necessarily lack of calcium in the growing medium.
Pale, papery, sunken patches on fruit: sunscald.
Cracking fruit: often uneven watering after dry periods.
Cucumbers
Leaves look pale, yellow, wilted, or spotted. The University of Maryland’s cucumber guide lists mosaic/mottling, distortion, curling, mildew symptoms, mite injury, and bacterial wilt as common cucumber issues.
Yellow or green mottled “mosaic” pattern, curled or distorted leaves, stunted growth: possible virus.
Yellow stippling or dusty-looking leaves: check for spider mites.
Yellow angular spots on leaves, especially with humid weather: possible downy mildew.
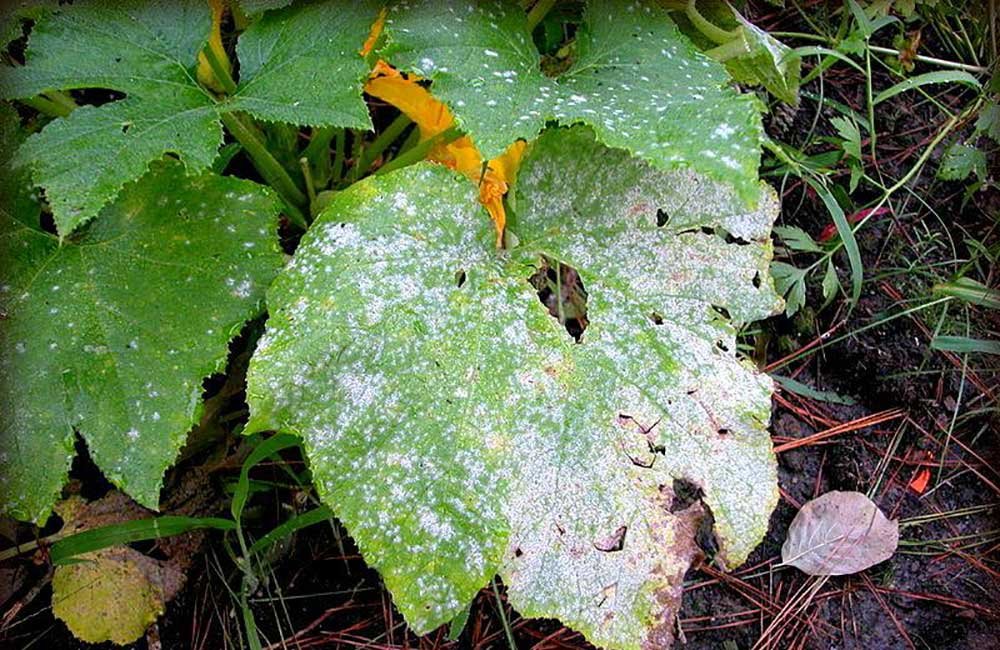
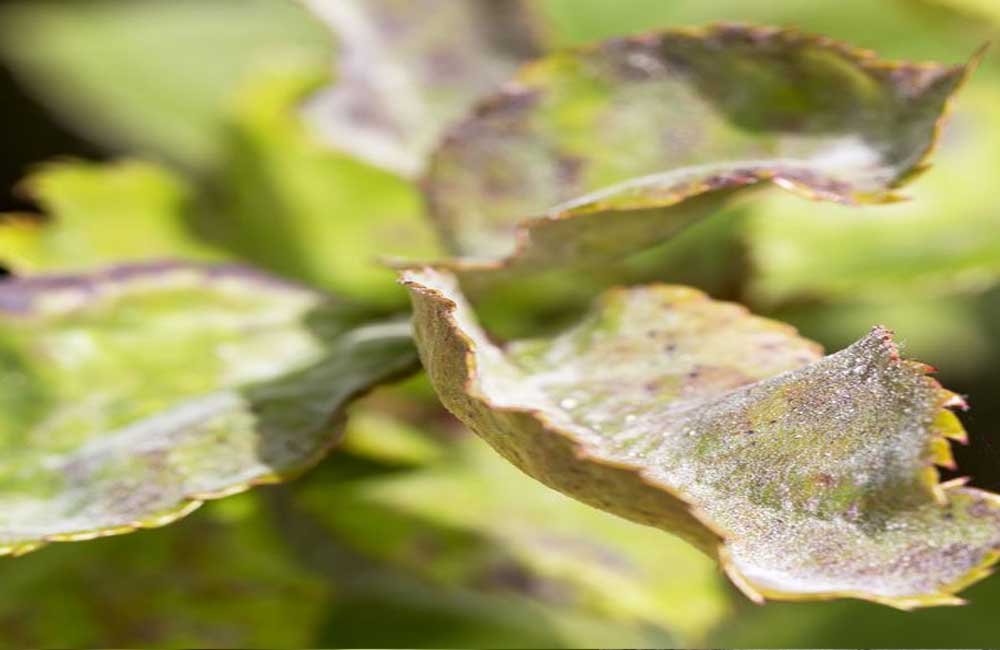
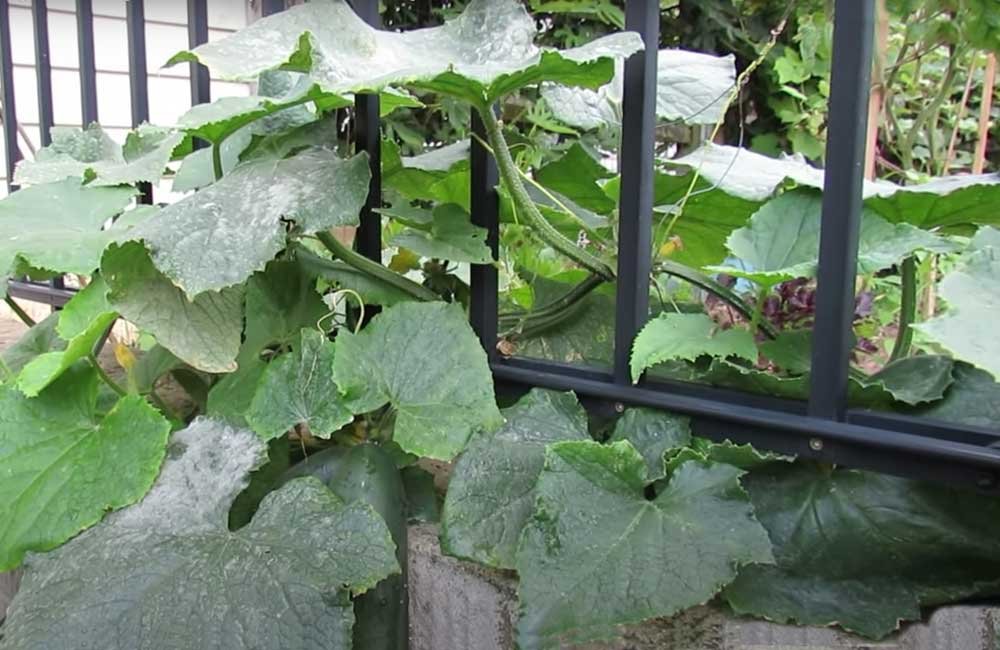
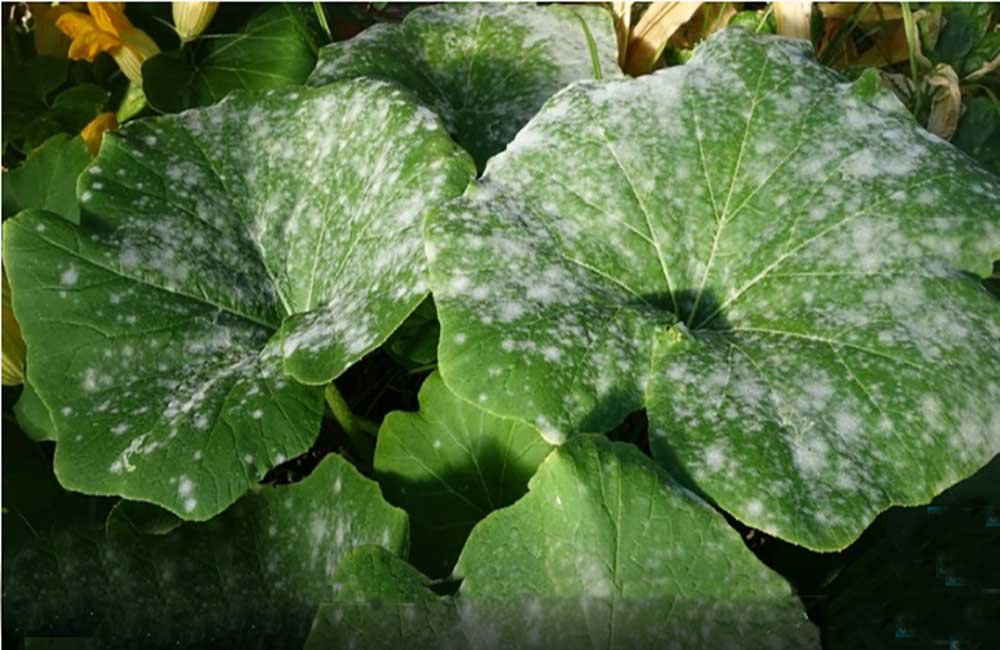
White powdery coating on leaves: powdery mildew.
Sudden wilting of leaves or vines, especially after cucumber beetles are present: possible bacterial wilt.
Chewed leaves or scarred stems: inspect for cucumber beetles.
Squash, Zucchini, Melons
Leaves, pale, wilted, damaged
Maryland Extension notes spider mites can affect vine crops such as melons and cucumbers, causing yellow-white stippling; heavy feeding can turn leaves pale, dry, and cause leaf drop, especially in hot, dry weather.
Large leaves wilt in afternoon but recover by evening: often heat stress, especially during mid-summer.
Leaves stay wilted in the morning: check for squash vine borer, root damage, bacterial wilt, or severe drought.
Yellow-white stippling that spreads across leaves: check for spider mites; they commonly flare in hot, dry weather on vine crops.
White powdery patches: powdery mildew.
Yellow or green mosaic pattern with distorted leaves: possible virus.
Ragged holes or chewing: look for squash bugs, cucumber beetles, or caterpillars.
Beans
Leaves look pale, curled, scorched, chewed
Maryland Extension notes anthracnose can cause soft, sunken, dark spots on vegetables, including bush bean pods, and also notes bean leaf beetles as a snap bean pest.
Fine yellow stippling, bronzing, or dusty-looking leaves: check for spider mites.
Leaf edges look yellow, brown, or burned: possible leafhopper injury, drought stress, salt stress, or heat stress.
Holes chewed in leaves: check for bean leaf beetles, Mexican bean beetles, caterpillars, or slugs.
Leaves curled or distorted: look for aphids, herbicide drift, or virus-like symptoms.
Soft, sunken, dark spots on pods: possible anthracnose. Peppers: Leaves look pale, curled, or stunted
Pale green or yellow leaves with slow growth: possible root stress, water stress, cool nights, heavy fruit load, or pest pressure.
New leaves curled, puckered, or distorted: check for aphids, mites, thrips, or herbicide drift.
Leaves drop suddenly: water stress, heat stress, or root problems.
Tiny pale speckles or bronzing: check for mites.
Silvery streaking or scarring on leaves or fruit: possible thrips.
Fruit symptoms
Pale, papery, sunken patches: sunscald.
Dark, sunken spot on blossom end: blossom-end rot, often tied to uneven watering.
Misshapen or small fruit: heat stress, poor pollination, pest feeding.
Eggplant: Leaves look pale, spotted, or chewed
Many tiny round holes: flea beetles are common on eggplant.
Yellow-white stippling or bronzing: check for spider mites.
Leaves curling or distorted: possible aphids, mites, herbicide drift, or heat stress.
Wilting during heat but recovering later: often temporary heat stress.
Wilting that does not recover: check roots and stems; ask Extension about wilt disease or root damage.
Basil and herbs: Leaves look pale, spotted, distorted
Pale yellowing between veins, especially with gray-purple fuzzy growth underneath: possible basil downy mildew.
Brown or black spotting: possible leaf spot disease, cold injury, or water sitting on leaves.
Leaves cupped, curled, or distorted: aphids, mites, thrips, herbicide drift, or heat stress.
Plant gets woody, stretched, or stops producing tender leaves: it may be flowering or past its prime; regular harvesting helps.
Lettuce & leafy greens: Leaves look pale, bitter, limp, stretched
Plants stretch upward and taste bitter, bolting from heat & long days.
Leaves wilt in afternoon: heat stress or shallow roots drying out.
Leaf edges brown: heat, drought, salts, or uneven watering.
Yellow older leaves: normal aging, crowding, water stress, disease.
Holes in leaves: check for slugs, flea beetles, caterpillars, or grasshoppers.
Brassicas: kale, cabbage, collards, broccoli
Ragged holes or green pellets of frass: cabbageworms or caterpillars.
Tiny shot holes: flea beetles.
Lower leaves yellowing: normal aging, water stress, crowding, or disease.
Leaves wilt during heat but recover later: heat stress.
Distorted new growth: aphids, especially tucked into curled leaves or growing tips.
Yellow V-shaped patches from leaf edges on cabbage-family crops: ask Extension about black rot.
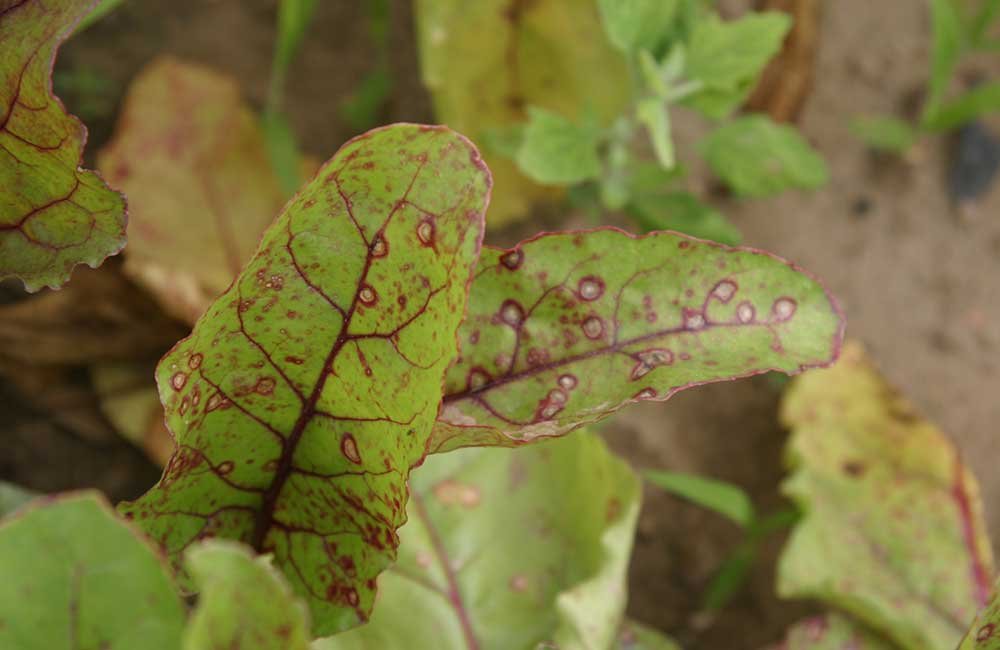
Alliums – onions, garlic, leeks, scallions: Leaves look pale, streaked, or collapsing
Whitish or silvery streaks on leaves: possible thrips feeding.
Leaf tips brown: heat stress, drought stress, salt stress, or natural maturation depending on crop stage.
Plants collapse or rot near base: possible bulb rot, excess moisture, or disease.
Yellowing from oldest leaves late in season: may be normal maturing, especially for onions and garlic.
General symptom words gardeners can use
Use these words when contacting the Extension:
Wilting: Does it happen only in afternoon, or all day?
Yellowing: Is it older lower leaves, new growth, one side of the plant, or the whole plant?
Stippling: Tiny pale dots, often from mites or insects.
Mosaic/mottling: Patchy yellow-green pattern, often virus-related.
Scorch: Brown crispy edges or tips.
Distortion: Twisted, curled, cupped, narrow, or puckered leaves.
Spots/blotches: Note color, shape, rings, yellow halos, and whether they start low on the plant.
Chewing damage: Holes, ragged edges, missing leaves, or frass.
Fruit load: Too many ripe or overripe fruits left on the plant can stress some crops.
Recovery pattern: Plants that perk up by evening may be heat stressed; plants that stay wilted need closer inspection.
A good email to Extension could say: “My cucumber leaves have yellow-green mottling and some leaves are curled. It started on July 20. The plant is watered every morning, does not recover fully at night, and I saw cucumber beetles last week. Photos attached: whole plant, top of leaf, underside of leaf, and nearby plants.”
Swede Midge Fly
Swede midge attacks only brassica veggies, and is often mistaken for nutrient problems, heat stress, herbicide drift, mechanical damage, or “weird growth.” Deep Roots is experimenting with the best ways to protect brassicas with bug netting. It is very tiny and is blown in by the wind. It over-winters in the soil. Agricultural science has only a very toxic herbicide that kills it. See our Swedish Midge Fly blog post for more details.
Club Root attacks broccoli roots
Deep Roots recommends NOT to grow broccoli in Chicago area gardens. Clubroot is not a quick, one-season problem. Illinois Extension says the pathogen can survive in soil up to 20 years, which is why gardeners may find that broccoli or other brassicas fail repeatedly in the same bed even when compost, watering, and care are good.

Prevention and Control of Powdery Mildew
Understanding which plants are prone to powdery mildew and why others are resistant can help you make informed decisions about what to plant in your garden and how to manage those that are susceptible. By choosing resistant varieties and maintaining good cultural practices, you can minimize the impact of powdery mildew in your garden.
Understanding which plants are prone to powdery mildew and why others are resistant can help you make informed decisions about what to plant in your garden and how to manage those that are susceptible. By choosing resistant varieties and maintaining good cultural practices, you can minimize the impact of powdery mildew in your garden.
Prevention of Powdery Mildew
Choose Resistant Varieties: Select plant varieties that are resistant or less susceptible to powdery mildew.
Proper Spacing: Ensure adequate spacing between plants to improve air circulation, which helps to reduce humidity levels around the foliage.
Watering Practices:
Water plants at the base, avoiding overhead watering, which can increase humidity and promote mildew growth.
Water early in the day to allow moisture on the plants to dry before evening.
Soil Management:
Keep the area around plants clean and free of debris, as organic matter can harbor the fungus.
Use well-draining soil to avoid excess moisture, which can contribute to mildew growth.
Mulching: Apply mulch around the base of plants to retain soil moisture and prevent splashing of water onto the leaves, which can spread spores.
Regular Monitoring: Inspect plants regularly, especially during periods of warm, dry weather followed by high humidity. Early detection can help prevent the spread.
Removal of Powdery Mildew
Prune Affected Areas:
Remove and destroy infected leaves, stems, or flowers as soon as you notice them.
Dispose of the infected plant material in the trash, not in compost, to prevent spreading the spores.
Natural Remedies:
Milk Spray: Mix 1 part milk with 2 parts water and spray the affected plants. Milk has natural anti-fungal properties.
Baking Soda Solution: Mix 1 tablespoon of baking soda, 1 teaspoon of liquid soap, and 1 gallon of water. Spray this solution on affected plants to kill the mildew.
Fungicides:
Edible Plants: Apply an organic fungicide, such as neem oil or sulfur-based products. These are effective and safe for edible plants.When treating edible plants, especially those you will soon harvest, prioritize non-toxic, organic solutions like milk sprays, neem oil, or baking soda. Chemical fungicides should be used with caution, ensuring they are safe for food crops.
Ornamental Plants: While you can use the same organic methods, you have more flexibility with chemical treatments since there’s no concern about consumption. For severe cases, you may need to use a chemical fungicide, but ensure it’s labeled safe for the specific plants you're treating. However, still consider the environmental impact and safety, particularly if the ornamental plants are near edible gardens or frequented by pets or children.
Improve Air Circulation:
Thin out the foliage to allow better airflow around the plants, which can help reduce the humidity that powdery mildew thrives on.
Ensure plants are not overcrowded.
Maintain a Dry Environment:
Avoid watering in the evening to reduce the amount of time plants stay wet, as mildew thrives in humid, dark conditions.
Increase sunlight exposure if possible, as powdery mildew is less likely to thrive in direct sunlight.
Washing Off Powdery Mildew
If you want to preserve as many leaves as possible, you can gently wash off the powdery mildew from the least affected leaves instead of removing them entirely. Choose a time when the plants are not exposed to direct sunlight, such as early morning or late afternoon. This prevents the leaves from getting sunburned after washing.
Prepare a mild solution using one of the following options:
Water and Baking Soda Solution: Mix 1 tablespoon of baking soda with 1 gallon of water. This helps to neutralize the mildew and prevent further spread.
Water and Dish Soap Solution: Mix a few drops of mild liquid soap (not detergent) with 1 gallon of water. The soap helps break down the mildew and makes it easier to wash off.
Water and Milk Solution: Mix 1 part milk with 2 parts water. Milk has natural antifungal properties and is gentle on the leaves.
Washing the Leaves:
Dip a soft cloth, sponge, or spray bottle into the solution.
Gently wipe or spray the affected leaves, focusing on the areas with visible mildew. Be careful not to scrub too hard, as this can damage the leaves.
If using a spray, ensure you thoroughly cover the affected areas, allowing the solution to sit for a few minutes.
Rinsing:
After wiping or spraying, rinse the leaves with clean water to remove any residue from the solution.
You can use a gentle spray from a garden hose or a watering can to do this.
Drying:
Allow the leaves to air dry naturally. Make sure there is good airflow around the plants to speed up the drying process and prevent further mildew growth.
Avoid watering the plants from above until the leaves are completely dry.
Follow-Up Care:
Monitor the leaves over the next few days. If you notice any new mildew spots, you may need to repeat the washing process.
Ensure the plants are in an environment with good air circulation and proper sunlight to help prevent future mildew outbreaks.
Plants Prone to Powdery Mildew
Powdery mildew is a common fungal disease that affects a wide variety of plants. Some of the most susceptible plants include:
Vegetables:
Cucurbits: Cucumbers, pumpkins, squash, and zucchini.
Tomatoes: Especially in humid conditions.
Peppers: Both hot and sweet varieties.
Beans: Particularly pole beans.
Fruits:
Grapes: Both wine and table varieties are prone to powdery mildew.
Apples and Pears: Especially in humid climates.
Strawberries: Can be affected under certain conditions.
Ornamentals:
Roses: Very susceptible to powdery mildew, particularly in humid environments.
Lilacs: Often affected, especially in areas with poor air circulation.
Zinnias and Phlox: Commonly get powdery mildew in gardens.
Begonias: Susceptible in both outdoor and indoor environments.
Trees and Shrubs:
Dogwoods: Particularly in shady, damp areas.
Oaks: Some species are prone, especially in moist conditions.
Maples: Certain varieties can be affected.
Proper Care and Maintenance: Plants that are well-cared for, with proper watering, fertilization, and pruning, are generally more resilient to diseases, including powdery mildew. Healthy plants can often fend off or recover from infections more effectively than stressed or neglected ones.
“Grow Your Own Food” blog posts
See the full list of our Grow Your Own Food blog posts. Each post is assigned ”tags” which are under the post title. If you need a quick answer to a gardening question give us a call or send a text to our customer support team – support[at]deep-roots-project.org AND 708-655-5299.
Deep Roots online store
See our online store for details about prices, ordering and delivery of raised beds, planter boxes, microbe-rich compost, worm castings, leaf mulch and more. We don’t sell traditional soil, since we use 100% compost as our growing medium. Our online store has 2 sections – (1) raised beds and planter boxes and (2) compost, worm castings, fertilizer.
Please contact our customer support team before placing an order online so we can assist you with the details and answer your gardening questions. You can pay by credit card in the store or by check.
(708) 655-5299 and support[at]deep-roots-project.org
Please leave your cell phone number when you sign up for our eNewsletter, if you want text message announcements now and then.
Donations help us provide organic kitchen gardening education to individuals, organizations, and entire communities. Thank you in advance for contributing to our community and for sharing our website and blog with friends and family.

Protection from the Squash Vine Borer
By following these instructions, you can effectively protect your squash plants from the squash vine borer moth and its caterpillar, ensuring a healthy and bountiful harvest. Trombocino squash is an Italian heirloom that provides it own natural protection against this pest because of it very hard lower stem.
By following these instructions, you can effectively protect your squash plants from the squash vine borer moth and its caterpillar, ensuring a healthy and bountiful harvest. Trombocino squash is an Italian heirloom that provides it own natural protection against this pest because of it very hard lower stem.
Summary:
Here are detailed instructions for protecting a squash seedling from the squash vine borer moth and caterpillar using the plastic cup method. A small plastic flower pot or plastic cup is placed around the root ball of a seedling before it is planted in the ground.
The bottom of the pot or cup must be removed with scissors. The side must be slit also so the pot or cup can be wrapped around the root. The cup is partially under the soil and partially above the soil. Bug netting can also protect the plant from the moth laying its eggs on or near the plant. The cup protects the lower stem from the caterpillar boring inside the stem.
Materials needed:
Small plastic flower pot or plastic cup
Scissors
Bug netting (optional)
Squash seedlings
Gardening trowel
Soil
Instructions:
Prepare the plastic cup or small flower pot:
Remove the Bottom: Use scissors to cut out the bottom of the plastic cup or flower pot. This creates an open cylinder that will allow the plant’s roots to grow into the soil.
Slit the Side: Make a vertical cut from the top to the bottom of the cup. This slit will enable you to wrap the cup around the root ball of the seedling.
Prepare the seedling:
Carefully remove the squash seedling from its nursery container, ensuring you keep the root ball intact.Place the cup around the root ball:
Gently wrap the prepared plastic cup around the root ball of the seedling. The slit should allow you to easily encircle the root without damaging it.Plant the seedling:
Dig a hole in your garden bed that is deep enough to accommodate the root ball and the plastic cup.
Place the seedling, with the plastic cup around its root ball, into the hole. Ensure that the cup is partially buried under the soil and partially above the soil. The buried part will protect the roots and lower stem, while the exposed part will prevent the squash vine borer moth from laying eggs near the base of the plant.
Secure the cup:
Firmly press the soil around the base of the plastic cup to keep it in place. Ensure that the cup stands upright and does not tip over.
The cup should protrude about 2-3 inches above the soil surface. This barrier will help protect the lower stem from the caterpillars boring inside.
Optional: apply bug netting:
To provide additional protection, you can cover the entire plant with bug netting. This will prevent the moth from reaching the plant to lay eggs.
Secure the netting tightly around the base of the plant, ensuring there are no gaps where the moth can enter.
Check regularly to ensure the netting is still secure and the plant has enough space to grow.
Regular monitoring:
Regularly inspect the plant for any signs of squash vine borer activity or damage. Look for small holes at the base of the stem, frass (sawdust-like debris), and wilting leaves.
If you notice any signs of infestation, take immediate action to remove the caterpillars manually and treat the plant with appropriate organic pesticides if necessary.
“Grow Your Own Food” blog posts
See the full list of our Grow Your Own Food blog posts. Each post is assigned ”tags” which are under the post title. If you need a quick answer to a gardening question give us a call or send a text to our customer support team – support[at]deep-roots-project.org AND 708-655-5299.
Deep Roots online store
See our online store for details about prices, ordering and delivery of raised beds, planter boxes, microbe-rich compost, worm castings, leaf mulch and more. We don’t sell traditional soil, since we use 100% compost as our growing medium. Our online store has 2 sections – (1) raised beds and planter boxes and (2) compost, worm castings, fertilizer.
Please contact our customer support team before placing an order online so we can assist you with the details and answer your gardening questions. You can pay by credit card in the store or by check.
(708) 655-5299 and support[at]deep-roots-project.org
Please leave your cell phone number when you sign up for our eNewsletter, if you want text message announcements now and then.
Donations help us provide organic kitchen gardening education to individuals, organizations, and entire communities. Thank you in advance for contributing to our community and for sharing our website and blog with friends and family.

Growing and Using Comfrey
Comfrey (Symphytum officinale) has been used for centuries in herbal medicine, but its use comes with significant safety concerns. The primary concern is the presence of pyrrolizidine alkaloids (PAs), which can cause severe liver damage and are potentially carcinogenic. (Searched 4 sites)
Comfrey (Symphytum officinale) has been used for centuries in herbal medicine, but its use comes with significant safety concerns. The primary concern is the presence of pyrrolizidine alkaloids (PAs), which can cause severe liver damage and are potentially carcinogenic. (Searched 4 sites)
Safe Uses of Comfrey
Topical Applications:
Wound Healing and Skin Conditions: Comfrey can be used safely on unbroken skin for treating wounds, bruises, sprains, and other minor injuries. It is often used in the form of poultices, salves, and ointments. However, it should not be applied to broken skin or used for more than 10 days in a row to avoid absorption of harmful PAs (Drugs.com) (SPICEography) .
Gardening:
Fertilizer: Comfrey leaves are rich in nutrients like nitrogen, phosphorus, and potassium, making them excellent for use as a natural fertilizer. The leaves can be steeped in water to create a liquid fertilizer or added directly to compost (Common Sense Home).
Unsafe Uses of Comfrey
Internal Use:
Ingesting Comfrey: Consuming comfrey, whether as a tea, in salads, or in other foods, is generally considered unsafe due to the risk of liver damage and other serious health issues. The PAs present in comfrey can accumulate in the liver and cause veno-occlusive disease, leading to liver failure and potentially cancer (Drugs.com) (SPICEography) .
Conclusion
While comfrey can be beneficial for certain topical applications and in gardening, it is not safe for internal consumption due to the high risk of liver toxicity and other serious health problems. It is always best to consult with a healthcare provider before using comfrey, especially if you have underlying health conditions or are taking other medications.

Swede Midge Fly Management
Suburban organic gardeners in Illinois usually protect their Brassica crops (kale, collards, cabbage, etc.) from cabbage moths and their caterpillars. But, brace yourselves for a new Brassica family pest challenge. The swede midge fly (Contarinia nasturtii), an invasive pest from Europe ,has begun wreaking havoc on brassica crops including also radish, horseradish, rutabaga, turnip, rapeseed (canola), arugula, bok choy and Chinese cabbage. Crops that are most damaged include common favorites such as broccoli, cauliflower, cabbage, kale, kohlrabi, collards and Brussels sprouts.
Suburban organic gardeners in Illinois usually protect their Brassica crops (kale, collards, cabbage, etc.) from cabbage moths and their caterpillars. But, brace yourselves for a new Brassica family pest challenge – the tiny Swede Midge fly. There are conventional toxic pesticide sprays that do control and prevent swede midge that we can’t use in our organic gardens. Deep Roots consulted with the Chicago Botanic Garden Plant Information Service about the best non-toxic solutions.
Protect Collards, Kale & Cabbage from Pests
The swede midge fly (Contarinia nasturtii), an invasive pest from Europe, has begun wreaking havoc on brassica crops. including radish, horseradish, rutabaga, turnip, rapeseed (canola), arugula, bok choy and Chinese cabbage. Crops that are most damaged include common favorites such as broccoli, cauliflower, cabbage, kale, kohlrabi, collards and Brussels sprouts.
Swede midge are very tiny lightweight flies that can spread long distances by the wind. Their life cycle is between May to October in Zones 5 and 6 (Chicagoland area). The first year or so of its presence often goes unnoticed, but un-recognized populations can quickly build up and devastate brassica crops. There are conventional toxic pesticide sprays that do control and prevent swede midge that we can’t use in our organic gardens.
Swede midge is a pest in many parts of the northeastern United States, including New York, Vermont, and New Hampshire. It has also been found in Minnesota, Illinois, and Wisconsin.

Understanding the swede midge life cycle
We expect the swede midge will find our collards kale and cabbage. Once the damage is visible there is no way to save the plant. Cut down the plant stem at the soil and put in the garbage – not the compost bin.
In the Chicago area, encompassing USDA Hardiness Zones 5b and 6a, adult swede midge (Contarinia nasturtii) typically begin to emerge from overwintering pupae in May . This emergence marks the start of their active period, which extends through October, during which they can produce multiple overlapping generations
The fly’s life cycle repeats about 5 times every growing season. Adult flies live for a few days, just long enough to reproduce and lay 2 to 50 eggs on the newest growth points of a Brassica host plant. The emerging larvae (maggots) feed by secreting digestive enzymes, damaging the plant’s growing points and causing deformities or preventing proper head formation.
After the maggots are well fed and fully grown, they dive into the top inch of soil to pupate – transform back into a fly. They emerge from the soil as adult flies within a week or two, depending upon soil temperature and moisture, and start the cycle over again. But if buried below 2 inches, the pupae can survive for two years and can emerge if digging or tilling brings them higher up at a later time.
Identifying swede midge damage

In the worst cases, damage to single-stemmed heading brassica crops such as broccoli, cauliflower and cabbage looks as if the plants have been pinched back, preventing a single large head from forming. Because feeding damage can vary greatly depending on where the larvae feed on the plant and on the stage of plant development, it can be confused with many other issues.
Eat the unaffected collard, kale and cabbage leaves
This method has been approved by the Chicago Botanical Garden Plant Information Service (847-835-0972). If a collard, kale and cabbage plant is infested with swede midge, you might still consider eating the unaffected leaves, but it's essential to take a few precautions. Make sure the leaves are thoroughly cleaned and cooked to minimize any potential risks associated with the infestation. Here are some steps to consider if you want to eat the unaffected leaves:
Inspect the whole plant: Carefully cut off any infected stems or parts.
Inspect the leaves: Carefully check the leaves for any signs of damage or presence of larvae. The larvae are very small and might not be immediately visible to the naked eye.
Wash thoroughly: Even if some leaves appear unaffected, wash them thoroughly in water, possibly with a mild soap solution, to remove any larvae or eggs that might be present.
Cook the leaves: Cooking can help ensure that any remaining insects or pathogens are killed. It's generally safer to eat cooked leaves than raw, especially if there's a chance they've been exposed to pests.
Monitor the plant: Keep an eye on the plant for further signs of infestation. If the infestation is severe, it might be better to remove and destroy the affected plant to prevent the pests from spreading.
Remove a plant without pulling the root in order to keep the healthy soil microbes in the soil. Not disturbing the soil as much as possible is a basic principle of our regenerative gardening method. Pull out the roots of only root crops like beets.

Recommendations for successful organic food harvest
Until agricultural scientists find an effective and simple way to organically and safely prevent or control swede midge. You won’t know if swede midge has already infected your soil before you plant. Deep Roots have suggestions for new growing seasons.
Protect a few collards, kale and cabbage plants with bug netting. See below details for a few options and links to videos.
It’s risky to buy seedlings from a garden center since they could be already infected by swede midge. Only buy them if they have been stored indoors.
DON’T grow Brassica crops this year. Substitute other leafy greens and veggies. Three suggestions
Grow regular spinach which must be started from seed. Best to plant the seeds in November.
Grow Red Malabar Spinach from seed indoors to give it a head start. This leafy green veggie doesn’t look like normal spinach, but has a similar taste. Unlike normal spinach, it grows well through the warm summer season. Plant it when you plant summer crops like tomatoes. It’s a vine that winds around any structure, trellis or plant nearby. Give it a big tall trellis.
Buy Swiss Chard seedlings at garden centers. It grows through spring and summer. Eat the leaves and the stems. We usually add the leaves to a salad and make hummus from the stems.
Beet greens look and taste like Swiss Chard. Direct sow the seeds in spring
Other veggies to try are:
Lettuce (various types, including romaine, butterhead, and iceberg)
Fresh herbs (cilantro, dill, parsley, chives, etc.)
Green onion
Leek
Chicory, Endive, Escarole, Radicchio
Fennel
French Tarragon
Asparagus
Celery

Make physical barriers with bug netting:
You won’t know until you try to grow Brassicas if your soil is already infected. If your soil is NOT already infected, physical barriers are a crucial defense mechanism. Cover your brassica plants with fine insect netting throughout the growing season. Place small groups of Brassica family crops under bug netting bags, or cover your whole bed with bug netting.
Contact our customer support team about buying bug netting bags and sheets from us. The bug netting page is not yet on our store.
Bug netting bags protect small groups of plants in a raised bed: Bags can be different heights. Learn more details in this video: Growing Georgia Southern Collards Greens about harvesting collard greens and protecting them with large 4 x 4 foot netting bags supported by garden stakes. Their system protects from cabbage worms and butterflies, since they haven’t yet been invaded by Swede Midge.
-Tall Brassicas (like kale, collards): Since these plants can grow 4 to 5 feet tall, use larger bug netting bags designed for big fruiting plants. Support the netting with 2-3 wooden stakes inside the bag to prevent it from resting on the plants and potentially damaging them. Use stones, wood or garden staples to hold down the bottom of netting against the soil.
-Short Brassicas (like cabbage): Use smaller bug netting bags suitable for their height. Or place sheets of bug netting on the plants supported by sticks or hoops made of bendable white PVC half-inch pipes, see our blog post Installing Hoops on Raised Beds.Bug netting on a cloth grow bag: Plant 2-3 collard plants in a cloth grow bag. Support the netting with a wooden stake or a wire hoop placed inside the bag to prevent it from resting on the plants. Put something soft at the top the stake so it doesn’t poke a hole in the netting,
Bug netting supported by hoops: Cover your entire bed with a sheet of fine bug netting supported by hoops. You can use various materials for the hoops. The hoops can be pushed into the soil or attached to the raised bed frame. Learn more details in this video: How to Make Hoops for Raised Beds (4 Ways) and see our blog post Installing Hoops on Raised Beds.
Bug netting attached to a hinged hoop house: Another option is to hinge a wooden rectangle to the top of your raised bed. Attach the hoops to the rectangle. Learn more details in this video: How to Build a Hinged Hoop House
Order Bug Netting and Bags from Deep Roots
You can order bug netting and bags from Deep Roots. We have not yet added an online store page for netting. To order call, text or email our customer support team – support[at]deep-roots-project.org AND 708-655-5299.
Other Brassica Family Pests
Please see our Brassica Family Pests and Diseases post for information about other Brassica family pests.
“Grow Your Own Food” blog posts
See the full list of our Grow Your Own Food blog posts. Each post is assigned ”tags” which are under the post title. If you need a quick answer to a gardening question give us a call or send a text to our customer support team – support[at]deep-roots-project.org AND 708-655-5299.
Deep Roots online store
See our online store for details about prices, ordering and delivery of raised beds, planter boxes, microbe-rich compost, worm castings, leaf mulch and more. We don’t sell traditional soil, since we use 100% compost as our growing medium. Our online store has 2 sections – (1) raised beds and planter boxes and (2) compost, worm castings, fertilizer.
Please contact our customer support team before placing an order online so we can assist you with the details and answer your gardening questions. You can pay by credit card in the store or by check.
(708) 655-5299 and support[at]deep-roots-project.org
Please leave your cell phone number when you sign up for our eNewsletter, if you want text message announcements now and then.
Donations help us provide organic kitchen gardening education to individuals, organizations, and entire communities. Thank you in advance for contributing to our community and for sharing our website and blog with friends and family.

Environmental Pest Management (EPM)
Environmental Pest Management (EPM) for organic food gardening is responsible environmental stewardship. Although EPM is modeled after the older Integrated Pest Management (IPM) it doesn’t allow use of toxic chemicals that are banned under the USDA organic standards. Contact your local botanic garden information service OR state university agricultural extension for help to identify treating pests. But only use the organic safe sprays we recommend in this post. Learn more about our growing method in two recently revised blog posts.
Environmental Pest Management (EPM) for organic food gardening is responsible environmental stewardship. Although EPM is modeled after the older Integrated Pest Management (IPM), it doesn’t allow use of toxic chemicals that are banned under the USDA organic standards. Contact your local botanic garden information service OR state university agricultural extension for help in identifying and treating pests. But only use the organic safe sprays we recommend in this post.

Learn more about our growing method in two recently revised blog posts.
EPM is all about multi-tasking
EPM tools and methods suppress and marginalize pests, and don’t totally eliminate all pests forever.
Previous attempts to totally eliminate pests with toxic chemicals never worked. Beyond Pesticides has a webpage with all the diseases caused by toxic chemical pesticides.
The combined use of EPM tools and methods are far more effective than the tools individually. These tools have limited impact as solo treatments. But combining EPM practices will deliver substantial pest relief to your garden without jeopardizing our environment or humans. Examples of multiple care methods include selection of diseases resistant varieties, proper spacing for air circulation, siting plants for their specific light requirements, proper watering, crop rotation, and bio-diverse planting. Throughout the season remove any badly affected leaves, practice good sanitation in fall by removing plant material. Find further discussion on insect and disease prevention at the Organic Gardening in NC State Extension website.
Treat the whole garden and use all the EPM tools all the time. We provide details below about what sprays to use and the frequecy of use. Not all pest control measures apply to all conditions. If you have an extreme infestation call us for a recommendation about using high-potency organic sprays.
Regularly practice ALL EPM methods
EPM is an integrated package. It's important to regularly practice all EPM methods.
Preventing pests and diseases will be far easier than managing them later. If you use all the EPM tools regularly you will have a major reduction in pests and diseases throughout the season. Spraying organic pesticides and fungicides regularly is only one supporting tool and will not be fully effective alone. Respect and practice all the parts of EPM as one tightly integrated system, so eventually they become habits that you are accustomed to and enjoy doing.
Pest prevention with a bio-diverse garden at its core is the key to success for your plants, your harvest and your enjoyment of gardening. Biodiversity planting is the foundation of EPM. Practicing EPM without a bio-diverse garden will be only partially effective - not the full protection you need for a flourishing garden and peace of mind. Learn more about practical steps of biodiversity and succession planting.
The entire EPM system has universal applications in every region and climate zone. Contact your local agricultural extension or botanic garden information service for help if you see a persistent pest problem.
Planting for biodiversity
Mass plantings of a single crop increases the vulnerability of the plants to insect pests and diseases. A proven method for discouraging pest infestations is the bio-diversity planting method. Traditionally, vegetable gardens follow the pattern of “mono-cropping” - growing a single crop. That means segregating cultivars (cultivated varieties) into rows and blocks, or filling a small plot or bed with a single crop. That practice mimics commercial production, perhaps based on the assumption that commercial growers know best. If a tomato plant is susceptible to Late Blight and it is surrounded by tomatoes, they are all vulnerable and the possibility of mass-infestation becomes a probability.
With bio-diversity a dozen or more crop varieties are placed throughout the beds including root crops, leafy greens, flowers, herbs, and fruiting crops (tomatoes and squash), beans and peas. Compared to the standard garden layout it looks like chaos but it resembles the biodiversity found in natural systems.
Choosing disease resistant plants
Planning your garden by choosing disease resistant plants is another useful EPM strategy for keeping plants healthy. Vegetable breeding research typically integrates disease resistance into their programs. Many bacterial, fungal, and viral problems can be marginalized by choosing seeds whose genetics favor the host plant over the pathogen. This method reduces infestation but doesn't eliminate diseases completely. Unfortunately, it doesn’t help suppress insect pests.
Take the time to learn how to plant many crops from seed by exploring seed catalogs. They are a source of helpful information and a great learning tool. Our favorite catalogs are High Mowing Seeds, Johnny’s Seeds, and Baker Creek Seeds.

Beneficial and predatory insects
The insect world is populated by predators and prey. We can recruit Insect predators to eliminate their prey. Ladybugs consume huge amounts of aphids. Parasitic wasps feast on cabbage loopers and tomato hornworms. The preying mantis targets grasshoppers. Some nematodes prey on slugs and snails. Parasitizers, like Trichogamma wasps, are bugs that lay eggs in their prey and when the larvae hatch, they feed on the prey. Dragonflies are a top predator with a voracious appetite that keep a healthy balance between all the insects in your yard including ornamental and native plants.
Various beneficial insect species can be purchased at garden stores and are used to control invasions of certain insects or just to achieve balance among insect populations. In some cases it will be possible to establish communities of such predators in your garden. Pollinators will be attracted by many species of flowers and aromatic herbs. Diversity of plants leads to diversity of insects.
Pest management with flowers & herbs
HERBS
Basil – Repels thrips, flies and mosquitoes.
Cilantro – Wards off aphids, Colorado potato beetles, and spider mites
Chives – Repels aphids
Dill – Can keep aphids, spider mites and squash bugs away from vegetables
Oregano – Repels cucumber beetles and cabbage butterfly. Good understory crop that you can plant everywhere. Cut some out when you need space for a new plant.
Mint – Plant mint in small containers and place them next to your beds. If you plant the mint in your beds they will take over!
FLOWERS
Cosmos – Attracts good insects like bees and butterfly, also repels the corn earworm
Marigold – The marigold is probably the most well-known plant for repelling insects. French marigolds repel whiteflies and kill bad nematodes. Mexican Marigold are the most potent for pest prevention but are not the most beautiful variety. Since garden centers will likely not stock these seedlings, grow them from seed indoors or in a “cold frame” (a raised bed protected with a glass or plastic cover).
Nasturtium – They deter striped pumpkin beetles and other pests of the cabbage family. Nasturtiums grown near squash are said to repel squash bugs. They can be used as a trap crop for aphids.
Sunflowers – They repel asparagus beetles, leafhoppers, a range of aphids, tomato worms, and a good many other pests.
BIRDS
Birds are often a neglected piece of this puzzle, but their impact on insect populations should not be underestimated. Install some bird feeders near the garden. Encouraging their presence will lead to more ecological balance and fewer pest issues.
The breadth of insect knowledge is encyclopedic, but you need not become an entomologist to benefit from it. Just be aware of the opportunities and take advantage of them as they present themselves. Consider installing bird houses and hummingbird feeders.
Visual inspection and manual removal
Make visual inspection your habit. It’s important to keep in mind that there is no substitute for visual inspection of the garden and physical removal of pests when possible. You may discover a huge hornworm dining on a tomato plant - you can grab it and remove it from the garden. Fungal and bacterial diseases that appear on the lower leaves of plants can be simply removed. When you’re in the garden be on the lookout for invasive activity – and act on it! Know when garden hygiene is necessary to prevent spreading of fungal and bacterial diseases by the gardener (your tools and fingers).
Control fungal diseases in humid climates. In areas like the Midwest and East Coast with humid weather and rampant fungal, viral and bacterial plant diseases that live in the soil get in the habit of regularly disinfecting tools and pots. Dip (or spray) clippers, shears and scissors in 100% alcohol before starting to remove infected leaves from a plant. Dip again each time you clip off a leaf or stem. Make sure it falls into a bag and not on the plant or soil. Spray them again when you are done. When using scissors to cut off infected leaves from tomatoes let them fall into a paper bag. Don’t use your fingers to pull them off which will just spread the disease further. Use hand sanitizer on your finger tips if you touch infected leaves. Use disposable gloves so your fingers don’t touch the alcohol.
Use dilute bleach to sterilize large tools and pots before reusing them. Here is our method: (1) Wash off soil and debris in a tub of soapy water with a small bristle brush. (2) Rinse. (3) Soak in 10% bleach for 20 minutes. (4) Let them dry. (5) Soak them in fresh clean water for a few minutes. (6) Let them dry again. Doing this easy cleaning task when necessary will save stress and time later.
Prevent flying pests from landing on crops
Physically blocking flying pests from landing on crops and laying eggs can be an effective method for protecting your plants. Remember that these physical barriers should be employed alongside other integrated pest management (IPM) strategies, such as biological control and crop rotation, to ensure long-term, sustainable pest control.
Here are some ways to achieve this:
Floating row covers: These lightweight, translucent fabrics can be draped over crops and secured at the edges, providing a physical barrier that prevents pests from reaching the plants. Row covers allow sunlight, air, and water to pass through, so they don't hinder plant growth. They are effective against cabbage moths, squash vine borer moths, and other pests like flea beetles, aphids, and leaf miners.
Insect netting: Similar to row covers, insect netting can be draped over crops or used to enclose an entire growing area. The mesh size should be small enough to prevent the target pests from passing through. Insect netting can protect various crops from pests like cabbage moths, squash vine borer moths, carrot rust flies, and whiteflies.
Greenhouses or high tunnels: Enclosing your crops in a greenhouse or high tunnel can provide a physical barrier against flying pests. Good ventilation is essential to avoid overheating and to maintain healthy plants. Greenhouses and high tunnels can protect a wide range of crops, such as tomatoes, peppers, lettuce, and cucumbers, from various flying pests, including aphids, whiteflies, and moths.
Companion planting: Some plants release chemicals that repel pests or attract beneficial insects that prey on pests. Planting these companion plants near your susceptible crops can help deter flying pests. For example, nasturtiums can repel cabbage moths, while marigolds can help repel whiteflies.
Physical traps: Sticky traps, pheromone traps, and light traps can be used to catch and reduce the population of flying pests. These traps can be effective against pests like cabbage moths, squash vine borer moths, and whiteflies.
Root and lower stem protection: Prevent the Squash Vine Borer from laying its eggs where the root and stem connect by surrounding that area with a sturdy paper cup with the bottom cut out. OR wrapping the area in aluminum foil.
Many crops can be protected this way from other flying pests:
Brassicas (cabbage, kale, broccoli, cauliflower) from cabbage moths and cabbage root maggots
Tomatoes, peppers, and eggplants from tomato hornworms and whiteflies
Lettuce and leafy greens from aphids and leaf miners
Carrots and parsnips from carrot rust flies
Cucurbits (cucumbers, melons, pumpkins) from cucumber beetles and squash bugs
Use organic pesticides as a last resort
NEEM Oil is often viewed as the be all and end all product for its insecticidal and fungicidal properties. Learn more about Neem Oil uses and drawbacks.
Bacillus thuringiensis or Bt is a naturally occurring soil bacterial parasite. There are different strains available. Learn more about BT – timing limitations, specific insects controlled, and storage/shelf life requirements.
Pyrethrins are derived from plants and are commonly sprayed as mosquito repellants. They are fairly nonselective insect killers and highly toxic to bees.
Spinosad is derived from a bacterium and classified as an organic pesticide. Try to avoid using it because It is also toxic to bees.
Trichoderma is a naturally occurring soil fungus that displaces gray mold. It has also shown some insecticidal impact. It is generally used agriculturally. There's minimal information on its usefulness in the home garden. Learn more here.
Insecticidal soap is another option for insect control. See below. Don’t use horticultural oils which are made from refined petroleum. Learn more about Insecticidal soap.
Copper and Sulfur are considered low toxicity, effective fungicides. Fungicides can help slow the spread, but don’t remove the problem. Use them alone with good management practices. They are often used to prevent disease. But it's a lot of spraying. It's always a good idea to do a test application on a small area, wait 24-48 hours to see if there is any phytotoxic effect.
Our Innovative Food Gardening Method
Learn more in our two recently revised blog posts.
Our online store
See our online store for details about prices, ordering and delivery of raised beds, compost, worm castings and more. Please contact our customer support team before placing an order online so we can assist you with the details and answer your gardening questions.
QUESTIONS? COMMENTS?
Contact us at (708) 655-5299 or support[at]deep-roots-project.org.
Stay in touch
Please leave your cell phone number when you sign up for our eNewsletter, if you want text message announcements now and then.
Donations help us provide organic kitchen gardening education to individuals, organizations, and entire communities. Thank you in advance for contributing to our community and for sharing our website and blog with friends and family.

Biodiversity Helps Control Pests
Biodiversity planting methods harness the forces of nature to help protect your garden as well as individual plants from pests and disease. Think of the plant populations as a team with complimentary skills all cooperating together. Balance and a strong ecosystem are achieved for the whole community of plants.
Biodiversity planting methods harness the forces of nature to help protect your garden as well as individual plants from pests and disease. Think of the plant populations as a team with complimentary skills all cooperating together. Balance and a strong ecosystem are achieved for the whole community of plants.

Biodiversity: The Foundation of a Thriving Garden
Abundant productivity in a garden starts with biodiversity—the presence of many different kinds of plants, each playing its own role. Scientific research shows that diverse plant communities improve soil health, attract beneficial insects, suppress pests naturally, and make crops more resilient to stress. In simple terms: the more variety you have, the better your garden can thrive without relying on synthetic inputs.
When we grow only one type of plant in one place, the soil becomes depleted, pests take over, and diseases spread easily. But when we intentionally design for diversity—mixing vegetables, herbs, flowers, and cover crops—we create a living system where plants support one another. Some fix nitrogen, others repel pests, and many attract pollinators or break up compacted soil. This natural teamwork is the secret to healthy, high-yield gardens.
Let abundance flourish through this careful orchestration. Biodiversity isn’t just beautiful—it’s functional. When you plant a rich mix of species and rotate your crops each season, you not only grow more food, you grow healthier soil and a more self-sustaining ecosystem. Even small changes—like interplanting herbs among your vegetables or choosing three different types of tomatoes instead of one—can make a big difference.
Learn how to put biodiversity to work in your raised bed or backyard plot. Whether you’re brand new to gardening or looking to deepen your skills, biodiversity is one of the most rewarding tools you can use to build a thriving, regenerative garden.
Be creative with biodiversity
Your imagination defines the limit of biodiversity in your garden. Be a creative gardener. How do you envision your garden? Experiment with many combinations of plants. Old fashioned gardening has many rules like planting in neat rows. Biodiversity gives you the freedom to co-create with nature. A biodiverse raised bed may look like chaos compared to the traditional garden layout. But actually it resembles the biodiversity found in natural systems.
As above, so below. There are tens of thousands of microbial species living in your soil. To balance that we need to preserve plant diversity above the soil. Our diversity mimics the diversity below ground. Learn more in our recently updated blog post about soil microbes and compost.
We recommend at least a dozen different plants including veggies, herbs and flowers in each bed and the large containers surrounding the bed. It can be dominated by a single veggie like tomatoes, with a dozen smaller plants scattered around. There are many ways to do this and it's up to you the gardener to decide. Smaller plants that need sun should be on the south side of the larger plant or at least not shaded by them.
Don’t try to plan your garden alone. For most gardeners, January and February are the planning months for the new gardening season. Give yourself time to explore several possibilities. Do some reading. Explore the Deep Roots blog posts. Talk to other food gardeners. Contact our support team for some phone discussions.
Take on as much as you can handle the first year. Send us questions when you run into a problem. Gardening is all about trying new things and learning from your mistakes. Learn more about our Innovative Method in our 2 recently updated posts.
Biodiversity basics and tips
A biodiverse food garden has a mixture of a dozen or more different plants growing throughout the bed and in surrounding containers including root crops, leafy greens, flowers, herbs, fruiting crops (tomatoes, eggplant and peppers), beans & peas and native plants.
The mixture of plants confuses pests who seek out a good size patch of their favorite plant.
Don’t plant the crops from the same family next to each other. A large group of the same plant has a stronger scent and attracts more pests and can more easily spread diseases.
Two raised beds is even better than one for biodiversity planting.
Plant large plants like tomatoes on opposite sides of your bed or in separate containers to discourage disease spread. Or, plant several tomatoes in one bed with basil and marigolds between them.
If you plant a tomato in a big pot strategically place basil and lettuce seedlings around the base of the tomato and watch them grow together. Prune off most of the tomato’s lower foliage to allow more sun to reach the kale and basil.
Fill empty spots with plants from a different family when you harvest a whole plant. Maximize your harvest by filling empty spots mid-season with seeds or seedlings.
Plant seeds of small plants in several spots around the bed in small clusters (6-8” diameter) or short rows. Examples of small plants are beets, carrots, radishes, onions.
If you want to grow a lot of the same crop like tomatoes, squash and cucumbers, figure out a way to plant them as far away from each other as possible. They can grow in their own large containers.
Environmental Pest Management (EPM) is a method that is used in combination with Biodiversity Planting to prevent and manage pests & diseases. But biodiversity is not a complete solution for any specific pest or disease. We also use organic pesticides and fungicides in limited quantities for pest prevention.
When you focus on a few crops because your family loves them and they are super healthy, plant lots of different flowers, herbs and small crops (lettuce, beets, radishes, strawberries, basil, marigolds, nasturtiums) at the edges of your bed and in the spaces between them.
Don’t block the sun with large plants. Place taller plants like tomatoes at the north side of a raised bed. Place the shortest plants on the south side of the bed.
Sunlight: Place your raised bed and large containers in the sunniest spot of your yard. 8 hours of sun or more is optimal. Some plants are okay with 5 to 8 hours of sun. They may be smaller and take longer to grow to maturity.
Shade a cool season plant like lettuce in mid-summer next to a tall tomato plant.
Plant small and medium size veggies that need less sun like lettuce and dill about 12” from the tomato plant’s main stem. Prune off most of the tomato’s lower foliage up to 10 inches.
Two or three tomato plants in your raised bed is fine if you prune them properly and grow them vertically on tomato cages or trellises.
Don’t plant huge plants like squash in your raised bed even if it grows up a trellis. Plant a huge plant in a large container next to the raised bed or in a separate bed. Place the container on the north side of your raised bed so it doesn’t block the sun. For example Butternut squash will sprawl all around the outside of the bed even if you have a trellis.
Often, garden centers don’t have the seedlings you want mid-season. Be prepared with fresh seedlings you grow yourself by growing a few seedlings from seed in small pots filled with the half and half mixture of our microbe-rich compost and our worm castings. Make sure they get enough sun and water them daily.
A planting calendar for your climate zone will tell you when to plant and harvest. We provide a Planting Calendar Chart for the Chicago Area since most of our gardeners are there. Ask your local state university agricultural extension for a planting calendar.
Greater plant diversity has most impact
Greater diversity of veggies, herbs & flowers has the most impact. Select plants for your bed and the surrounding containers from at least 5 of the 10 Biodiversity Plant Groups. (See list below) Ideally, select around 3 individual plants from the same plant variety to plant in one 4 x 8 raised bed. This adds up to about 10 to 15 plant small to medium-size varieties per bed and about 30 individual total plants (or clusters of tiny plants) per bed.
This list of major functional garden crop groups are not “taxonomical” classifications used by professional plant scientists. These are simplified groups organized to help you make gardening decisions. Try to plant at least five or six of these groups in each bed and you’ll achieve adequate diversity. Planting multiple cultivars within a group doesn’t contribute much to diversity. This is not a rule, rather it’s a guideline. The guideline also applies to cloth planters, on a reduced scale.
Our biodiversity plant groups
Legumes: peas, bush beans, pole beans
Herbs: (culinary & medicinal): basil, lavender, peppermint, lemon balm. sage, oregano (Used for bee attraction and repelling insects)
Flowers: marigold, nasturtium, calendula, echinacea, cosmos (Learn about each flower’s benefit in our post Environmental Pest Management.
Brassicas: cabbage, collard, kale, broccoli, cauliflower, brussel sprouts
Fruiting veggies: eggplant, tomato, peppers
Salad Greens: lettuce, spinach, swiss chard
Root veggies: beets, carrots, onions, scallions, garlic, radish, potato, sweet potato
Grain: Corn
Cucurbits: melons, cucumbers, squash, gourds
Perennials: Asparagus, artichoke (warm zones only), strawberry, bramble berries (thorny berries like blackberry and raspberry). (Blueberries are hard to grow since they need acid soil.
Cover crops: mustard, buckwheat, cowpeas
Our online store
See our online store for details about prices, ordering and delivery of raised beds, compost, worm castings and more. Please contact our customer support team before placing an order online so we can assist you with the details and answer your gardening questions.
QUESTIONS? COMMENTS?
Contact us at (708) 655-5299 or support[at]deep-roots-project.org.
Stay in touch
Please leave your cell phone number when you sign up for our eNewsletter, if you want text message announcements now and then.
Donations help us provide organic kitchen gardening education to individuals, organizations, and entire communities. Thank you in advance for contributing to our community and for sharing our website and blog with friends and family.

How to Sterilize Garden Tools
Garden tools play a crucial role in maintaining a healthy and beautiful garden. They help us till the soil, plant seeds, trim the plants and keep the garden in pristine condition. However, if not properly maintained and sterilized, garden tools can spread diseases and pests from one plant to another, leading to significant damage and loss. In this blog post, we'll discuss the best ways to sterilize garden tools to keep your garden free of any harmful organisms.
Garden tools play a crucial role in maintaining a healthy and beautiful garden. They help us till the soil, plant seeds, trim the plants and keep the garden in pristine condition. However, if not properly maintained and sterilized, garden tools can spread diseases and pests from one plant to another, leading to significant damage and loss. Tips for sterilizing small pre-used pots for transplanting seedlings is also highly recommended.
Sterilizing garden tools is an essential step in maintaining a healthy and beautiful garden. There are several methods that can be used to sterilize garden tools, including the use of a bleach solution, boiling water, UV-C light, heat treatment, and hydrogen peroxide. Choose the method that works best for you and your tools, and make sure to sterilize your tools regularly to keep your garden free of any harmful organisms.
Several sterilization methods available
Cleaning the tools before sterilization: Before sterilizing your garden tools, it is essential to clean them thoroughly. This will ensure that any dirt, debris, or residual plant material that may be present on the tool is removed. You can clean your tools with water, soap, and a scrub brush, or by using a solution of water and bleach (1:10 dilution).
Disinfection with a bleach solution: One of the most effective ways to sterilize garden tools is by using a bleach solution. Wear rubber gloves and don’t get the bleach on your skin. Eye protection is also beneficial.You can make a solution of 1 part bleach to 9 parts water and soak the tools in it for at least 10 minutes. This will kill any bacteria, viruses, or fungi that may be present on the tools. Make sure to rinse the tools thoroughly with water after soaking in the bleach solution to remove any residual bleach.
Sterilization with boiling water: Boiling water is another effective way to sterilize garden tools. Fill a large pot with water and bring it to a rolling boil. Carefully place the tools in the pot and let them boil for 10 to 15 minutes. This will kill any harmful organisms that may be present on the tools. After boiling, let the tools cool down before handling them.
Use of UV-C light: UV-C light is a powerful sterilization method that can be used to sterilize garden tools. UV-C light has been proven to kill 99.9% of bacteria, viruses, and fungi in a matter of minutes. You can purchase UV-C sterilization lamps, which are designed specifically for sterilizing garden tools. Simply place the tools in the lamp and let the UV-C light do its work.
Heat treatment: Heat treatment is another effective method of sterilizing garden tools. You can sterilize your tools by baking them in the oven at a temperature of 160°F for 30 minutes. This method is particularly useful for metal tools as it will kill any harmful organisms that may be present on the surface of the tool.
Use of hydrogen peroxide: Hydrogen peroxide is a powerful sterilizing agent that can be used to sterilize garden tools. Mix a solution of 3% hydrogen peroxide with water in a spray bottle, and spray it on your tools. Let the solution sit for 10 to 15 minutes and then rinse the tools with water. This method is particularly useful for sterilizing wooden handles of garden tools.
Proper tool storage
It’s worth noting that while sterilizing your tools is important, it's also crucial to properly store them to extend their life and prevent rust, wear, and other damage. Keep your tools clean, dry, and oiled to prevent rust, and store them in a cool, dry place when not in use. With proper care and maintenance, your garden tools will last for many years and help you create a beautiful and thriving garden.
“Grow Your Own Food” blog posts
See the full list of our Grow Your Own Food blog posts. Each post is assigned ”tags” which are under the post title. If you need a quick answer to a gardening question give us a call or send a text to our customer support team – support[at]deep-roots-project.org AND 708-655-5299.
Deep Roots online store
See our online store for details about prices, ordering and delivery of raised beds, planter boxes, microbe-rich compost, worm castings, leaf mulch and more. We don’t sell traditional soil, since we use 100% compost as our growing medium. Our online store has 2 sections – (1) raised beds and planter boxes and (2) compost, worm castings, fertilizer.
Please contact our customer support team before placing an order online so we can assist you with the details and answer your gardening questions. You can pay by credit card in the store or by check.
(708) 655-5299 and support[at]deep-roots-project.org
Sign up for our newsletter
Please leave your cell phone number when you sign up for our eNewsletter, if you want text message announcements now and then.
Donations help us provide organic kitchen gardening education to individuals, organizations, and entire communities. Thank you in advance for contributing to our community and for sharing our website and blog with friends and family.