
Shade Loving Veggies
A shady yard can feel discouraging to a food gardener. Most people look at a dim corner, a north-facing wall, or the space beneath trees and assume it is a dead zone where vegetables will never grow well. But that assumption is totally wrong.
A shady yard can feel discouraging to a food gardener. Most people look at a dim corner, a north-facing wall, or the space beneath trees and assume it is a dead zone where vegetables will never grow well. But that assumption is totally wrong.
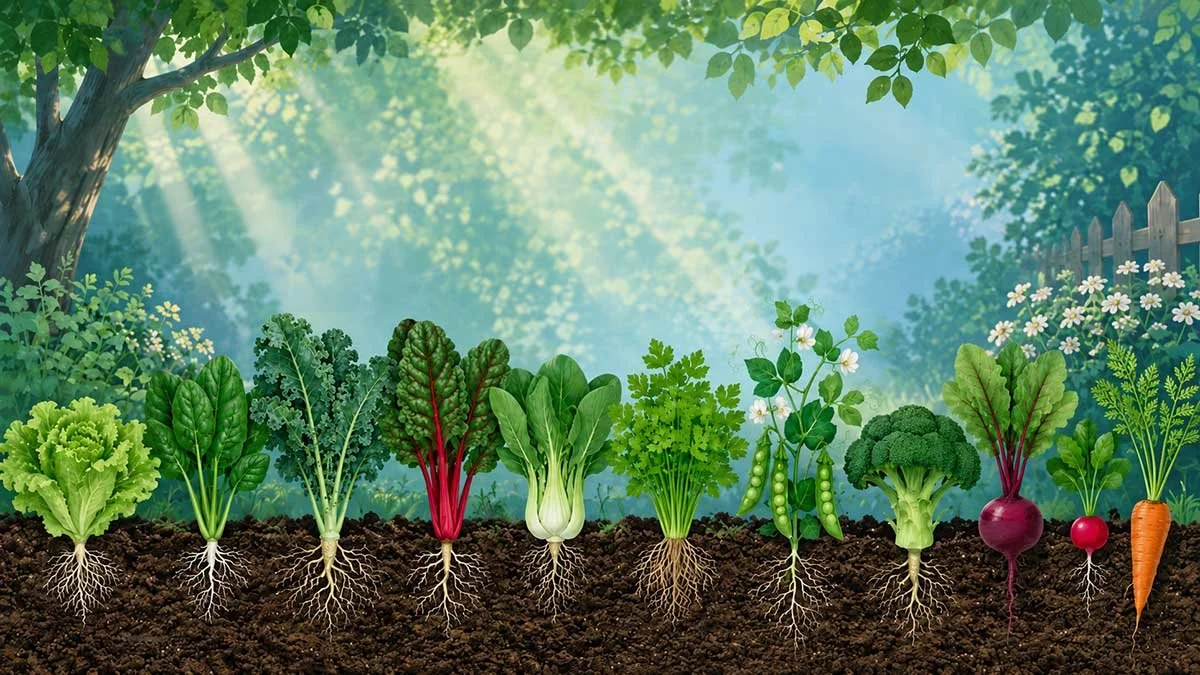
A shady yard can be a productive food garden
Some of the most flavorful, nutrient-dense, and dependable food crops actually perform better in partial shade than in full sun. While many gardeners compete for the brightest, hottest spaces in the yard, an entire group of vegetables, herbs, and root crops quietly prefers cooler, filtered light. These are the plants that often taste sweeter, stay tender longer, bolt more slowly, and need less water when they are protected from intense sun.
This is especially useful for small yards, urban balconies, north-facing beds, and gardens in zones 3 through 9. A space that receives fewer than four hours of direct sun does not have to sit empty. With the right crops, it can become one of the most productive parts of your garden.
Shade gardening is not a compromise
For thousands of years, people did not always grow food in wide-open fields under blazing sun. Much of early food cultivation happened in forest clearings, along woodland edges, beneath canopy trees, and in the dappled light between taller plants. In other words, shade gardening is not some modern workaround. It reflects the way many crops naturally evolved.
Modern agriculture has trained many gardeners to believe that vegetables need eight hours of direct sun every day. Some crops do. But many do not. Plenty of plants developed as understory crops, growing beneath taller vegetation and learning to use filtered light efficiently. Some create more chlorophyll. Others grow larger leaves to capture available light. Some even develop better flavor because they are not constantly stressed by heat and harsh sun.
Many of the crops on this list are not rare or obscure, either. They are common vegetables you may have already tried to grow in full sun — only to watch them bolt, turn bitter, become tough, or stop producing too soon. Often, the problem was not your gardening skill. The problem was that the plant was being forced into conditions it did not actually prefer. In partial shade, some of these crops can double their harvest window. Others become sweeter, milder, more tender, and more productive.
1. Lettuce
Lettuce is one of the clearest examples of a crop that gardeners often grow in the wrong place. It is a cool-season vegetable that struggles in strong sun and heat. When lettuce is exposed to intense light and warm temperatures, it bolts quickly. That means it sends up a flower stalk, turns bitter, and becomes nearly inedible within a short period of time.
In partial shade, lettuce behaves very differently. It stays in its leafy growth stage for weeks longer. The leaves remain sweet, crisp, and tender instead of becoming bitter and tough.
Commercial growers in hot climates often use shade cloth to create exactly the kind of environment lettuce naturally prefers. Historically, lettuce was grown under fruit trees in Persian gardens and in the shaded courtyards of Roman villas.
For the home gardener, lettuce is a perfect crop for the north side of a wall, beneath taller vegetables, or under light tree cover. Instead of harvesting for only a short spring window, you can often keep picking lettuce from spring into early fall.
2. Spinach
Spinach has a similar preference for shade, but its reaction to sun and heat can be even more dramatic. In full sun, spinach bolts faster than almost any other crop in the garden. Once temperatures climb above about 75°F and sunlight becomes intense, spinach acts as though it is under threat. It quickly shifts from leaf production into reproduction, sending up flower stalks and ending the harvest.
That response makes sense when you understand where spinach came from. It originated in the cooler mountainous regions of ancient Persia, where it grew among rocks and larger plants as a true understory crop.
When spinach is moved into partial shade, the leaves often grow larger to capture the available light. The plant stays in vegetative growth longer, and the flavor becomes noticeably sweeter because it is not producing as many stress compounds.Ancient Chinese agricultural texts from more than a thousand years ago even recommended growing spinach in the shadow of taller crops.
3. Arugula
Arugula grown in full sun can become almost too spicy to enjoy. The leaves turn tough, jagged, and intensely peppery, and the plant may bolt within just a few weeks.
In shade, arugula becomes a completely different vegetable.Instead of harsh heat and bitterness, shade-grown arugula develops a nutty, gently peppery flavor with more complexity. It becomes much better suited for salads and fresh eating.
This makes sense because arugula originated in the Mediterranean, not in open, sunbaked fields, but along woodland edges and in the partial shade of olive groves. Italian farmers traditionally grew it between taller crops as a quick-producing understory plant.The practical benefit is huge: in full sun, arugula may produce for only three weeks. In shade, it may continue producing for two to three months.
4. Kale
Kale is often described as nearly indestructible. It can tolerate a wide range of conditions, but that does not mean full sun is always best. In hot climates, kale grown in full sun can become tough and bitter because the plant is under constant heat stress. In partial shade, the leaves are often softer, more tender, and almost buttery in texture. The bitterness that causes many people to dislike kale can nearly disappear.
Scottish farmers traditionally planted kale in the partial shade of stone walls and farm buildings. They knew from experience that kale grown in the cooler, lower light of autumn had the best flavor. Kale also responds to lower light by producing more chlorophyll, which can increase its nutritional density.
5. Swiss Chard
Swiss chard is one of the most reliable crops for a shade garden. It can produce continuously for months in conditions where many vegetables struggle. Its wild ancestors grew in coastal Mediterranean areas where fog, cloud cover, and filtered light were common.
In full sun, chard’s large leaves lose a great deal of moisture through transpiration, which means the plant needs frequent watering. In partial shade, its water needs can drop significantly. The leaves stay crisp and vibrant, and the colorful stems often become even more intense because they are not being bleached by constant sunlight.
Medieval European monastery gardens often included chard in their shadiest corners because it was dependable, nutritious, and required very little attention.
6. Asian Greens
Asian greens include bok choy, mizuna, tatsoi, and many other brassicas. These crops evolved in agricultural systems that often imitated natural forest ecosystems.
They were commonly planted beneath fruit trees or in the dappled shade of bamboo groves. For these greens, shade is not a weakness or a limitation. It is close to their native growing environment.
In full sun, many Asian greens turn spicy, bitter, and tough. They may also bolt quickly. In partial shade, they become mild, slightly sweet, and tender enough for both raw and cooked dishes.
Chinese agricultural manuals from the Song Dynasty described careful planting systems where Asian greens were deliberately positioned in the shadow of taller crops. This was not accidental. It was sophisticated garden design based on generations of observation.
7. Cilantro
Cilantro frustrates countless gardeners. Many people plant it in full sun, watch it bolt within two weeks, and decide they simply cannot grow cilantro. But the real issue is usually not the gardener. It is the light exposure.
Cilantro is biologically programmed to bolt when it experiences heat stress and intense sunlight. That is part of its survival strategy. In full sun, it quickly shifts into flowering and seed production.
In partial shade, cilantro behaves like a completely different herb. It can stay leafy and productive for months rather than weeks. The leaves grow larger, and the flavor becomes stronger but less harsh.
The soapy flavor that some people dislike may also be partly intensified by stress from too much sun. Ancient Egyptian texts mention cilantro being grown in the shade of date palms, and medieval Persian gardens often grew it beside taller herbs.
8. Parsley
Parsley may prefer shade even more than cilantro. In its native Mediterranean habitat, parsley grows naturally in scrubland understories and along forest edges. It is adapted to dappled light and cooler soil.
In full sun, parsley can develop woody stems and lose some of its fresh flavor. In shade, it focuses more energy on leaf production. The leaves become larger, more tender, and more flavorful.
Shade-grown parsley may also be less attractive to pests because the plant is not weakened by heat stress and can maintain stronger natural defenses. Greek and Roman gardeners specifically noted that the best parsley came from shaded garden spaces.
9. Chives
Chives grown in full sun can become sharply onion-like, sometimes too strong for delicate dishes. In partial shade, their flavor softens. They develop a mild, slightly sweet onion taste that works beautifully as a finishing herb for soups, eggs, potatoes, salads, and sauces. Chives are native to cooler regions of Asia and Europe, where they naturally grew in meadows among taller grasses that provided dappled light.
Chinese herbalists more than two thousand years ago noted that chives grown in half-light had superior medicinal qualities. Modern analysis supports the idea that shade-grown chives can contain higher concentrations of beneficial sulfur compounds.
10. Mint
Mint evolved along stream banks and woodland edges, where moisture is consistent and light is filtered. Although mint can survive in full sun, heat and intense light can reduce the essential oils responsible for its signature flavor and aroma. In shade, mint often produces darker green leaves with a stronger fragrance and more complex flavor.
Shade-grown mint is usually less harsh, more aromatic, and more vigorous because it is not constantly battling heat stress. Ancient Roman gardens included mint beds placed in the shade of walls and buildings, and medieval monasteries continued the tradition by growing medicinal mint in cool, shady corners.
11. Peas
Peas need some sun in order to flower and set pods, but they benefit greatly from afternoon shade, especially in warmer climates.
Too much heat and intense light can shorten the pea harvest dramatically. In partial shade, peas often keep producing for weeks longer. Their pods stay tender instead of becoming tough and starchy, and the flavor is noticeably sweeter.
English cottage gardens often planted peas along north-facing walls or in the shade of taller crops. This was not random placement. Gardeners observed over generations that protected peas performed better than exposed ones.
12. Bush Beans
Bush beans can grow in partial shade, though they may produce a little more slowly than they would in full sun. The tradeoff is that they often produce over a longer period. In partial shade, the pods remain tender for days rather than becoming tough quickly. The plants may also resist pests better because they are not under as much heat stress.
The traditional Three Sisters planting system used by Indigenous farmers in Central America placed beans in the partial shade of corn stalks, with squash growing below. This was not primitive agriculture. It was a sophisticated ecosystem design that recognized how beans benefit from some protection from intense light.
13. Radishes
Radishes, especially summer types, can genuinely prefer partial shade. In full sun, they often become sharply peppery. They may also turn woody in the center or split before harvest. In partial shade, radishes develop a milder, crisper, slightly sweet flavor. Japanese daikon radishes were traditionally grown in the partial shade of rice paddies and beneath fruit trees. Korean gardeners also grew radishes in the filtered light of forest gardens.
The advantage for modern gardeners is important: partial shade can make it possible to grow radishes throughout the summer, which is often difficult or impossible in full sun.
14. Broccoli
Broccoli may be one of the most surprising shade-friendly crops. Most gardeners plant broccoli in full sun. It may grow well at first, but then suddenly bolt or form small, bitter heads. Many people blame the variety or the timing, but light and heat exposure are often the real problem.
Broccoli is a cool-season brassica. It evolved in coastal Mediterranean conditions with frequent cloud cover and cool temperatures. It is biologically designed to form heads in moderate light and cool weather. Intense sun can trigger premature bolting.
In partial shade, broccoli often produces larger heads, stays productive longer, and develops a sweeter, nuttier flavor. The side shoots may continue producing for months rather than weeks. Traditional Italian farmers grew broccoli in the shade of olive trees and grape vines because they knew protected broccoli was better broccoli.
15. Cauliflower
Cauliflower is famously difficult in home gardens, but shade can solve many of its problems. Too much sun can cause cauliflower heads to turn yellow or purple and develop unpleasant flavors. Temperature swings can make the heads separate into grainy sections, a problem often called “ricing.”
In partial shade, cauliflower becomes much easier to manage. The heads form more slowly and evenly. The white color stays cleaner, and the flavor becomes mild and sweet rather than bitter.
French market gardeners in the 1800s developed systems using shade cloth and strategic planting to protect cauliflower from harsh sun. This was not just a workaround. Shaded cauliflower brought premium prices because of its quality.
16. Cabbage
Cabbage develops better flavor and tighter heads when protected from strong afternoon light. This crop originated in coastal Europe, where cool temperatures, clouds, and filtered light were common. In full sun, cabbage heads may split as they mature. This splitting is often caused by rapid growth spurts triggered by heat and intense light. In partial shade, cabbage grows more steadily. The heads form tight and uniform, and the outer leaves remain more tender instead of turning tough.
German and Polish agricultural traditions noted that shade-grown cabbage was especially good for sauerkraut. Its firmer texture and slightly lower sugar content produced better fermentation results.
17. Celery
Celery may be the ultimate shade-loving crop. It is very difficult to grow well in full sun unless you provide constant water and careful attention. In partial shade, celery becomes much more manageable.
Celery is naturally a marsh plant. Its wild ancestors grew in wetlands where tall reeds and grasses provided constant shade and moisture. In full sun, celery’s shallow roots struggle to stay hydrated, and the stalks can become stringy, bitter, and hollow. In partial shade, celery needs much less water. The stalks grow thick, crisp, sweet, aromatic, and tender.
Even the traditional practice of blanching celery by mounding soil around the stalks is really an attempt to recreate shade conditions artificially. Growing celery in partial shade from the start is much simpler.
18. Beets
Beets offer two harvests: the roots and the greens. In shade, both can improve. The roots may size up faster in full sun, but in warm climates, full sun can make them woody and tough. They may develop growth rings that reduce their eating quality.
In partial shade, beets grow more slowly, but the roots often become sweeter and more tender. The greens are even better. Beet greens are highly nutritious, and in shade they become mild, soft, and pleasant instead of tough and strongly flavored.
Russian and Eastern European farmers often planted beets in the partial shade of sunflowers or corn, using companion planting to create better growing conditions.
19. Turnips
Turnips are often overlooked by modern gardeners, but they are highly productive in shade. In full sun, turnips can rush to maturity. Their flavor may become sharp or bitter, and the roots can turn pithy and woody unless harvested at exactly the right time. In partial shade, turnips grow more slowly. That slower growth produces a milder, slightly sweet flavor and a more versatile texture for both raw and cooked dishes.
Scottish and Irish agricultural traditions relied heavily on turnips grown in the partial shade of hedgerows and stone walls. These were not merely emergency crops. Generations of growers observed that turnips often performed better in those protected spaces.
20. Carrots
Carrots can also succeed in partial shade, and in some situations they may actually perform better there.
They do need some direct sun to develop good root size, so they will not thrive in deep shade. But in dappled shade or areas with four to five hours of direct sunlight, carrots can develop long, straight roots with excellent flavor.
In full sun and warm soil, carrots often rush through their growth cycle. This can produce short, thick, bitter roots. In partial shade, cooler soil slows growth. The roots elongate, develop a finer texture, and concentrate sugars instead of stress compounds.
French market gardeners in the 1700s used shade cloth over carrot beds during the hottest part of summer to produce the sweetest, most tender carrots for premium customers.
Shade is a garden asset
The deeper pattern is clear: shade-loving crops are not merely tolerating bad conditions. They are often expressing their true genetic potential.
Industrial agriculture has taught us to think maximum sun equals maximum production. But that idea comes from mechanized monoculture, not diverse home gardens. A home garden is not a factory field. It is a collection of microclimates.
Forest gardens in Asia, cottage gardens in Europe, and the Three Sisters planting system of the Americas all used layered growing spaces. These systems were not primitive. They were sophisticated ecological partnerships created through centuries of careful observation.
So that shady north side of your house is not a liability. It may be the perfect place for cool-season greens.
The area beneath your fruit trees is not wasted space. It may be an understory waiting to be planted.
Your shade is not a curse.
It is a secret weapon.
Companion Planting Guide
Companion planting is one of the simplest ways to create a healthier, more productive garden. By growing certain crops together, gardeners can naturally improve plant health, reduce pest problems, make better use of limited space, and even increase harvests.
Companion planting is one of the simplest ways to create a healthier, more productive garden. By growing certain crops together, gardeners can naturally improve plant health, reduce pest problems, make better use of limited space, and even increase harvests. Whether you are planting in raised beds, rows, or containers, a little planning can go a long way.
Smart Pairings for Spring Garden
Early spring is the perfect time to put companion planting into practice. Cool-season vegetables and herbs often grow well side by side, and thoughtful pairings can help you get the most from every square foot of soil. If you want steady harvests throughout the season, sow fast-growing crops every two to three weeks. This succession planting method keeps fresh produce coming while making sure your garden beds stay productive.
Another key to success is space efficiency. Use vertical supports such as trellises for peas and other climbing crops, and tuck smaller or quicker-growing plants between slower-maturing vegetables. This layered approach helps you harvest more from the same area while keeping the garden full and lively.
Why Companion Planting Works
Companion planting is based on the idea that plants can support one another in different ways. Some crops repel harmful insects, while others attract pollinators and beneficial predators. Some pairings make better use of light, water, and soil space. Others simply grow well together because they mature at different speeds and do not compete heavily for nutrients. Plua, get higher yields over time.
Crop combinations in your spring garden.
Carrots and Onions or Leeks Carrots and onions are one of the most well-known companion planting pairs. Onions and leeks help repel carrot rust flies, a common pest that can damage carrot roots. In return, carrots do not compete too aggressively with alliums, making them a practical match in the same bed. This pairing is especially useful for gardeners looking for a natural way to protect carrots without relying on sprays.
Peas and Spinach Peas and spinach make a great early-season team. As the weather begins to warm, peas can offer light shade that helps spinach stay cooler a little longer. Since spinach tends to bolt in rising temperatures, this extra protection can extend your harvest. Peas also grow upward when trained on a trellis, leaving more room below for leafy greens.
Beets and Lettuce Beets take time to size up, leaving open spaces between plants early in the season. Lettuce is an ideal companion because it grows quickly and fills those gaps efficiently. While the beets are still developing, you can harvest lettuce from the same bed. This is a smart way to maximize garden space and avoid leaving bare soil exposed.
Radishes and Carrots Radishes are often planted with carrots because they sprout much faster. As radishes grow, they help loosen the soil, making it easier for slower-germinating carrots to push through. Radishes also act as a marker crop, showing you where your carrot rows are before the carrots become visible. By the time carrots need more space, the radishes are often ready to harvest.
Lettuce and Cilantro Lettuce and cilantro grow well together in cool spring weather, but their benefits go beyond timing. Cilantro can help deter aphids, which are a frequent nuisance on tender leafy greens. This pairing works especially well in small kitchen gardens where gardeners want both beauty and function in one planting space.
Parsley and Carrots Parsley and carrots belong to the same family, but they can still be useful companions when grown thoughtfully. Parsley helps attract beneficial insects such as hoverflies, whose larvae feed on soft-bodied pests like aphids. Adding more insect-friendly herbs to the garden supports a healthier growing environment overall.
Peas and Mint Peas and mint can be a helpful combination because mint may deter aphids. However, mint is an aggressive spreader and should always be planted in containers rather than directly in the garden bed. Kept under control, it can still provide its pest-repelling benefits without taking over nearby crops.
Pairings to Avoid
Just as some plants help one another, others can cause problems when grown too close together. Avoiding poor matches is just as important as choosing good ones.
Carrots and Dill Although carrots and dill are related, dill can stunt carrot growth. Keeping them apart helps carrots develop properly without unnecessary competition or interference.
Peas and Onions Peas generally do not grow well near onions and other alliums. Onions can inhibit pea growth, so it is best to plant them in separate areas of the garden.
Beets and Pole Beans Beets and pole beans are not the best companions because they can compete for nutrients. When plants are too demanding in the same space, neither may perform at its best.
Fennel and Most Vegetables Fennel is known for being a difficult garden neighbor. It releases chemicals that can interfere with the growth of many other vegetables. Because of this, fennel is usually best planted on its own, away from the main garden beds.
Best results from companion planting
Think of your garden as a system rather than a collection of individual crops. Combine plant pairings with a few practical strategies:
Succession sowing is one of the easiest ways to keep beds productive. Fast-growing crops like lettuce, spinach, radishes, and cilantro can be sown every two to three weeks for a continuous harvest.
Vertical growing also makes a major difference. Trellising peas saves ground space and opens room for lower-growing companions.
Interplanting is another valuable technique. Place smaller or quick-maturing crops between vegetables that take longer to develop, such as beets or carrots. This helps reduce wasted space and keeps the garden working harder for you.
Finally, observe your garden closely. Companion planting is part science and part experience. What works especially well in one climate or soil type may need slight adjustments in another.
Final Thoughts
Companion planting is a practical, natural way to build a more resilient spring garden. With the right combinations, you can discourage pests, support beneficial insects, improve space usage, and enjoy better harvests throughout the season. Start with a few proven pairings, avoid known problem combinations, and keep planting in succession for fresh crops over many weeks.
A well-planned garden does not just grow more food. It grows smarter.
Hardening Off Seedlings
You’ve babied your seedlings indoors for weeks. Before they go into the garden, they need one more step – hardening off.
You’ve babied your seedlings indoors for weeks. Before they go into the garden, they need one more step – hardening off. Hardening off is the gradual process of getting indoor-grown seedlings used to outdoor conditions before transplanting. It helps them adjust to stronger sunlight, wind, cooler temperatures, rain, and lower humidity. Without it, tender seedlings can wilt, scorch, or stall after planting.
Get your indoor seedlings used to outdoors
This matters because indoor seedlings have lived a protected life. Their leaves are softer, their stems are weaker, and they are not ready for the stress of open air and direct sun. A proper hardening-off period helps plants develop tougher leaves, sturdier stems, and better resistance to transplant shock.
Start gradually: Start hardening off seedlings 7 to 14 days before transplanting. In general, put them outside for 1 to 2 hours on the first day in a sheltered, shady spot. Then add about an hour of outdoor time each day. Gradually increase light exposure too, moving from shade to morning sun and eventually to longer periods outside.
Always watch the forecast. A cold snap or strong wind can undo a week of progress. Bring plants in if strong wind, heavy rain, or cold temperatures are expected. For most warm-season crops, do not leave them out if temperatures fall below 45°F, and some crops need warmer conditions than that.
A simple hardening-off schedule looks like this:
Days 1–2: Sheltered shade for 1–2 hours
Days 3–4: Morning sun and afternoon shade for 3–4 hours
Days 5–7: Longer outdoor exposure with some direct sun and light wind
Days 8–10: Outdoors most of the day
Days 11–14: Outdoors day and night, as long as frost is not expected
Different crops harden off at different speeds.
Tomatoes need about 10–14 days and should only be hardened when nights are consistently above 50°F. Start them in shade and increase sun exposure slowly.
Peppers and chilies are even more cold-sensitive than tomatoes and should not be exposed to temperatures below 55°F. Give them a sheltered, warm starting spot and take your time.
Cucumbers, squash, zucchini, and melons usually need 7–10 days. Their large leaves sunburn easily, so shade is especially important at the beginning.
Brassicas such as cabbage, broccoli, kale, and Brussels sprouts are among the easiest seedlings to harden off. Most can handle cooler weather and usually need 7–10 days, though cauliflower is more sensitive.
Lettuce and salad greens often need only 5–7 days. They handle cool weather well, but heat and intense midday sun can cause stress and bolting.
Beans and peas can also harden off in about 5–7 days if started indoors, though many gardeners prefer to direct sow them.
Herbs vary widely. Basil needs a long, warm hardening-off period and dislikes cool temperatures. Parsley is far tougher. Cilantro and dill harden quickly but can bolt in heat. Woody herbs such as thyme, oregano, rosemary, and chives are usually forgiving.
Common Mistakes
Moving too fast: Gardeners often make the same few mistakes when hardening off seedlings. The biggest is moving too fast. A warm, sunny day can make it tempting to leave plants out all day, but that often leads to sun-scald and wilting.
Ignoring wind: Another common mistake is ignoring wind. Even light wind can dehydrate tender seedlings quickly. And of course, skipping hardening off altogether is risky; healthy-looking indoor seedlings may collapse within hours of transplanting if they are not prepared.
How do you know your plants are ready? Hardened seedlings usually have thicker, tougher-looking leaves and sturdier stems. They can handle a full day outdoors without wilting or scorching. Once they have spent several days outside successfully, including overnight when conditions are safe, they are ready to go into the garden.
For the final transplant, choose a calm or cloudy day if possible, and water well after planting. That extra patience pays off in stronger, more resilient plants.

Watering, Moisture and Mulch
Although deep watering is usually best, over watering can also stress your plants. Of course, there will be a lot of variables to take into consideration – such as the amount of rain and other weather conditions. Do a simple moisture test with your finger on the top 2 to 4 inches of soil before you water. Be careful about the watering tips you see circulating on the internet or in Youtube videos!
Different plants need different kinds of watering. Some veggies need more frequent and deeper watering than others. Seeds and seedlings need to be constantly moist. Although deep watering is best, over watering can also stress your plants, making good drainage essential. Of course, there will be a lot of variables to take into consideration – such as the amount of rain and other weather conditions. Do a simple moisture test with your finger on the top 2 to 4 inches of soil before you water. Be careful about the watering tips you see circulating on the internet or in YouTube videos!

Proper watering is critical to plant health
Just as soil health depends on the latest soil science – the same is true of about watering edible plants. The Deep Roots method creates the best environment for your plants because our compost used as soil has good drainage and lets the water get to the plant roots quickly. We recommend installing drip irrigation if you don’t have time to water or go out of town often. Take time to correctly set the irrigation timing and amount. Past the seedling stage water deeply 2 or 3 times a week so the roots grow deep. Test soil moisture with your finger 2 to 3 inches down.
Cover soil with mulch.
Save water and time: Retaining as much moisture as possible saves watering time and keeps your plant healthy and happy. Plants grow faster and get bigger harvests if protected from temperature and dehydration. The two best options for mulching vegetable gardens are either a one inch layer of our organic leaf mulch, which you can purchase in our webstore, or organic straw mulch. Don’t use hay since it adds unwanted weed seeds to your garden. Never use any mulch that is not organic, as it could contain herbicides or pesticides which can ruin your garden and severely damage your plants.
Sourcing straw mulch can be a challenge. You can grow Miscanthus grass and allow it to overwinter, cutting it down in the fall. If you don’t have space for this, you may wish to purchase organic straw mulch from garden centers. Since certified organic straw mulch is hard to find, we recommend that you speak with local garden center owners to find out if the straw they sell is grown on farms that are functionally organic, even if they may not be certified. Once such center selling straw mulch from a local farm is The Feed Store, 5408 S. Harlem, Summit IL 60501, (708) 458-1327. Closed on Wednesdays.
Seed watering tips
When direct sowing seeds in your garden, keeping them moist is essential — peek under your mulch and if the soil looks and feels dry on the surface, go ahead and water. Daily is best, mornings are ideal. When you are planting in Deep Roots compost in raised beds or containers with good drainage, overwatering isn’t a big concern. However, if you are direct sowing in a growing medium or vessel that doesn’t drain well, you’ll need to be careful that your seeds don’t become waterlogged which can cause them to rot. Learn through observation the difference between soil that is moist, and waterlogged soil which is more like mud. You want moist soil, not soil soup.
If conditions are exceptionally hot, dry, or windy, check the soil moisture and consider a second light watering to prevent the soil from drying out. Water gently so you do not wash seeds out of place, and always check the soil before watering again. Raised beds and containers dry out faster than in-ground beds, so they usually need more frequent attention.
Transplanted seedlings watering tips
When you have just transplanted new seedlings into your garden, they should be kept moist consistently just like your direct sown seeds. Mulch around new seedlings and water whenever the soil under the mulch appears dry. If you are unsure, touch the surface. Keep up watering whenever the first inch or so is dry until you start to see new growth on the plant that wasn’t there when you transplanted it.
DON’T water mature plants a little everyday!
You have been watering daily early in the season as seeds are being sown and new seedlings are going into the garden. But once those plants are established, DON’T keep watering every day. It promotes shallow roots. One of the worst practices is to water your garden lightly every day or every few days. This frequent sprinkling provides water to only the top layer of the soil and promotes shallow root systems. Instead, water deeply whenever the top two inches of soil is dry.
Simple, standard suggestions like: water every day and “make sure you give your plants an inch of water each week” are now being questioned and re-evaluated. Because the plant’s roots are not close to the soil surface, we now know that the water needs to get deep enough and the roots need to have enough time to soak it up to allow the plants to develop deep root systems that are necessary to be healthy.
While overwatering, and waterlogging, can stress plants out, the risk of this is low if you are using Deep Roots compost as your growing medium and have a well-draining raised bed or vessel. If your vessels don’t have good drainage, or your not sure how well your soil drains, you should observe how long it takes your garden to drain after a heavy rain.
If top 2 inches of soil feels dry it’s time to water. Soak the soil to a depth of 4 to 6 inches. Test for soil moisture also after you water. It can take some time if you are watering with a hose, but it is worth it to do this deep watering less frequently to encourage root development.
Overhead watering (sprinklers) is the least efficient and least preferred method of watering. Far too much of the water is lost to evaporation, and the water tends to sit on the plants instead of making it to the soil, which can lead to fungal issues. Apply water directly to the soil, not the plants, with a soaker hose, drip irrigation, watering can or watering wand.
Watering tips from our horticulturist
Some conventional soils can have drainage problems, so too much water does not allow plant roots to breathe and will cause plants to wilt from lack of oxygen.
Don’t water too fast. Water gently at all times. When watering with a hose, avoid a hard stream of water, which risks injuring your plants and the soil. Use a steady, gentle shower of water instead – but only on the soil, not the plants.
If you are using municipal water, put a water filter on your hose or water source. Municipal water often has levels of chlorine that kill essential microorganisms. There are also many harmful pollutants in some city water. Chlorine filters used for RV water intakes are available online and can be connected directly to your hose.
Lack of water stresses plants. Drought may produce stunted fruit, produce no fruit at all, or may produce tasteless, woody, or unpalatable fruit.
Over watering stresses plants. Over watering can cause as much stress as severe drought. Too much water will saturate soils, displace air which starves the roots of oxygen. The compost Deep Roots used instead of conventional soil (Microbe Rich Compost) has good drainage properties.
Keep SEEDS moist at all times. Germinating seeds must be constantly moist. Watering seeds twice a day may be needed on dry hot days. It’s easiest to let drip irrigation water your seeds. Some gardeners without irrigation have found a work-around that saves time and constant attention.
Place a board or large tiles over tiny carrot seeds. This keeps the moisture in the soil longer, even longer than a standard mulch, and protects them from being washed away by heavy rain. Make note of how many days it takes for the first sign of germination. Check the seeds everyday when it is close to germination. Remove the cover when the first seed sprouts. Some seeds will sprout sooner and some later. Carrot seeds are very tiny and need to be kept constantly moisturized more carefully. Once you see them sprout, remove the board and add your mulch.
Keep SEEDLINGS moist at all times and water daily or more often for 2 weeks. When the seedling is at least 5 inches tall its roots are stronger and constant monitoring is not necessary. Test soil before and after watering and water gently and deeply as needed.
Don’t over water seeds! Finding the right amount of water for your seeds is difficult. Not enough and they will not germinate - BUT too much and they could rot. Just to be safe - water seeds lightly twice a day - you just need to moisten the top layer.
When plant leaves wilt on a very hot day, it could be from the heat and not lack of water. If you are following all the above tips, the wilting is likely from heat and not lack of water. In this case, try a shade clothe instead of more water.
Prune off lower foliage of plants prone to fungal diseases that prefer damp environments like powdery mildew on cucumbers and squash) and like tomato blights. Water very close to the soil with a watering wand on a hose or a watering can. Avoid wetting the leaves. Water early in the day
Health of mature plants is dependent on correct watering. Remember that large plants need a lot more water than seedlings. We want mature plants to have deeper roots that suck lots of water out of the soil.
A drip irrigation system nurtures healthier plants and less stressed gardeners. If you can’t or don’t want to water and monitor your soil moisture constantly get a drip irrigation system. Drip irrigation should be the watering method of choice. It will save you time and make your plants stronger, happier and healthier. The larger your garden the more critical drip irrigation becomes. Contact the Deep Roots team for advice on installing the new system we designed.Seed watering tips
Use our Planting Calendar blog posts for more useful seed starting tips like spring/ simmer/fall planting dates, soil temperature, temperature tolerances, direct seed vs transplants, seed depth, sunlight, and days to maturity. Choose from 9 planting calendar blog posts organized by crop group on our Planting Calendar and Climate blog category page: brassicas, cucurbits, fruiting crops, leafy greens, legumes, root crops, herbs, and berries.
“Grow Your Own Food” blog posts
Questions, comments, suggestions? We’d love to hear from you! Send photos of your garden too!
See the full list of our Grow Your Own Food blog posts. Our blog posts are divided into 6 categories – each with its own page of blog post photos and summaries.
Questions, comments, suggestions? We’d love to hear from you! If you need a quick answer to a gardening question give us a call or send a text. We are here to solve your gardening problems. Please call OR text our Customer Service team at 708-655-5299 OR send an email to: support@deep-roots-project.org.
Deep Roots online store
See our online store for details about prices, ordering and delivery of raised beds, planter boxes, microbe-rich compost, worm castings, leaf mulch and more. We don’t sell traditional soil, since we use 100% compost as our growing medium. Our online store has 2 sections – (1) raised beds and planter boxes and (2) compost, worm castings, fertilizer.
Please contact our customer support team before placing an order online so we can assist you with the details and answer your gardening questions. You can pay by credit card on the store or by check.
(708) 655-5299 and support[at]deep-roots-project.org
Gardening connects you to the Earth. Our community connects you to each other.
SIGN UP FOR OUR NEWSLETTER
(Use green rectangle and white type button style)
Please leave your cell phone number when you sign up for our eNewsletter, if you want text message announcements now and then.
Donations help us provide organic kitchen gardening education to individuals, organizations, and entire communities. Thank you in advance for contributing to our community and for sharing our website and blog with friends and family.

Over-Winter Your Hot Pepper Plants
The idea is simple: move healthy peppers into pots before hard frost, keep them alive with minimal effort through winter, and set them back outside in spring for a head start.
Hot peppers are tender perennials. In warm climates they can live for years, forming woody trunks and producing earlier, heavier harvests each season. In Zones 5 and 6, you can capture much of that benefit by overwintering a few favorite plants indoors. The idea is simple: move healthy peppers into pots before hard frost, keep them alive with minimal effort through winter, and set them back outside in spring for a head start.
How to Overwinter Hot Pepper Plants
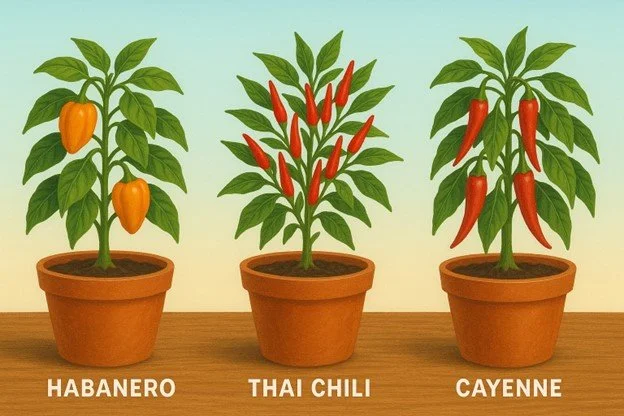
Among the hot pepper varieties that successfully overwinter in pots indoors are Habanero, Thai chili, and Cayenne. These peppers, which are perennials in their native tropical climates, are more resilient and adapt more easily to overwintering than bell peppers or other sweet varieties. For the best results, select the healthiest, most compact plants for overwintering.
Begin by choosing strong, compact plants that produced well this season. Skip any that are diseased, pest‑ridden, or severely stressed. About a week before moving them inside, remove flowers and small fruit and thin crowded branches to improve airflow. Give each plant a thorough rinse with a firm spray of water—especially the undersides of leaves—and let it dry. Follow with insecticidal soap or horticultural oil as directed on the label, and repeat several days later. If your peppers are in the ground, lift them with a generous root ball; if they’re already in containers, simply refresh the potting setup.
For winter containers, a 2‑ to 5‑gallon pot with large drainage holes works well. Deep Roots gardeners fill containers with 100% finished, microbe‑rich compost rather than a peat‑based mix, and we add a handful of high‑quality worm castings both in the planting hole and as a thin top‑dress. Plant peppers at the same depth they grew outdoors, water once to settle, and place a few coarse wood chips over the interior drain holes to prevent clogging—no pebbles needed.
Two Workable Paths
From here you have two workable paths. The lowest‑effort option is the semi‑dormant “stump” method. Cut the plant back to about 6–10 inches, leaving three to five main nubs with visible nodes, and remove most remaining leaves. Park the pot in a cool space around 50–65°F (10–18°C). A bright window is helpful but not essential. Water sparingly—wait until the top 2–3 inches of compost are dry, then water lightly. Skip fertilizer through winter; the compost biology and initial castings provide all the nutrition a resting plant needs. Expect little visible growth. That’s fine—the goal is survival, not production.
If you prefer greenery indoors or hope for an occasional winter pepper, keep the plant in light growth as a houseplant. Prune it back by roughly one‑third to one‑half to fit your space and lights, but leave some foliage. A sunny south window may suffice, though a simple LED grow light on a timer makes this method much more reliable. Aim the light 12–18 inches above the canopy for 12–14 hours daily. Keep temperatures around 65–75°F (18–24°C) with humidity in the 40–60% range; a pebble tray can help if your home is dry.
Water thoroughly when the top 1–2 inches of compost are dry and never leave water standing in the saucer. Once you see steady new growth, top‑dress a quarter to half an inch of worm castings about once a month and water it in. That, plus quality compost, usually replaces bottled fertilizers; if you like, add a very light fish/seaweed drench every three to four weeks. Expect modest winter growth and the occasional flower; fruit set is possible under strong light, but the real payoff comes in spring.
Indoor Pest Management
Indoor pest management is simple if you stay ahead of it. Check plants weekly, especially the undersides of leaves and tender new growth, for aphids, spider mites, whiteflies, and thrips. Yellow sticky cards help you catch flying pests early. If you see trouble, start by rinsing the plant in a sink or shower and gently wiping the leaves. Follow up with insecticidal soap or horticultural oil, coating all leaf surfaces and repeating within a week if needed. For fungus gnats, let the top layer of compost dry a bit more between waterings, add a thin top‑layer of coarse sand or fine gravel, and use sticky cards to trap adults. Quarantine any new or returning plants for a week or two before placing them with other houseplants.
Late Winter
As days lengthen in late winter, gradually increase light intensity or duration to “wake” your peppers. Refresh the container with a little new compost and a fresh top‑dress of worm castings or step up to the final outdoor pot if needed—most hot peppers are happy in 3–7 gallons for the season. Tip‑prune leggy stems back to two to four nodes to encourage branching. Harden plants off over 7–10 days by introducing them to outdoor conditions a little at a time and set them outside for good once nights reliably stay above 50°F (10°C) and frost risk has passed. Overwintered peppers typically leaf out quickly, flower early, and yield sooner than first‑year plants.
If leaves yellow or drop after the move indoors, don’t panic—some shedding is normal. Over-watering is the most common winter mistake, so check moisture with your finger instead of watering on a schedule. If growth stretches and looks leggy, bring the lights closer or increase brightness, then lightly prune to shape. If flowers don’t appear indoors, that’s fine; focus on plant health now for a strong spring flush. Should pests persist despite gentle controls, it’s better to discard a badly infested plant than endanger the rest of your collection.
Deep Roots’ compost‑and‑castings approach shines indoors because living, microbe‑rich compost delivers a steady, biology‑mediated trickle of nutrients rather than the feast‑or‑famine swings of synthetic salts. Roots stay healthier, watering is more forgiving, and you can usually skip bottled fertilizer altogether. Just be sure your compost is truly finished, your container drains freely, and you water by touch.
Getting Started
To get started, gather clean bypass pruners and a rag with isopropyl alcohol for disinfecting, appropriately sized pots with generous drain holes, finished compost, premium worm castings, insecticidal soap or horticultural oil, and a few yellow sticky cards. An LED grow light, a simple plug‑in timer, and a pebble tray for humidity are inexpensive upgrades that improve success. Follow the steps above and your peppers will sleep comfortably through winter and greet spring ready to produce earlier and better than ever.
Join the Deep Roots movement
We’re not just about gardening; we’re about changing the way people grow food. Whether you have a tiny balcony or a full backyard, we’ll help you grow like a pro.
Stay in the loop: Signup for our email newsletter. If you also provide your phone number you will get text message updates that link to our best blog posts.
Get involved: Attend a free workshop, become a volunteer, grab a raised bed, or simply follow along for expert tips. Contact our support team any time you have a question at 708-655-5299 and support@deep-roots-project.org.
Learn. Share. Grow. Volunteer: We invite you to be a part of our sustainable movement right here in our own backyards! We want all our volunteers to have fun and learn while they contribute to expanding the Deep Roots community. We can customize a volunteer assignment to your time, interests and skills. Learn more on our Volunteer page
Dive Deeper
Click on the Blog Posts below for more about our Innovative methods.
Beautify Your Garden with Our Cedar Raised Beds!
Our Deep Roots handcrafted cedar raised beds are designed to endure outdoors while adding a touch of style to your yard. As a bonus, they are the perfect depth to hold just the right amount of our nutrient-rich compost growing medium, which comes free with each bed.
Deep Roots Supports Gardeners
We provide our gardeners with the best products for success – like cedar raised beds, microbe-rich compost and microbe-rich worm castings.
Call our customer support team with any questions or help with calculations. Then place your order online. If you need help or have a question contact us at support[at]deep-roots-project.org and 708-655-5299.
See our online store for details about prices, ordering and delivery of raised beds, planter boxes, microbe-rich compost, worm castings, leaf mulch and more. We don’t sell traditional soil, since we use 100% compost as our growing medium. Our online store has 2 sections
Signup for Our Newsletter
Please leave your cell phone number when you sign up for our eNewsletter to get gardening and seasonal text messages announcements now and then.
Donations help us provide organic kitchen gardening education to individuals, organizations, and entire communities. Thank you in advance for contributing to our community and for sharing our website and blog with friends and family.

Planting a Fall Food Garden
In zones 5b and 6a (including the Chicago area), our first frost is usually mid-October. Plant seeds and seedlings in July and August. Some fast growing, fast maturing, cold-hardy vegetables seedlings can be planted as late as early September—the ones that thrive in cooler days and can even sweeten after a light frost.
Planting a Fall Food Garden
In zones 5b and 6a (including the Chicago area), our first frost is usually mid-October. Plant your seeds and seedlings in July and August. See the planting calendar below. Some fast growing, fast maturing, cold-hardy vegetable seedlings can be planted as late as mid September. They thrive in cooler days and can even sweeten after a light frost. Cover the bed with “floating row cove” (lightweight white fabric) for extra warmth.

Tips for Success
Buy seedlings locally - here are some local sources we recommend:
Good Earth Greenhouse
Address: 7900 Madison St, River Forest, IL 60305
Phone: (708) 366-9500Gethsemane Garden Center
Address: 5739 N Clark St, Chicago, IL 60660
Phone: (773) 878-5915We Grow Dreams
Address: 1055 W Washington St, West Chicago, IL 60185
Phone: (630) 293-0100Buying locally is important! Local seedlings will be acclimated to local conditions.
Floating row cover is lightweight white fabric that allows sunlight, water, and air through, and protects crops from frost and pests. A lightweight row cover might provide 2ºF of frost protection, whereas a heavy-weight row cover might provide as much as 6ºF to 10ºF of frost protection. Learn how to Install Hoops on Raised Beds. Remove it to allow pollination.
Harvest continuously—baby greens and radishes give quick results while slower crops catch up.
Fast growing fall crops from seedlings
Leafy Greens (Very Reliable for Fall) - These can be planted to mid September .
Spinach – plant seeds in mid-November for germination in spring. Your spinach will grow bigger and better if planted in the fall rather than spring. Note - always plant spinach from seed, using seedlings does not work for Spinach.
Lettuce - Opt for loose-leaf varieties, which mature quickly and are more frost-tolerant than crisp-head types. Plant seedlings, harvest as baby leaves in 3–4 weeks.
Arugula –plant seedlings, ready fast (3–4 weeks), perfect for cut-and-come-again harvest.
Swiss Chard –plant seedlings, tolerates cool temps but may slow in late fall.
Bok Choy and baby kale are short-season varieties that are easy to grow and produce baby greens in just a few weeks.
Brassicas (Hearty Cool-Weather Crops) - Best planted by late August in Zone 5b/6a. If planting in September, focus on faster maturing types (kohlrabi, broccoli raab). Brassicas are harder to grow recently because of an invasion of tiny fly called Swede Midge that attacks only brassica plants. Covering your brassicas with bug netting helps. Swede Midge Fly Management. Ask our customer support about buying or borrowing a large bug netting bag.
Roots (Quick Harvest Varieties Only) - Stick to radish and turnip seedlings for reliable results.
Radishes – super fast, 25–35 days; can re-seed weekly until frost.
Turnips – 40–60 days; tender greens + roots to enjoy before frost.
Beets – possible if seeded in July or early August; seedlings planted later may still size up if fall is mild.
Alliums - for germination in spring
Garlic – planted in late September through October; harvested next summer.
Onions/Shallots – some can be fall-planted to overwinter.
Fall Planting Calendar – Zones 5b & 6a
Here’s a clear planting chart for a fall garden in Zones 5b & 6a (Chicago area). It starts in mid-summer (July) and runs through early fall (October), showing both direct seeding and transplanting seedlings.

Notes for Success
Mid-July to Early August → Plant longer-season brassicas (broccoli, cabbage, cauliflower) as seedlings.
Late July to Mid-August → Sow roots (carrots, beets, turnips) and leafy greens that take 45–60 days.
Late August to Early September → Focus on fast crops (radish, arugula, spinach, lettuce).
September–October → Plant garlic, shallots, overwintering onions for next summer’s harvest.
Frost protection → Use row covers to extend harvest of spinach, lettuce, and kale well into November.
Join the Deep Roots movement
We’re not just about gardening; we’re about changing the way people grow food. Whether you have a tiny balcony or a full backyard, we’ll help you grow like a pro.
Stay in the loop: Signup for our email newsletter. If you also provide your phone number you will get text message updates that link to our best blog posts.
Get involved: Attend a free workshop, become a volunteer, grab a raised bed, or simply follow along for expert tips. Contact our support team any time you have a question at 708-655-5299 and support@deep-roots-project.org.
Learn. Share. Grow. Volunteer: We invite you to be a part of our sustainable movement right here in our own backyards! We want all our volunteers to have fun and learn while they contribute to expanding the Deep Roots community. We can customize a volunteer assignment to your time, interests and skills. Learn more on our Volunteer page
Dive Deeper
Click on the Blog Posts below for more about our Innovative methods.
Beautify Your Garden with Our Cedar Raised Beds!
Our Deep Roots handcrafted cedar raised beds are designed to endure outdoors while adding a touch of style to your yard. As a bonus, they are the perfect depth to hold just the right amount of our nutrient-rich compost growing medium, which comes free with each bed.
Deep Roots Supports Gardeners
We provide our gardeners with the best products for success – like cedar raised beds, microbe-rich compost and microbe-rich worm castings.
Call our customer support team with any questions or help with calculations. Then place your order online. If you need help or have a question contact us at support[at]deep-roots-project.org and 708-655-5299.
See our online store for details about prices, ordering and delivery of raised beds, planter boxes, microbe-rich compost, worm castings, leaf mulch and more. We don’t sell traditional soil, since we use 100% compost as our growing medium. Our online store has 2 sections
Signup for Our Newsletter
Please leave your cell phone number when you sign up for our eNewsletter to get gardening and seasonal text messages announcements now and then.
Donations help us provide organic kitchen gardening education to individuals, organizations, and entire communities. Thank you in advance for contributing to our community and for sharing our website and blog with friends and family.

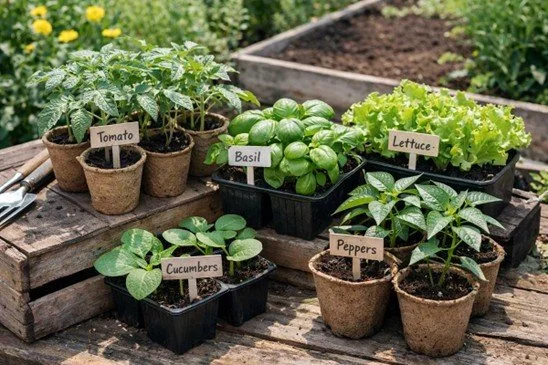
How to Start Seeds Indoors
Starting seeds indoors is a fun and rewarding activity for gardeners of all levels. With a little bit of planning and care, you can grow healthy, strong seedlings that will thrive in your garden. It’s a great way to get a jumpstart on your garden and extend your growing season. It's also a fun and rewarding activity for gardeners of all levels.
Starting seeds indoors is a fun and rewarding activity for gardeners of all levels. With a little bit of planning and care, you can grow healthy, strong seedlings that will thrive in your garden. It’s a great way to get a jumpstart on your garden and extend your growing season. It's also a fun and rewarding activity for gardeners of all levels.
Grow Strong, Healthy Seedlings
Starting seeds indoors is one of the most satisfying ways to get a head start on your garden—and it’s easier than you might think. This post will walk you through every step: from selecting seeds to preparing soil, to caring for your seedlings—and finishing with “hardening them off” before planting outdoors. Deep Roots uses a 1:! mix of our microbe-rich compost and worm castings as our potting soil, not shown in this video.
Why Start Seeds Indoors?
Whether you're growing tomatoes, peppers, herbs, or flowers, starting your own “transplants” (another word for seedlings) can save you money, expand your variety choices, and give your garden a healthy early boost.
By starting seeds indoors in early spring, you can give summer crops like tomatoes and peppers the head start they need to be productive all season long. It’s a great way to extend your growing season and get hands-on with your garden early in the year.
Follow These Simple Steps
Step 1: Choose the Right Seeds
Not every plant needs to be started indoors. Focus on varieties that need a longer growing season and benefit from transplanting, such as tomatoes, peppers, many herbs, and flowers. Choose seeds that are fresh, high quality, and well-suited to your growing conditions. You can buy them from local nurseries, trusted online seed retailers, or even seed swaps with other gardeners.
Step 2: Gather Your Supplies
To get started, you’ll need a few essentials. These include containers to plant in, such as seed trays or small pots with drainage holes. For an eco-friendly option, consider biodegradable pots made from materials like peat, coir, or paper—these can be planted directly into the garden without disturbing the roots. Your potting mix should be rich and alive; we recommend a blend of half microbe-rich compost and half worm castings. You’ll also need a light source—grow lights work best, since windows typically don’t provide enough consistent sunlight indoors. Keep a spray bottle or watering can nearby to keep the soil moist.
Step 3: Plant Your Seeds
Fill your containers with the compost and worm casting mixture, leaving about a quarter inch of space at the top. Gently press down the soil to remove any air pockets. Follow the seed packet instructions, but a general rule is to plant seeds about a quarter inch deep and place two to three seeds per cell or pot. Cover the seeds lightly with more soil and water gently. Be sure to label your trays so you know which plants are which.
Step 4: Provide Proper Light
Most seedlings require 12 to 14 hours of light per day to grow properly. A grow light is your best bet to provide this kind of steady illumination. While it might seem convenient to use a sunny window, it usually doesn’t provide strong or consistent enough light to keep your seedlings healthy. Without enough light, seedlings may become weak and leggy.
Step 5: Care for Your Seedlings
Once your seeds have germinated and begun to grow, keep the soil consistently moist but not soggy. As they get taller, thin them out by snipping the weaker seedlings and leaving the strongest one in each pot. Eventually, your seedlings will outgrow their starter pots. At that point, transplant them into slightly larger containers filled with fresh compost and worm castings. This gives their roots more space to grow and prepares them for life in the garden.
Step 6: Harden Off Your Seedlings
Before you plant your seedlings outdoors, you’ll need to harden them off. This means gradually getting them used to outdoor conditions like wind, sun, and changing temperatures. Start this process about ten to fourteen days before you plan to transplant them into your garden.
On the first day, place the seedlings outside in a shaded, sheltered spot for one to two hours, then bring them back inside. Each day, increase their time outdoors and gradually expose them to more sunlight. Always bring them indoors at night unless the temperatures are very mild. This slow transition toughens up your seedlings and helps prevent transplant shock, giving them the best chance to thrive when they go into the ground.
Step 7: When Are Seedlings Ready to Go Outside?
Before moving your seedlings to your outdoor garden beds, it’s important to make sure they’re mature and sturdy enough to handle the transition. A good rule of thumb is to wait until your seedlings have at least two to three sets of “true leaves”—the ones that grow after the first small seed leaves (called cotyledons). At this point, the plant is photosynthesizing and growing on its own.
Your seedlings should be about 3 to 6 inches tall, with strong, thick stems. If they are tall and wobbly, they may need more time under the grow lights or better airflow to strengthen their stems. The roots should be well-developed and hold the soil together when gently removed from the container. If the roots are still fragile or fall apart easily, give your seedlings more time indoors. However, if the roots are circling the pot tightly (called rootbound), it’s time to transplant.
Step 8: Planting Dates
Depending on where you live, the growing season can be limited, and it can be challenging to extend it. Know which crops are cold tolerant and which need warmth to thrive. Know how to protect your seeds and seedlings from unexpected temperatures. Learn more details about planting dates in the Chicago area in our blog post on Planting Calendar for Zone 6a.
The average last frost dates for Chicago and its surrounding suburbs, including Oak Park and River Forest, in 2025 are typically April 21 to 30. However, it's important to note that this is just an average, and there's always a chance of frost occurring before or after these dates.
Gardeners not in the Chicago area can ask their local university ag extension or a botanic garden for a planting calendar and average frost dates for their climate zone.
Final Thoughts
Starting seeds indoors is a simple and deeply rewarding practice that lets you take control of your growing season. It’s a fun way to engage with your garden long before outdoor planting begins. With a little planning, care, and patience, you’ll grow strong, healthy transplants that are ready to flourish the moment they hit the soil.
You can also use Winter Sowing techniques to start some seeds outdoors - see the blog linked below.
Join the Deep Roots movement
We’re not just about gardening; we’re about changing the way people grow food. Whether you have a tiny balcony or a full backyard, we’ll help you grow like a pro.
Stay in the loop: Signup for our email newsletter. If you also provide your phone number you will get text message updates that link to our best blog posts.
Get involved: Attend a free workshop, become a volunteer, grab a raised bed, or simply follow along for expert tips. Contact our support team any time you have a question at 708-655-5299 and support@deep-roots-project.org.
Learn. Share. Grow. Volunteer: We invite you to be a part of our sustainable movement right here in our own backyards! We want all our volunteers to have fun and learn while they contribute to expanding the Deep Roots community. We can customize a volunteer assignment to your time, interests and skills. Learn more on our Volunteer page
Dive Deeper
Click on the Blog Posts Below for more about our Innovative methods.
Beautify Your Garden with Our Cedar Raised Beds!
Our Deep Roots handcrafted cedar raised beds are designed to endure outdoors while adding a touch of style to your yard. As a bonus, they are the perfect depth to hold just the right amount of our nutrient-rich compost growing medium, which comes free with each bed.
Deep Roots Supports Gardeners
We provide our gardeners with the best products for success – like cedar raised beds, microbe-rich compost and microbe-rich worm castings. Check our online store. Always talk to our customer support team before placing your order online. If you need help or have a question contact us at support[at]deep-roots-project.org and 708-655-5299.
Deep Roots Online Store
See our online store for details about prices, ordering and delivery of raised beds, planter boxes, microbe-rich compost, worm castings, leaf mulch and more. We don’t sell traditional soil, since we use 100% compost as our growing medium. Our online store has 2 sections – (1) raised beds and planter boxes and (2) compost, worm castings, fertilizer.
Please contact our customer support team before placing an order online so we can assist you with the details and answer your gardening questions. You can pay by credit card in the store or by check.
Please leave your cell phone number when you sign up for our eNewsletter, if you want text message announcements now and then.
Donations help us provide organic kitchen gardening education to individuals, organizations, and entire communities. Thank you in advance for contributing to our community and for sharing our website and blog with friends and family.

Grow Miscanthus Grass for Straw Mulch
This is one of those plants that earns its keep in more ways than one—ornamental beauty in the garden all season long, then natural, homemade mulch to feed next year’s crops. Pretty clever, right?
This is one of those plants that earns its keep in more ways than one—ornamental beauty in the garden all season long, then natural, homemade mulch to feed next year’s crops. Pretty clever, right?
This Prairie Grass is Beautiful & Easy
If you’ve ever wished you could make your own mulch instead of buying bales of straw every year, I’ve got a garden tip you’ll love: grow Miscanthus grass. It’s beautiful, easy to care for, and—best of all—you can cut and use the dried stems as mulch right from your own yard.
Miscanthus, often called maiden grass, is a tall, graceful ornamental grass with soft, arching leaves and fluffy flower heads that show up in late summer. Even when it’s not blooming, the plant looks elegant. Once it dries out in the winter, you can cut it back and use the stalks just like straw to protect and nourish your soil.
Planting and Maintenance
This grass grows best in full sun and well-drained soil, and it likes a little compost added to the planting hole to help it get started. The best time to plant it is in spring, after the last frost. You’ll want to give it some room to grow—most varieties get tall and wide—but there are also smaller options like 'Adagio' if space is limited. If you live in a warmer climate, make sure to choose a sterile variety so it doesn’t spread where it’s not wanted.
When you first plant Miscanthus, keep the soil moist until the roots settle in. After that, it becomes quite drought tolerant and low-maintenance. Don’t worry about fertilizing it the first year, and keep any feedings light in later years so the plant doesn’t grow too floppy. The dried leaves and stems also provide winter interest, so it’s nice to leave them up until early spring.

Harvest Straw in Early Spring
When you see signs of new growth, that’s your cue to cut it down to just a few inches tall. That’s also when you’ll collect your straw mulch. Just gather the dried stalks and store some in a dry place. There are two ways to use the straw. Lay them across your garden beds or cut up the straw before placing it around your seedlings. Straw helps keep the soil moist, block weeds. Don’t let the straw decompose and mix with soil in your edible plant beds. Push the straw to the sides of the beds after harvesting your crops.
If your Miscanthus gets too big over time or starts to die out in the center, you can dig it up and divide it to refresh the plant and maybe even give a few chunks away to friends.
Tips for Getting Started
For beginner gardeners, it's best to start with low-maintenance, non-invasive varieties of miscanthus that are reliable, manageable in size, and easy to care for. it’s also a good idea to check with your local extension office or nursery to make sure the variety you choose isn’t considered invasive in your area. Look for sterile cultivars, especially if you live in a warmer climate
Here are a few beginner-friendly options to consider:
Miscanthus ‘Adagio’: Height is 3 to 4 feet. Compact, tidy, and beautiful. Perfect for small gardens or raised beds. It still offers that soft, graceful miscanthus look, but won’t overwhelm your space. Drought tolerant once established and produces lovely silver plumes in fall.
Miscanthus ‘Gracillimus’: Height is 4 to 6 feet. One of the most popular varieties for a reason—it’s adaptable, elegant, and reliable in many climates. Narrow leaves with a silver stripe down the center and airy flower plumes.
Miscanthus ‘Morning Light’: Height is around 4 feet. A bit finer-textured and slightly more refined than ‘Gracillimus.’ Great for adding a silvery glow to your garden. The reddish-pink flowers turn a soft tan as they mature.
Miscanthus X Giganteus (for large spaces only): Height is up to 12 feet in one season. This giant variety produces a ton of biomass, so it’s ideal if your main goal is making mulch. It's sterile, so it won’t spread or reseed. This one’s better suited for bigger gardens or as a screen.
Join the Deep Roots movement
We’re not just about gardening; we’re about changing the way people grow food. Whether you have a tiny balcony or a full backyard, we’ll help you grow like a pro.
Stay in the loop: Signup for our email newsletter. If you also provide your phone number you will get text message updates that link to our best blog posts.
Get involved: Attend a free workshop, become a volunteer, grab a raised bed, or simply follow along for expert tips. Contact our support team any time you have a question at 708-655-5299 and support@deep-roots-project.org.
Learn. Share. Grow. Volunteer: We invite you to be a part of our sustainable movement right here in our own backyards! We want all our volunteers to have fun and learn while they contribute to expanding the Deep Roots community. We can customize a volunteer assignment to your time, interests and skills. Learn more on our Volunteer page
Dive Deeper
Click on the Blog Posts Below for more about our Innovative methods.
Beautify Your Garden with Our Cedar Raised Beds!
Our Deep Roots handcrafted cedar raised beds are designed to endure outdoors while adding a touch of style to your yard. As a bonus, they are the perfect depth to hold just the right amount of our nutrient-rich compost growing medium, which comes free with each bed.
Deep Roots Supports Gardeners
We provide our gardeners with the best products for success – like cedar raised beds, microbe-rich compost and microbe-rich worm castings. Check our online store. Always talk to our customer support team before placing your order online. If you need help or have a question contact us at support[at]deep-roots-project.org and 708-655-5299.
Deep Roots Online Store
See our online store for details about prices, ordering and delivery of raised beds, planter boxes, microbe-rich compost, worm castings, leaf mulch and more. We don’t sell traditional soil, since we use 100% compost as our growing medium. Our online store has 2 sections – (1) raised beds and planter boxes and (2) compost, worm castings, fertilizer.
Please contact our customer support team before placing an order online so we can assist you with the details and answer your gardening questions. You can pay by credit card in the store or by check.
Please leave your cell phone number when you sign up for our eNewsletter, if you want text message announcements now and then.
Donations help us provide organic kitchen gardening education to individuals, organizations, and entire communities. Thank you in advance for contributing to our community and for sharing our website and blog with friends and family.