Growing Potatoes
For urban and suburban gardeners, potatoes can feel like a crop that belongs on farms, not patios, side yards, and small backyard beds. But the right variety and the right growing method can turn a few square feet into a surprisingly productive potato patch.The determinate potato method is best for beginners and has smaller harvests. The indeterminate method is great for experienced gardeners and produces a huge harvest in a tiny space.

Magic Molly is one of our favorite potatoes
This Deep Roots guide focuses on Magic Molly, a striking purple potato with deep violet skin, richly colored flesh, and the kind of garden-to-table beauty that makes small-space gardening feel abundant.
It’s great for compact gardens because it offers more than novelty. Its purple color comes from anthocyanins, the same family of plant pigments that gives blueberries and eggplants their deep color, and purple potatoes are valued for these antioxidant-rich compounds. Magic Molly also holds its color well when cooked, making it especially fun for roasting, boiling, potato salads, and colorful weeknight meals. Cornell University describes Magic Molly as an extremely vigorous purple-fleshed potato that can be harvested young as “fingerlings” or left longer to size up into larger tubers.
Check Out These Blog Posts As Well
Potatoes & tomatoes are in the nightshade family.
Both potatoes and tomatoes can be determinate or indeterminate. Other nightshade veggies include eggplants, tomatillo, peppers, spices made from nightshade peppers. Both grow from “seed potatoes” instead of from. seeds. The sprout emerges form fuzzy of dark spots called “eyes” on the potato skin, visible in the photo above.
Determinate potato varieties grow as a compact, bush-like plant and reach a fixed mature size. They produce tubers in a single layer at a fixed point along the stem, just below the soil surface. They are often referred to as "early" or "mid-season" potatoes, typically maturing in 70 to 90 days. They require minimal “hilling/mounding” (covering leaves as they grow). While light mounding is recommended to prevent the tubers from turning green due to sunlight exposure, it will not increase the overall yield. No matter how carefully you add layers, determinate potatoes will not take full advantage of the stacked growing space and will have lower yields.
Indeterminate potato varieties are larger, sprawling plants that continue to grow and produce tubers underground along the length of their stems (“stolons”) throughout the season. They need a “stacked grow tower” to accommodate their much larger yield. They require a longer season (110–135 days) and must be continually hilled with soil & straw to cover new leaves for maximum production. Magic Molly purple fingerling potatoes are the Deep Roots favorite indeterminate variety.
Mix the soil blend
Potatoes need loose, fertile, well-drained soil. Hard, compact soil leads to misshapen potatoes, and potatoes need uniform moisture while tubers develop. Blend a loose potato soil mix:
50% high-quality low-nutrient potting soil
30% Deep Roots high-nutrient compost
20% Deep Roots dense leaf mulch
Blend in potassium fertilizer. Mix in a organic potassium fertilizer like Kelp Meal or “Sulfate of Potash” into your lower soil layer to ensure the tubers have food to bulk up later in the season. For a 30-inch diameter grow tower, mix in 1 to 2 cups of kelp meal total. Avoid leaving dense clumps of kelp meal, which can occasionally lock up moisture or concentrate salt.
Prepare certified organic seed potatoes
Conventional grocery store potatoes are not seed potatoes because they lack quality assurance, carry high risks of spreading soil-borne diseases, and are often treated with sprout inhibitors that prevent them from growing. While they look identical, their intended use and production processes differ entirely. Conventional grocery store potatoes are sprayed with chemicals (like chlorpropham) to prevent them from sprouting. If planted, they will likely rot in the ground before they ever grow into a plant. Some organic potatoes are not sprayed and can become seed potatoes if they develop “eyes” in storage. We use the organic potatoes sold at Sugar Beet Coop in Oak Park, IL
Potatoes are “tubers” (underground fruits) that form on underground stems called “stolons.” The "eyes" of a potato are small dormant buds located on the surface of the tuber where new growth begins. The photo above shows the “eyes.” When conditions like warmth and moisture are favorable, the buds in the eyes break dormancy to produce shoots.
These shoots grow upward to become leafy stems above ground, while also developing roots and “stolons” that eventually produce new tubers. The growing shoot fuels its initial development by drawing stored starch from the seed potato until it can photosynthesize on its own.
Chitting: About 5 to 10 days before planting put seed potatoes in a bright room with indirect light. Let them form short, sturdy green sprouts. This is called green sprouting or “chitting.” Do not let them grow long, pale, fragile sprouts.
Cutting the seed potatoes: One to three days before planting leave very small seed potatoes whole. Cut larger seed potatoes into chunks. Make sure every piece has at least one strong eye; two or three is better.
Callusing the seed potatoes: (“scabbing over.”) Place the cut potatoes in clean, dry, ventilated air at room temperature for a few days, with the cut sides exposed so they can dry and form a leathery protective surface. This step helps reduce the risk of rotting once the seed pieces are planted.
Growing determinate potatoes is easier
Determinate potatoes reach maturity faster and are the best choice for gardeners who are planting late in the season or who want the simplest small-space method. Unlike long-season indeterminate potatoes, determinate varieties set most of their tubers in one layer near the base of the plant. That means they do not need a tall stacked tower, and repeated deep hilling will not greatly increase the yield. For these varieties, the goal is simpler – give the plants loose soil, steady moisture, and enough light covering to keep the developing potatoes from turning green.
This matters especially for gardeners planting in late May in Zone 6a. By this point, the best choice is usually a faster-maturing determinate variety such as Yukon Gold, Red Norland, or Dark Red Norland. These varieties have a shorter growing season than late indeterminate potatoes, so they can still produce a useful harvest when planted after the ideal early-spring window. Late planting may produce more “new potatoes” or medium-size potatoes rather than maximum storage-size potatoes, but it is still worthwhile if you plant in late May and keep the soil evenly moist.
A simple no-dig method can be done without a potato tower. Place four seed potato pieces directly on bare soil in a loose cluster about two feet wide. Cover them with about six to eight inches of loose straw. When the shoots grow eight to ten inches tall, add more straw around the stems, leaving several inches of green foliage exposed. Repeat lightly as needed through the season, mainly to keep the tubers covered and protected from sunlight.
Because determinate potatoes do not produce heavily up a long buried stem, this mound does not need to become very tall. A finished mound of about 12 to 18 inches is usually enough. Focus on keeping the straw loose, the soil underneath moist, and the plants growing steadily. In hot weather, check moisture often because straw mounds can dry out quickly.
At harvest, pull the straw apart by hand and gather the potatoes from the soil surface and upper soil layer. This no-dig version may produce less than a tower planted earlier in the season, but it is inexpensive, beginner-friendly, and well suited to late planting. For urban and suburban gardeners, it is one of the easiest ways to grow a dependable potato crop in a small backyard space.
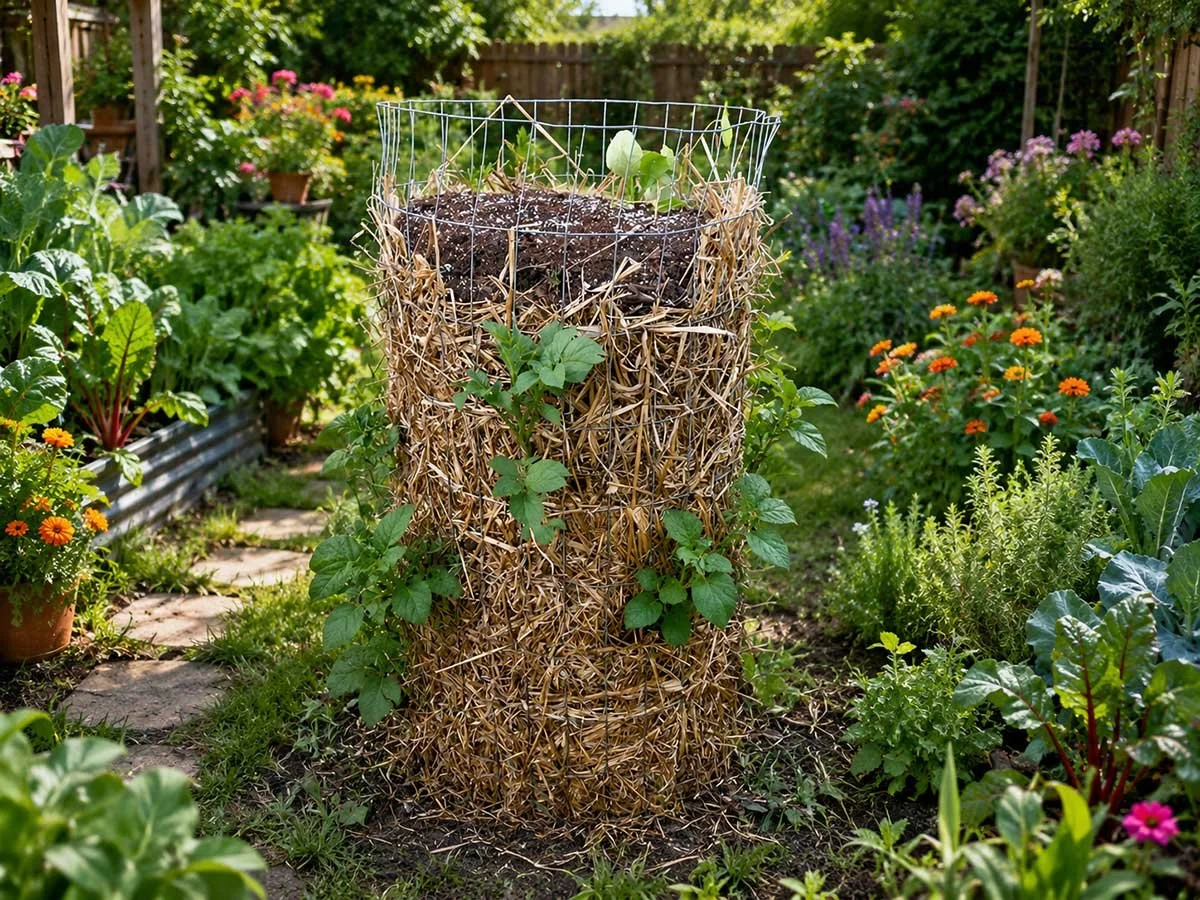
The potato tower method
Vertical potato growing is not magic. It is plant care. It is the experience of growing something unusual, nutritious, and generous in a space that might otherwise seem too small for potatoes at all. Potatoes still need full sun, loose soil, steady moisture, and enough growing medium to support tuber development. A tower can be useful where garden space is limited because it concentrates the crop into a compact footprint, keeps the growing area tidy, and makes harvest easier when the tower is opened at the end of the season.
Planning the DIY potato tower. This stacked vertical growing technique is for late-season indeterminate potatoes. Instead of planting potatoes in long rows, this method grows them upward in a wire tower. The purpose is to keep burying the underground potato stems (stolons) as they grow, giving the plant more covered stem area. This repeated covering encourages tubers to develop at multiple levels inside the tower.
Choose the right potato variety. This method works best with late-season indeterminate potatoes such as Magic Molly, Russet Burbank, Kennebec, Elba, or German Butterball. Avoid determinate varieties like Yukon Gold, Red Norland, and most fingerlings, because they usually set their tubers in one layer near the base of the plant.
Choose a sunny location that receives at least six to eight hours of direct sunlight each day. Potatoes need strong sun to produce healthy foliage and support tuber development. For gardeners in zones 5 through 7, planting is usually done two to three weeks after the last frost, once the soil temperature has reached about 45°F.
Building the Potato Tower
Choose the wire fencing. Use wire fencing that is 24 to 30 inches tall. Any sturdy wire fencing will work as long as the openings are about 3 by 5 inches. Deep Roots prefers green wire fencing because it blends naturally into the garden.
Cut the fencing to length. For a tower about 30 inches in diameter, cut a piece of fencing about 8 feet long. This will give you enough length to form the circle and overlap the ends slightly for fastening.
Shape the tower. Bend the fencing into a cylinder about 30 inches wide. Stand it upright in the garden where the potatoes will grow.
Secure the ends. Overlap the two ends of the fencing by a few inches and fasten them together with wire ties, zip ties, or short pieces of garden wire.
Check the finished size. The finished tower should be about 24 to 30 inches tall and about 30 inches across. This creates a compact growing space with a footprint of roughly 5 square feet, which is ideal for small-space potato growing.
Drainage is important. The tower should drain freely into the ground. Dig our any weed roots in the ground. A light 1- to 2-inch layer of loose straw at the very bottom is okay, if the tower sits on bare soil. But it should not be packed down or thick enough to block drainage.
Line the tower sides with straw. Line the first 12 inches inside vertical sides of the wire tower with straw, pressing it against the grid to keep the soil blend from spilling out through the wire openings.
Add the first 6” of soil. Add your first 6 inches of loose soil blend to the bottom area.
Add the seed potatoes. Place 10 to 15 seed potato cut-pieces on top of the first 6” of the soil with the eyes facing upward. 10 pieces spread further apart will produce larger potatoes. Space them evenly around the tower.
Add the second 6” layer of soil to cover the seed potatoes .
Water thoroughly. The tower should be evenly moist but not waterlogged.
What is “Hilling”?
Hilling is the heart of the potato tower method. Potatoes grow from underground branches called "stolons." By burying the stems as they grow upward, you trick the plant into producing more stolons, which means a much bigger harvest! Hilling also creates a dark underground environment. This is critical because any developing potatoes exposed to sunlight will turn green and become toxic.
The golden rule: Keep soil and straw in separate layers. In your tower, you will create a "lasagna" of distinct, alternating layers of soil and straw. Do not mix or blend the straw directly into the soil. Mixing straw into active soil causes a "nitrogen tie-up." Soil microorganisms will steal nitrogen from your potato roots just to break down the tough straw. Keeping them in separate layers gives your potatoes a light, fertile base that drains well, holds moisture, and keeps your plants fed.
The mounding schedule. Within one to two weeks of planting, green shoots will begin to emerge. Once they pop up, follow this step-by-step hilling schedule. (1) Wait until the green vines grow 8 inches above the surface. (2) Add another 10 inches of stray lining to the wire gred. (3) Add 4 inches of loose soil around the stems and leaves. (4) Immediately cover that new soil with 3 to 4 inches of loose straw. (5) Always leave the top 2 to 3 inches of green foliage exposed so the plant can breathe and get sunlight. (6) Repeat this alternating process (soil layer, then straw layer) every 2 to 3 weeks whenever the vines grow another 8 inches. (7) Most towers require 3 to 4 layering cycles.
Critical hilling milestones & tips. Straw compresses significantly over time. A loose 12-inch pile of straw will quickly settle into a layer of just a few inches, so don't be afraid to pack the outer edges tightly to block light. Stop adding layers once your tower reaches 2 to 3 feet tall. Indeterminate potato varieties lose growing efficiency if forced to climb any higher than this. Always finish your tower with a thick top layer of straw. This acts as a protective mulch to regulate soil temperature, conserve water and allow the vines to easily push through as they grow. Indeterminate potatoes are ideal for towers because they continuously grow new tubers all the way up the stem. The loose soil layers give the roots room to expand, while the sponge-like straw layers catch water from the top and slowly feed it down to the base of the tower.
Watering is especially important
A grow tower dries out faster. A wire tower filled with straw/soil mix dries out faster than potatoes grown in the ground because air moves around the sides. Check moisture by pushing your finger about three inches into the growing mix. If it feels dry at that depth, water deeply until moisture comes out of the bottom of the tower. In hot summer weather, this may be needed every other day. In cooler or rainy weather, twice a week may be enough.
Stop adding new layers when flowering begins. Flowering signals that tuber formation is already underway, and the plant should now focus its energy on swelling the potatoes it has set. But, continue watering evenly, but do not keep burying the leaves after this point.
After flowering, allow the plants to grow for another four to six weeks, or until the vines begin to yellow and die back naturally. This waiting period allows the potatoes to gain size and helps the skins toughen for better storage.
Avoid harvesting too early,
The final weeks can add meaningful weight to the crop. To harvest, cut the wire ties and unwrap the fencing. The column of straw, compost, and potatoes will collapse onto the ground. Pull the loose material apart by hand and collect the potatoes from each layer. A well-managed first-year tower using the right variety, full sun, and steady watering may produce about forty to sixty pounds from one four-square-foot tower.
Pest and disease watch
Check leaves at least twice a week. Watch for Colorado potato beetle eggs and larvae, Flea beetle feeding, Leafhopper damage, Yellowing, spotting, or early die-back, and chewed stems near soil level.

Colorado Potato Beetle
Pest prevention steps are:
Use certified seed potatoes.
Start with fresh clean soil mix.
Do not reuse potato/tomato soil from a diseased crop.
Keep foliage dry when possible.
Remove badly diseased leaves.
Do not compost diseased potato vines.