Native Gardens
Native Gardening Basics
Native plants enhance your garden aesthetically and ecologically
There are many ways to start using native plants in your garden. Your garden can be attractive aesthetically and ecologically when you use native plants. You can start to incorporate native plants into your existing landscape – or – you can start completely from scratch. First, make an assessment of the environmental conditions (shady or sunny, drainage, soil types, irrigation, etc.). Also, make an inventory of your existing plants.
It is also helpful when creating a naturalistic landscape design to consider the associations found in specific plant communities (a prairie, wetland or forest). You may also want to visit some local natural areas to observe these associations first-hand.
Planning and planting a native garden does not have to be done all at once. It can be installed in phases as your budget and time allows.
Understand your site and select appropriate plants.
You need to know the amount of sun your intended garden receives:
• 6 hours or more of direct sun is full sun.
• 4-6 hours is considered part sun.
• 2-4 hours is considered part shade
• 2 hours (the light should be dappled) or less is considered shade.
We will assume you have the typical clay/loam Oak Park soil. Does water collect where you plan to put the garden? Or is it relatively dry? If it stays wet, in a depression or is near a downspout, you can select plants that prefer more moisture. If it is a drier or hotter spot (near a sidewalk), you should select plants that prefer well-drained and dry soil.
Soil Preparation if removing lawn
If you are removing lawn, there are two options after you create the outline of your garden.
First option: You can physically remove the lawn by simply digging a few inches down, pull up strips of lawn, shake off the soil, and you can place the grass in a compost pile or even use as a kind of mulch if you place them with the roots up to the air.
Second option: The easiest method to start a new garden is to use sheet composting or lasagne bed, which is simply layering browns and greens on a bed of cardboard, in the fall. First make sure you have mown the area. Place down cardboard and wet it thoroughly. Then place a layer of leaves, then a layer of greens (lawn clippings are great), and so on till you have a pretty think bed. Water these layers. Add a layer of mulch on top.
Over the fall, winter, and spring, all of the decomposers in the soil will be working and by late spring you can plant into your new garden. All of the ingredients may not be thoroughly composted, but they are usually enough so that you can plant. As the temperatures warm up, the materials will be consumed and turned into soil soon enough.
Soil preparation if weeds are a problem
If weeds are a big problem, you may want to consider not only hand-pulling, but maybe even covering them with a sheet of clear plastic for several months – a process known as solarization. Other methods to kill weeds are pouring boiling water or vinegar on them. By eliminating weeds first, as much as possible, before planting, it will be much easier than trying to control them in a newly planted site.
Just as a note, methods that involve solarization, vinegar, boiling water may also kill the beneficial life in the soil. If you use those methods, allow some time for pH of the soil to return to normal and consider adding good compost or healthy soil from other areas of your garden to help repopulate your soil with beneficial microorganisms.
Plant selection
Choose species based on the soil, light, and water conditions of your site and for the size, shape, texture, and color you desire. You can look at our Top Ten Lists for different conditions (under the Learn tab in the Main Menu). You can purchase plants from our Native Plant Sale or look at other plant resources here: Where to Get Native Plants.
Suggested Prairie Plants (full sun):
• Spring: Spiderwort, Golden Alexanders, Prairie Smoke, Prairie Phlox, Cream Prairie Indigo
• Summer: Purple Prairie Clover, Purple Coneflower, Black-eyed Susan, Butterflyweed, Culver’s Root,
• Fall: New England Aster, Smooth Blue Aster, Stiff Goldenrod, Showy Goldenrod, Aromatic Aster
• Grasses: Little bluestem, Big Bluestem, Prairie Dropseed, Indian grass, Switch Grass, Purple Love Grass
Suggested Woodland Plants (shade):
• Spring: Wild geranium, Virginia Bluebells, Wild Columbine, Celadine Poppy, Jacob’s Ladder, Early Meadow Rue, Virginia Water Leaf, Wild Blue Phlox, Columbine
• Ferns: Marginal Shield fern, Ostrich Fern, Christmas Fern
• Groundcovers: Wild Ginger, May Apple, Allegheny Foam Flower
• Three-Season Plants: Solomon’s Seal, Solomon’s Plume, White Baneberry
• Fall: Short’s Aster, Large-leaf Aster, Elm-leaved Goldenrod, Zig-zag Goldenrod, Blue-stemmed Goldenrod, Blue Mist, White Snakeroot (can be a prolific self-seeder, grows smaller in shady situations)
• Shrubs: Hazelnut, Witch Hazel, Arrowwood Viburnum, Pagoda Dogwood
• Maintaining Your Landscape
Planting your native plants
Place your plants in your garden in their pots and arrange until you are satisfied. Be sure to allow for them to mature and fill out. Plan for 12″ between narrow plants (like liatris) or 18″ inches for larger plants (like coneflowers). It is desirable to plant densely; plants support each other, shade out competing weeds, and offer cover for beneficial insects.
Place shorter plants in the front, taller ones in the back. Plant in drifts (e.g. if you have 3 plants, plants them near each other as opposed to spaced out. Easier for pollinators and more aesthetically pleasing.)
Once you are satisfied with your layout, plant them. Dig the hole a little deeper and wider than the pot or the root system. Gently tip the pot over to the side and ease the plant out. Place the plant into the hole, start to fill in the hole. After the hole is filled halfway, sprinkle some water to help the soil settle and reduce air pockets. Continue to backfill the soil, and keep a little berm around the plant to help hold and collect water around the plant.
Water well. Generally, there is no need to fertilize.
Your native plants will need time to become established.
The critical period for watering and weeding is two to three weeks after planting – or longer if you are planting in warm, dry seasons. If you are planting trees or shrubs, apply a four to six-inch layer of organic mulch around them (but, not touching the main stem) and a one-inch or less mulch layer for perennials. Mulch can help control weeds, reduce temperature fluctuations, help retain moisture and give a finished look to the landscape.
Native plants usually do not require fertilizer.
Many thrive in poor soil and applying fertilizer could chemically burn them, or stimulate either lush or spindly, weak foliage growth with few flowers. Leaving the organic matter in the fall and spring is all you need to do. This material will feed the soil organisms which will then feed your plants. Fungi are critically important for the health of your plants, and they prefer whole material to consume.
Monitor your plants.
If your plant suffers transplant stress, you can place a container or something to help shade the plant from the sun until it has settled into its new home.
Be sure to keep the area weeded and watered appropriately. All transplants will need watering on a regular basis for the first month. If it’s hot and dry, you might need to water daily even for drought tolerant plants for the first week or so. Then you can try to water every other day. Then the third week see if you can stretch out to two full days, and continue till they no longer need supplemental irrigation.
Mulch is essential at this stage of your garden to help conserve water, feed soil organisms, and suppress weeds. As your plants mature, keep the plant material in the garden and use a light layer of leaves as a mulch. They will naturally feed the soil organisms which then feed your plants as well as preserving beneficial insects that overwinter.
Enjoy your garden, and the real satisfaction comes from watching all the changes and paying close attention to the life that will discover and flourish in your living landscape.
Maintain and expand your native plants
Each year add more native plants. Make more prairie and/or woodland spaces. Educate your neighborhood by example! Once you get started, it becomes easier and easier every year to maintain your property/grounds — less mowing and watering; more wildlife and soil improvement. Enjoy the butterflies and birds that visit!
Source: West Cook Wild Ones blog posts
Posted by Stephanie Walquist November 16, 2014
http://westcook.wildones.org/2014/11/16/start-up-guide-for-native-garden-in-west-cook-county/
Posted by Stephanie Walquist March 11, 2016
http://westcook.wildones.org/2016/03/11/greenguide/
Edible Gardens
How to Start an Organic Garden
Growing your own fruits and vegetables
An organic garden has benefits that far surpass the simple salad you may serve with lunch, or the delicious potatoes you prepare for a family dinner. Knowing what nutrients are going into the food you harvest (and what chemicals aren’t going into the food on your plate and into your body), creates a wonderful peace of mind.
While many think that starting their own organic garden can be complicated or require special skills, the truth is, anyone with a little time on their hands, a small growing area, and a passion for good food can grow a garden! All you have to do to get started is follow these eight guidelines.(https://www.craftsy.com/gardening/classes/vegetable-gardening-smart-techniques-for-plentiful-results/35503)
1. Know your growing season
Honestly, Growing Zones can be confusing. However, knowing how many frost-free days you have in your area and planning accordingly is easy. Dave’s Garden (http://davesgarden.com/guides/freeze-frost-dates/) has an amazing tool to help you figure out how many frost-free days you have on average in your growing season based on your zip code. Plug in your five-digit zip code and take note of your number as it will go a very long way to helping you plan what you can grow.
2. Track the sunshine
It’s important to keep in mind how the sun hits your property throughout the day. The number of hours of direct sunlight your growing space gets will determine what you can actually grow.
For example:
• With 6+ hours of direct sun each day, you can grow things like corn, tomatoes (https://www.craftsy.com/gardening/classes/growing-heirloom-tomatoes/35542), peppers, beans and peas, summer and winter squash, melons, potatoes, cucumbers and a wide variety of culinary herbs.
• With 4 to 6 hours of direct sun each day, you can grow things like broccoli, cabbage, cauliflower, kale, and Brussels sprouts.
• With 2 to 4 hours of direct sun each day, you can grow greens! Spinach, Swiss chard, lettuce, endive, mesclun, arugula, bok choi, mustard greens and parsley.
• If you have less than 2 hours of direct sun per day, you’re in for a challenge, but it’s still worth a shot! Try loose leaf lettuce or radishes.
3. Build and prepare your beds
Whether you live in a home that already has established garden beds, will be building the beds yourself (https://www.craftsy.com/blog/2015/04/how-to-build-a-raised-garden-bed/?_ct=rbew&_ctp=148369), buying a raised bed kit from Deep Roots Project (url to our kits page) or planting in pots (http://www.bhg.com/gardening/vegetable/vegetables/growing-vegetables-in-containers/) depends on your time, your budget and your skill. If yo have the budget and not time alf skill we suggest yo hire a company to build the beds for you and fill them with rich organic soil ready for planting vegetable seedlings or seeds.
4. Get to know, then build your soil
Edibles must have a nutrient-dense home to grow in in order to become nutrient-dense themselves. Soil that is lacking nutrients has nothing to give the plants that are growing in it, so it won’t. Most local nurseries sell inexpensive soil testing kits that will give you a good idea of what is in your soil. Once you know what’s in your soil, you can amend it using compost (https://www.craftsy.com/blog/2015/04/easiest-compost-tea-recipe/?_ct=rbew&_ctp=148369), manure or a variety of organic products found in your local nursery.
When planning an organic garden, you have to take this process one step further by doing your best to find out how the soil has been treated previously. If you can easily track who has planted what and whether or not it has been organic, excellent. If you cannot track it, your best bet is to proceed with raised beds so you can build up on top of the existing soil with organic soil and compost.
Lasagna gardening (https://www.craftsy.com/blog/2015/05/lasagna-garden-layers/?_ct=rbew&_ctp=148369) and hugelkultur beds (are two other fantastic ways to build your soil while knowing exactly what is going into it. These methods take a little more effort than simply pushing seeds into the existing soil, but will ensure that the vegetables you plant are growing in healthy, organic soil.
Adapted from an article on craftsy.com https://www.craftsy.com/blog/2015/05/how-to-start-an-organic-garden/) & (https://www.craftsy.com/blog/2015/04/hugelkultur/?_ct=rbew&_ctp=148369)
5. Water
Think about your water sources and how you will water your growing plants. Depending on whether you have raised beds (https://www.craftsy.com/gardening/classes/building-a-raised-bed-garden/40761, ground level beds or are planning to grow in pots, all seeds must have water and all established plants require even more water.
Your options for getting water to your growing space might include hand watering, using a hose, drip irrigation or letting nature take care of it (if you are lucky enough to live in an area that isn’t faced with drought (https://www.craftsy.com/blog/2015/01/water-wise-gardening/?_ct=rbew&_ctp=148369), but it must be thought about and planned for. Depending on the size of your growing space, watering by hand can take a lot of time and must be factored in to your daily routine.
6. Seeds and seedlings
Once you know how much sun your plants will get, how long your growing season is and where you’ll be planting your glorious veggies, it’s time to think about purchasing some seeds (https://www.craftsy.com/blog/2014/11/rare-heirloom-seeds/?_ct=rbew&_ctp=148369) or starts.
If you have the space and know-how to build your own set of grow lights, you might not ever have to purchase starts from your local nursery or farmer's market. However, if you are limited on space, time or confidence in your building abilities (practice makes perfect!), ensure that you are purchasing organic vegetables that were started from organic seed and not treated with any chemicals before they get to you. Your pollinator friends (http://evergrowingfarm.com/2014/02/the-importance-of-pollinators.html) will thank you first, your body will thank you later.
Start small and work your way up. If you’re passionate about growing your own organic fruit and vegetables, you probably want to start with as many varieties as possible, right? While this is not without its merits, you will do yourself a huge favor by picking just a few things to start and learn with now. Then, next year (and every year after that), you can expand. It’s always better to have a few successful varieties than a ton of failing varieties. Trust me.
7. Try companion planting on a small scale.
Companion planting
and organic gardening easily go hand in hand. Planting a tomato in a big pot? Strategically place 10 carrot seeds or three basil seeds around the base of the tomato and watch them grow together. Planting some cucumbers to climb up a fence? Plant some bush beans in front of them to shade their toes and add nitrogen to the soil.
Companion planting, when done intentionally, can help your fruits and vegetable grow healthier and more nutrient dense as well as help protect each other from pests.
(https://www.craftsy.com/blog/2015/02/companion-plants/?_ct=rbew&_ctp=148369)
8. Be prepared for “failure” and take pride in the small victories.
Every single seed will not germinate and despite your best efforts, not every start will survive. Pests will find your beautiful plants and rip them to shreds. Hail or whipping winds will damage your fruits and veggies right before harvest time. As hard as it is, it’s really just part of the process. Some years are better than others, some years you just can’t seem to do anything right in the garden. Like life, take every lesson and each heartbreak and pour the knowledge gained from them into next year’s plans and each year in the garden will get a little bit better.
Harvesting 10 carrots from a small pot for the first time can feel like winning a gold medal. Eating a still-warm-from-the-sun tomato is one of the most satisfying experiences ever. Allow yourself to feel the pride of your harvest and then enjoy each of that carrot or that tomato like it’s the best thing on the planet because it is and because you deserve to!
Organic gardening is full of rewards, both for your own health, and for the health of the planet. By following a few easy steps on how to start your own organic garden, you can be well on your way to harvesting your first meal straight out of your very own garden!
Deep Roots Project is your support system. We welcome volunteers.
Register for our workshops, sign up for our Newsletter and contact us with questions. We welcome all into Deep Roots Project. Please contact David Murphy at djmurphy1967@gmail.com or 773-502-5600 if you have questions or if you are interested in exploring ways you can become involved.
Natural & Organic Lawn Care
The upside and downside of having a lawn
There will always be some who hate lawns and some who love them. Once a lawn is established, it gets better. The first year is always the hardest when trying to grow a lawn. Long stretches of lawn invite bats and bluebirds, both of which are voracious eaters of mosquitoes and other bugs. Lawns can keep bare ground from eroding and they provide a nice environment for kids and pets to play.
Lawns can be costly to maintain. The sheer volume of water it takes just to get grass started is unbelievable. Then there’s the mowing, weeding, fixing holes, overseeding, and the possibility of dealing with diseases or pests. Mosquitoes can lay eggs and hatch in long grass. All of these and other problems are time consuming and some can be dangerous to the environment as well as kids and pets.
How to have a beautiful chemical-free lawn
A natural lawn can also be beautiful, even by conventional standards, In fact, well-established natural lawns are healthier and stronger than conventionally maintained ones, especially in times of stress like drought. Furthermore, as sustainable landscapes require less water, fertilizer, and pesticides, they are more cost effective.
Natural lawn care health and the environment
Natural lawn care (NLC) practices rely on naturally occurring processes and organic amendments to create a sustainable lawn and garden. By cultivating healthy soil without synthetic chemicals, you can grow and maintain a healthy landscape with less impact on the environment and the health of your family. Organic lawn care uses fewer resources and most are sustainable. It is non-toxic to the environment, animals & food chain and supports a healthy & diverse ecosystem. Lawn maintenance costs become lower over time as the natural health and ecology of the soil and the grass is restored.
What is the minimumsize lawn you need?
Consider filling some of your current lawn area with organically maintained decorative plants, shrubs, edible plants and native plants. Take care of your lawn naturally using the following steps.
Take a soil test
Healthy lawns require healthy soil. Grass thrives with properly balanced nutrients. Perform a soil test every three to five years to help determine exactly what you need to maintain your soil’s health. Testing is inexpensive and reduces unnecessary fertilizer applications.
Fertilize organically
Switch to an organic fertilizer made from plant or animal materials. Most commercial fertilizers have too much “fast release” nitrogen. Fast release nitrogen is like junk food for plants, creating a cycle of dependency between your yard and synthetic
chemicals. Grass can’t use all those nutrients at once, so a portion of them washes away, polluting nearby water resources. Organic fertilizers, on the other hand, allow the grass to absorb nutrients as needed as the excess nutrients bind to soil. Grass cycling, or leaving grass clippings on the lawn, is another great natural alternative to synthetic fertilizers.
Reseed and top dress annually
Reseed at least once a year, in the spring or fall, with a mix of grass seed and compost. Select a variety of grass that is well suited to your region. Use hardy grasses such as fescues and ryes when possible. To establish the seed, water slightly each day for
at least two weeks. Top dressing with compost will naturally replenish your lawn, providing nutrients and microbes that keep your soil healthy. Three applications of freshly brewed compost tea containing essential soil microbes will restore the soil ecology and is strongly recommended.
Get rid of weeds naturally
Keeping weeds out of your lawn can be tough when you’re trying to go organic. You can use a salt and vinegar solution to kill the weeds, but then you might kill some grass with it and either way, you’ll have to overseed the bare spots. One of the easiest ways to keep weeds out of your lawn is to cut it as long as you can. There was a study that was done many years ago at a university that determined the longer you keep your grass, the fewer weeds you’ll have. If you can keep your lawn at 4 inches tall, you won’t have to worry as much about weeds.
Stop using synthetic pesticides on your lawn and garden. Consider using corn gluten (an organic, corn by-product that is a natural preventative weed control) to reduce weeds. Apply it early in the spring, usually before the forsythia bloom. Over the course of a few growing seasons, you will see how it reduces weeds naturally. Invest in a sturdy weeding tool and go after weeds as they appear, rather than all at once. Remember that a thick, healthy, dense turf is your best defense against weeds.
Pests
Pests in lawns can range anywhere from moles, to bugs, to even armadillos! Each one has its specific solutions. For insects try Diatomaceous Earth, or DE. Sprinkle some around your lawn and work it in well. This will not harm the beneficial earthworms, but will kill the bugs. Unfortunately, it will kill good bugs too, so be careful how and where you use it. You can also use granules with cedar wood essential oil or clove essential oil on them. Make your own by adding the oils to clay kitty litter and sprinkling it around. This should chase off most bugs like ants and spiders. For moles, castor oil based products work well for a while, but you have to reapply them every few months. Milky Spore, which is a bacteria that targets grubs, one of the staples in a mole’s diet, is very effective. It’s not cheap, and you don’t get full results for 3 years. But when it’s fully colonized it will remain effective for up to 30 years. Other pests like armadillos and ground hogs may need to be relocated. Use a live trap to catch them and take them to an approved location.
Water correctly
Watering correctly is not about watering your lawn a fixed number of times each week. Instead, you want to water deeply and infrequently early in the morning to minimize evaporation and safeguard against fungus. Ideally, you want one inch of water
delivered once a week. Use a tuna can to measure when you have reached one inch. Daily, brief watering discourages deep root growth, one of the essentials of healthy turf grass.
Mow properly
Mow your lawn to at least three inches high. Correct mowing will increase the strength of the root system and naturally shade out weeds. Don’t mow your lawn every week out of habit if it doesn’t need it. Mow with sharp blades that make a clean cut. Dull blades will rip the grass and weaken your lawn’s defenses.
New lawns can be mowed when the grass is about 6 inches high. Established lawns can be mowed whenever you think they need it. A reel mower has blades that curve around and clip off the grass. These are fairly inexpensive and will last for years.
Diversify your yard
The reason turf grass takes so much work to maintain is that it is not native to our region. We recommend that you diversify your yard to include native grasses, trees, bushes, and perennials. These plants will enhance the beauty of your home, attract birds and beneficial insects, and give you more time to get out and enjoy the summer!
(Source: Midwest Pesticide Action Center “Activist’s Toolkit”)
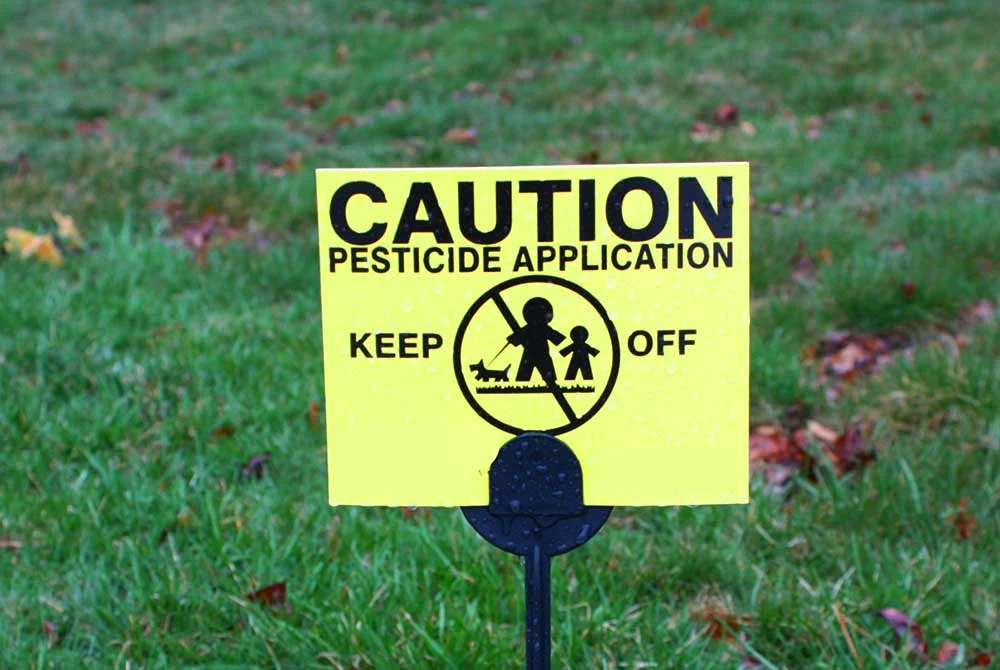
Pesticides and Toxic Fertilizers

Conventionally treated lawns are unsafe for children, pets and wildlife.
Traditional lawn care is toxic and wasteful
Nationwide, turf grass is estimated to cover over 40 million acres, an area three times larger than the amount dedicated to corn. Lawn and landscape care practices take up many resources as they rely on large amounts of synthetic fertilizers, pesticides, and water for maintenance.
These practices negatively affect the quality of life in our communities by degrading local waterways, polluting the air, harming pets and wildlife, contributing to climate change, and threatening human health.
For these reasons, many people, municipalities, and countries are transforming their lawns, parks, and public spaces by eliminating pesticides and using other sustainable lawn and landscape care practices.

Traditional lawn care has huge environmental costs.
It is misleading and a unfair to compare what the consumer pays for organic vs conventional lawn care. Homeowners use up to 10 times more chemical pesticides per acre on their lawns than farmers use on crops. Nearly 80 million pounds of pesticide active ingredients are used on U.S. lawns annually. On top of this, 90 million pounds of chemical fertilizers are used on lawns annually. Additionally, 26.7 million tons of air pollutants from mowing are introduced annually.

Americans spread over 90 million tons of toxic pesticides and fertilizers on our lawns each year
Traditional lawn care disadvantages
• Manufacturing & transportation environmental costs
• Toxic to plants, insects, fungi and other soil microorganisms
• Runoff affects waterways, sheds & a growing dead zone in the Gulf of Mexico
• Provides limited nutrients
• “Apply til you die”
• “Downstream” costs paid by society
• Herbicide resistance is happening
• 40 million acres of turf grass in U.S. (America’s largest irrigated crop)
• Iawn account for 30% of residential water usage
• Average American lawn is 1/3 acre and 54 million Americans mow their lawns each weekend
• Lawn mowers consume over 800 million gallons of gasoline annually
• In 1 hour, a lawn mower produces as much air pollution as driving a car for 100 miles
• Nearly 90,000 tons of pesticides are used on U.S. lawns annually
• Pesticides were found in “detectable levels” in 100% of river samples taken
Example of why traditional lawn care works poorly
• After a homeowner sprays dandelions with herbicides the plants reproduce lots of seeds for next year’s crop
• After a homeowner applies poison for grub damage the grass take up the poison. Grubs eat the grass roots and get poisoned. Birds and mammals eat the grubs poisoning the food chain. Lawn is still damaged
Join the natural lawn care movement.
Find more details on our Natural Lawn Care page.
Register for a Natural Lawn Care workshop